Build a simple web scraper with node.js

Recently I released my first personal iOS app into the wild. The app is called unit guide for Starcraft 2 and it provides Starcraft 2 player with up to date and accurate information for every unit in the game. Instead of manually creating a huge JSON file I wrote a web scraper in node.js that allows me to quickly extract all the data I need and output it in a JSON format. In this post I will explain how you can build something similar using techniques that are familiar for most web developers.

Step 1: preparing

Before you get started you're going to want to install some dependencies. The ones I have used are: request, cheerio and promise. Installing them will work like this:

npm install --save request cheerio promise

If you don't have npm installed yet then follow the instructions here to install node and npm.

Once you have all the dependencies, you're going to need a webpage that you will scrape. I picked the Starcraft 2 units overview page as a starting point. You can pick any page you want, as long as it contains some data that you want to extract into a JSON file.

Step 2: loading the webpage

In order to start scraping the page, we're going to need to load it up. We'll be using request for this. Note that this will simply pull down the html, for my use case that was enough but if you need the webpage to execute javascript in order to get the content you need you might want to have a look at phantomjs. It's a headless browser that will allow javascript execution. I won't go in to this right now as I didn't need it for my project.

Downloading the html using request is pretty straightforward, here's how you can load a webpage:

var request = require('request');

request('http://eu.battle.net/sc2/en/game/unit/', function(error, result, html){
    if(error) {
        console.log('An error occurred');
        console.log(error);
        return;
    }

    console.log(html);
});

Getting the html was pretty easy right? Now that we have the html we can use cheerio to convert the html string in to a DOM-like object that we can query with css style selectors. All we have to do is include cheerio in our script and use it like this:

var request = require('request');
var cheerio = require('cheerio');

request('http://eu.battle.net/sc2/en/game/unit/', function(error, result, html){
    if(error) {
        console.log('An error occurred');
        console.log(error);
        return;
    }

    var $ = cheerio.load(html);
});

That's it. We now have an object that we can query for data pretty easily.

Step 3: finding and extracting some content

Now that we have the entire webpage loaded up and we can query it, it's time to look for content. Or in my case, I was looking for references to pages that contain the actual content I wanted to extract. The easiest way to find out what you should query the DOM for is to use the "inspect element" feature of your browser. It will give you an overview of all of the html elements on the page and where they are in the page's hierarchy. Here's part of the hierarchy I was interested in:

Screen Shot 2016-02-29 at 15.42.15

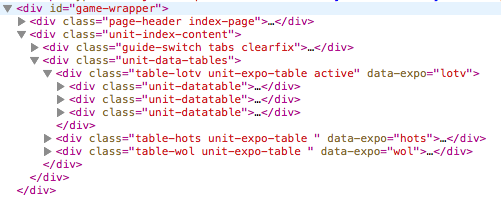
You can see an element that has the class table-lotv in the hierarchy. This element has three children with the class unit-datatable. The contents of this unit-datatable are of interest for me because somewhere in there I can find the names of the units I want to extract. To access these data tables and extract the relevant names you could use a query selector like this:

$('.table-lotv .unit-datatable').each(function(i, dataTable){
    var race = $(dataTable).find('.title-bar span').text();
    var $unitnames =  $(dataTable).find('.databox table .button-rollover');
});

In the above snippet $('.table-lotv .unit-datatable') selects all of the data tables. When I loop over these I have access to the individual dataTable objects. Inside of these objects I have found the race name (Terran, Protoss or Zerg) which is contained inside of a span element which is contained in an element with the class title-bar. Extracting the name isn't enough for my use case though. I also want to scrape each unit's page and after doing that I want to write all of the data to a JSON file at once. To do this I used promises. This is a great fit because I can easily create an array of promise objects and wait for all of them to be fulfilled. Let's see how that's done, shall we?

Step 4: build your list of promises

While we're looping over the dataTable objects we can create some promises that will need to be fulfilled before we output the big JSON file we're aiming for. Let's look at some code:

var request = require('request');
var cheerio = require('cheerio');
var Promise = require('promise');
var fs = require('fs');

request('http://eu.battle.net/sc2/en/game/unit/', function(error, result, html){
    //error handling code and cheerio loading

    var promises = [];

    $('.table-lotv .unit-datatable').each(function(i, dataTable){
        var race = $(dataTable).find('.title-bar span').text();
        var $unitnames =  $(dataTable).find('.databox table .button-rollover');

        promises.append(scrapeUnits($unitnames));
    });

    Promise.all(promises).then(function(promiseResults){
        var data = {};

        // use the promiseResults to populate and  build your data object...

        // write the JSON file to disk
        fs.writeFile('public/units.json', JSON.stringify(data), function(err){
            if(err) { console.log(err); }
        });
    });
});

Okay, so in this snippet I included Promise to the requirements. Inside of the request callback I created an empty array of promises. When Looping over the data tables I insert a new promise which is returned by the scrapeUnits function (I'll get to that function in the next snippet). After looping through all of the data tables I use the Promise.all function to wait until all promises in my promises array are fulfilled. When they are fulfilled I use the results of these promises to populate a data object (which is our JSON data). The function we provide to the then handler for Promise.all receives one argument. This argument is an array of results for the responses we put in the promises array. If the promises array contains three elements, then so will the promiseResults. Finally I write the data to disk using fs. Which is also added in the requirements section. (fs is part of node.js so you don't have to install that through npm).

Step 5: nesting promises is cool

In the previous snippet I showed you this line of code:

promises.append(scrapeUnits($unitnames));

The function scrapeUnits is a function which returns a promise, let's have a look at how this works, shall we?.

function scrapeUnits(unitUrls) {
    return new Promise(function(fulfil, reject) {
        var units = [];

        // some code that loads a new page with request
        // some code that uses querySelectors and cheerio to extract data
        // some code that creates a unit object and eventually adds units to the array

        // eventually we're done with grabbing data for our units and we do this:        
        fulfil(units);
    });
}

This function is pretty straightforward. It returns a new Promise object. A Promise object takes one function as a parameter. The function should take two arguments, fulfil and reject. The two arguments are functions and we should call them to either fulfil the Promise when our operation was successful, or we reject it if we encountered an error. When we call fulfil, the Promise is "done". When we use Promise.all, the then handler will only get called if all promises passed to all have been fulfilled.

Step6: Putting it all together

var request = require('request');
var cheerio = require('cheerio');
var Promise = require('promise');
var fs = require('fs');

request('http://eu.battle.net/sc2/en/game/unit/', function(error, result, html){
    if(error) {
        console.log('An error occurred');
        console.log(error);
        return;
    }

    var $ = cheerio.load(html);

    var promises = [];

    $('.table-lotv .unit-datatable').each(function(i, dataTable){
        var race = $(dataTable).find('.title-bar span').text();
        var $unitnames =  $(dataTable).find('.databox table .button-rollover');

        promises.append(scrapeUnits($unitnames));
    });

    Promise.all(promises).then(function(promiseResults){
        var data = {};

        // use the promiseResults to populate and  build your data object...

        // write the JSON file to disk
        fs.writeFile('public/units.json', JSON.stringify(data), function(err){
            if(err) { console.log(err); }
        });
    });
});

function scrapeUnits(unitUrls) {
    return new Promise(function(fulfil, reject) {
        var units = [];

        // some code that loads a new page with request
        // some code that uses querySelectors and cheerio to extract data
        // some code that creates a unit object and eventually adds units to the array

        // eventually we're done with grabbing data for our units and we do this:        
        fulfil(units);
    });
}

The above script is a stripped version of the code I wrote to scrape all of the unit information I needed. What you should take away from all this, is that it's not very complex to build a scraper in node.js. Especially if you're using promises. At first promises might seem a bit weird, but if you get used to them you'll realise that they are the perfect way to write maintainable and understandable asynchronous code. Especially Promise.all is a very fitting tool for what we're trying to do when we scrape multiple webpages that should be merged into a single JSON file. The nice thing about node.js is that it's javascript so we can use a lot us the technology we also use in a browser. Such as the css / jQuery selectors that cheerio makes available to us.

Before you scrape a webpage, please remember that not every webpage owner appreciates it if you scrape their page to use their content so make sure to only scrape what you need, when you need it. Especially if you start hitting somebody's websites with hundreds of requests you should be asking yourself if scraping this site is the correct thing to do.

If you have questions about this article, or would like to learn more about how I used the above techniques, you can let me know on Twitter

Service workers are awesome

In the war between native and web apps there's a few aspects that make a native app superior to a web app. Among these are features like push notifications and offline caching. A native app, once installed, is capable of providing the user with a cache of older content (possibly updated in the background) while it's fetching new, fresh content. This is a great way to avoid loading times for content and it's something that browser vendors tried to solve with cache manifests and AppCache. Everybody who has tried to implement offline caching for their webpages will know that the AppCache manifest files are a nightmare to maintain and that they're pretty mysterious about how and when they store things. And so the gap between native and web remained unchanged.

In comes the service worker

The service worker aims to solve all of our issues with this native vs. web gap. The service worker will allow us to have a very granular controlled cache, which is great. It will also allow us to send push notifications, receive background updates and at the end of this talk Jake Archibald mentions that the Chrome team is even working on providing stuff like geofencing through the service worker API. This leads me to think that the service worker just might become the glue between the browser and the native platform that we might need to close the gap once and for all.

If you watch the talk by Jake Archibald you'll see that the service worker can help a great deal with speeding up page loads. You'll be able to serve cached content to your users first and then add new content later on. You're able to control the caching of images that aren't even on your own servers. And more importantly, this method of caching is superior to browser caching because it will allow for true offline access and you can control the cache yourself. This means that the browser won't just delete your cached data whenever it feels the need to do so.

How the service worker works

When you want to use a service worker you have to install it first. You can do this by calling the register function on navigator.serviceWorker . This will attempt to install the service worker for your page. This is usually the moment where you'll want to cache some static assets. If this succeeds the service worker is installed. If this fails the service worker will attempt another install the next time the page is loaded, your page won't be messed up if the installation fails.

Once the service worker is installed you can tap into network requests and respond with cached resources before the browser goes to the network. For example, the browser wants to request /static/style.css . The service worker will be notified through the fetch event and you can either respond with a cached resource or allow the browser to go out and fetch the resource.

HTTPS only!!

Because the server worker is such a powerful API it will only be available through HTTPS when you use it in production. When you're on localhost HTTP will do but otherwise you are required to use HTTPS. This is to prevents man-in-the-middle attacks. Also, when you're developing locally you can't use the file:// protocol, you will have to set up a local webserver. If you're struggling with that, I wrote this post that illustrated three ways to quickly set up an HTTP server on your local machine. When you want to publish a demo you can use github pages, these are server over HTTPS by default so service workers will work there.

A basic server worker example

Browser support

Before I start with the example I want to mention that currently Chrome is the only browser that supports service workers. I believe Firefox is working hard to make an implementation happen as well and the other vendors are vague about supporting the service worker for now. This page has a good overview of how far the completion of service workers is.

The example

The best way to illustrate the powers of the service worker probably is to set up a quick demo. We're going to create a page that has ten pretty huge pictures on it, these pictures will be loaded from several resources because I just typed 'space' in to Google and picked a bunch of images there that I wanted to include on a webpage.

When I load this page without a service worker all the images will be fetched from the server, which can be pretty slow considering that we're using giant space images. Let's speeds things up. First create an app.js  file and include that in your page html right before the body tag closes. In that file you'll need the following script:

navigator.serviceWorker.register('worker.js')
    .then(function(){
        console.log("success!");
    },
    function(){
        console.log("failure..");
    });

This code snipper registers a service worker for our website. The register function returns a promise and when it gets resolved we just log the words 'success' for now. On error we'll log failure. Now let's set up the service worker.

// You will need this polyfill, at least on Chrome 41 and older.
importScripts('serviceworker-cache-polyfill.js');

var files_to_cache = [
    // an array of file locations we want to cache
];

this.addEventListener('install', function(evt){
    evt.waitUntil(
        caches.open("SPACE_CACHE")
            .then(function(cache){
                console.log("cache opened");
                return cache.addAll(files_to_cache);
            })
        );
    });

The code above creates a new service worker that adds a list of files to the "SPACE_CACHE" . The install eventHandler will wait for this operation to complete before it returns a success status, so if this fails the installation will fail as well.

Now let's write the fetch handler so we can respond with our freshly cached resources.

this.addEventListener('fetch', function(evt){
    evt.respondWith(
        caches.open("SPACE_CACHE").then(function(cache){
            return cache.match(evt.request).then(function (response) {
                return response || fetch(event.request.clone());
            });
        })
    );
});

This handler will take a request and match it against the SPACE_CACHE. When it finds a valid response, it will respond with it. Otherwise we will use the fetch API that is available in service workers to load the request and we respond with that. This example is pretty straightforward and probably a lot more simple than what you might use in the real world.

Debugging

Debugging service workers is far from ideal, but it's doable. In Chrome you can load chrome://serviceworker-internals/ or chrome://inspect/#service-workers to gain some insights on what is going on with your service workers. However, the Chrome team can still improve a lot when it comes to debugging service workers. When they fail to install properly because you're not using the cache polyfill for instance, the worker will return a successful installation after which the worker will be terminated without any error messages. This is very confusing and caused me quite a headache when I was first trying service workers.

Moving further with service workers

If you think service workers are interesting I suggest that you check out some examples and posts online. Jake Archibald wrote the <a href="http://jakearchibald.com/2014/offline-cookbook/" target="_blank">offline cookbook</a>. There's many information on service workers in there. You can also check out his <a href="https://github.com/jakearchibald/simple-serviceworker-tutorial" target="_blank">simple-serviceworker-tutorial</a> on Github, I learned a lot from that.

In the near future the Chrome team will be adding things like push notifications and geofencing to service workers so I think it's worth the effort to have a look at them right now because that will really put you in the lead when service workers hit the mainstream of developers and projects.

If you feel like I made some terrible mistakes in my overview of service workers or if you have something to tell me about them, please go ahead and hit me up on Twitter.

The source code for this blog post can be found on Github.

Don’t depend on javascript to render your page.

Today Christian Heilmann posted this tweet, demonstrating a rather huge delay between page load and javascript execution. This huge delay made the page show things like {{venue.title}} for an awkward amount of time. Once the page has loaded for the first time you can refresh it and the {{venue.title}} won't show. What it does still show, however, is a wrong page header (the venue title is missing) and the font isn't loaded straight away either. So I guess we all agree that there's several things wrong with this page and at least one of them is, in my opinion, completely unnecessary.

What's actually going wrong here?

From what I can tell this page is using Angular.js. I'm not going to rant about Angular and what might be wrong with it, there's plenty of other people out there who do that. What I will say, however, is that the approach this website uses to rendering rather simple data is wrong. This website is serving you a webpage from their server. Then the browser has to read that page, load all assets and read them. So the page will only start looking better after all the javascript was loaded and executed. If this sound terrible to you that's because it is.

Not only did Christian post a Youtube video, he also ran the page through Web Page Test. This produced another video that shows the page loading with a timer. It takes six(!) seconds for the correct title to appear in this video. It takes twenty-five seconds for the page to be complete.  For a webpage, six second is a long time, twenty-five seconds is an eternity. People might not even stay on your page for six seconds, let alone twenty-five.

So why is the page this slow? Angular is pretty fast, or at least computers are fast enough to make what Angular does really fast. So something fishy must be going on here. Let's use some inspector tools to find out what this page is doing and where it's spending time at.

Loading the page and assets

When loading the page using Safari with timelines enabled we can see how this page is loading it's assets and how rendering is going on. The first thing I'll look at is the networking section to get an idea of how everything is being loaded.

Schermafbeelding 2015-03-14 om 11.11.42

As you might expect, the browser will first load the page itself. The page is 10KB, which isn't bad. A website like reddit weighs in at about 125KB. Then the styles load, they're about 240KB, rather large. Especially if you consider what the page looks like. Then a 5KB print stylesheet is loaded as well, nothing wrong with that.

And then comes an almost 500KB(!) libraries file. That's huge. Like, really huge. That file alone almost takes a full second to load over my fast cable connection.

At the 577ms mark we start loading the actual information that should be displayed on the page. There's a full second of latency before that file starts loading. And once that file is loaded (and parsed) the title can be displayed. This result is a little different from the web page test, probably because I have really fast internet and a fast machine and maybe a bit of luck was involved as well, but almost two full seconds before anything happens is a long time. That's almost two seconds after the initial page loaded.

What does this mean?

The analysis that I've done above isn't very in-depth, and to make my point it doesn't have to be. What the above statistics tell us that it took the webpage almost two seconds to go from loading html to displaying a rendered page. Not everything on the page was loaded properly yet, it just took about two seconds to go from {{venue.title}} to displaying the venue's actual title. What if I told you that there's no good reason for this to take two seconds or even six seconds in the web page test video? And what if I tell you that I could get that title on the page in about zero seconds?

Doing this better

The title of this article says that you shouldn't rely on javascript to render your page and I believe that the better.org.uk is a perfect example of this. This website could be improved an insane amount if they would just render that initial view on their server. I don't see single valid reason for the server to not pick up that .json file containing the venue info, parse it and put it's contents on the page. Doing this would result in {{venue.title}} not even being in the html at all. Instead it will contain the actual venue title. This goes for all the venue info on the page actually. Why load that after loading the page and all the javascript and waiting for the javascript to be parsed? There are times where you might want to do something like this but that's usually after user interactions. You might want to use javascript to load a list of search results while a user is typing to provide real-time searching for example. But I don't think javascript should be used to load page critical information, that's the server's job.

Wrapping this up

The example I used is a really slow website, not all websites are this slow and some website don't suffer from that flash of {{venue.title}}. But my point still stands for those websites, they are slower than they need to be because they load page critical data after the page is loaded. I want to thank Christian Heilmann for tweeting about this issue and allowing me to use his resources for this post. This issue seems to be a real one and everybody seems to forget about it while they fight over which framework is the best, fastest and most lightweight. Not depending on the framework to render your page is the fastest, best and most lightweight way there is. You can find me on Twitter if you have pointers, corrections or opinions on this. Thanks for taking the time to read this!

Getting started with Gulp

Let's talk about tools first

Lately I've noticed that many Front-end developers get caught up in tools. Should they use Less, or Sass? Do they code in Sublime or Atom? Or should they pick up Coda 2? What frameworks should they learn? Is Angular worth their time? Or maybe they should go all out on Ember or Backbone.

And then any developer will reach that point where they want to actually compile their css, concatenate their javascript and minify them all. So then there is the question, what do I use for that? Well, there's many options for that as well! Some prefer Grunt, others pick Gulp and some others turn to Codekit for this. Personally I got started with Codekit and swapped that out for Gulp later on. The reason I chose Gulp over Grunt? I liked the syntax better and people said it was exponentially faster than Grunt.

What is Gulp

After dropping all these tools in the previous paragraphs you might be confused. This article will focus on getting you started with Gulp. But what is Gulp exactly?

Gulp is a task runner, it's purpose is to perform repetitive tasks for you. When you are developing a website some things you might want to automate are:

  • Compiling css
  • Concatenate javascript files into a single file
  • Refresh your browser
  • Minify your css and javascript files

This would be a very basic setup. Some more advanced task include:

  • Running jshint
  • Generating an icon font
  • Using a cachebuster
  • Generating spritesheets

And many, many more. The way Gulp does all these things is through plugins. This makes Gulp a very small and lightweight utility that can be expanded with plugins so it does whatever you want. At this time there's about 1200 plugins available for gulp.

When should I learn Gulp

You should learn Gulp whenever you feel like you are ready for it. When you're starting out as a front-end developer you will have to learn so many things at once I don't think there's much use in immediately jumping in to use Sass, Gulp and all the other great tools that are available. If you feel like you want to learn Sass (or Less) as soon as you start learning css you don't have to learn Gulp as well. You could manually compile your css files as you go. Or you could use a graphical tool like Codekit for the time being. Like I said, there's no need to rush in and confuse yourself.

What about Grunt?

For those who payed attention, I mentioned Grunt at the start of this article. I don't use Grunt for a very simple reason, I don't like the syntax. And also, Gulp is supposed to be faster so that's nice. I feel like it's important to mention this because if you choose to use a tool like Gulp or Grunt you have to feel comfortable. A tool should help you get your job done better; using a tool shouldn't be a goal in itself.

That said, Grunt fulfills the same purpose as Gulp, which is running automated tasks. The way they do it is completely different though. Grunt uses a configuration file for it's tasks and then it runs all of the tasks in sequence. So it might take a Sass file and turn it into compiled css. After that it takes a css file and minifies it. Gulp uses javascript and streams. This means that you would take a Sass file and Gulp turns it into a so called stream. This stream then gets passed on an plugins modify it. You could compare this with an assembly line, you have some input, it get's modified n times and then at the end you get the output. In Gulp's case the output is a compiled and minified css file. Now, let's dive in and create our first gulpfile.js!

Creating a gulpfile

The gulpfile is your main file for running and using gulp. Let's create your first Gulp task!

Installing gulp

I'm going to assume you've already installed node and npm on your machine. If not go to the node.js website and follow the instructions over there. When you're done you can come back here to follow along.

To use gulp you need to install it on your machine globally and locally. Let's do the global install first:

npm install -g gulp

If this doesn't work at once you might have to use the sudo prefix to execute this command.

When this is done, you have successfully installed Gulp on your machine! Now let's do something with it.

Setting up a project

In this example we are going to use gulp for compiling sass to css. Create the following folders/files:

my_first_gulp/
    sass/
        style.scss
    css/
    gulpfile.js

In your style.scss files you could write the following contents:

$background-color: #b4da55

body {
    background-color: $background-color;
}

Allright, we have our setup complete. Let's set up Gulp for our project.

Setting up Gulp

Let's start by locally installing gulp for our project:

npm install gulp

If you're more familiar with npm and the package.json file that you can add to your project you'll want to run the command with --save-dev appended to it. That will add gulp as a dependency for your project. This also applies to any plugins you install.

Next up, we install the sass compiler:

npm install gulp-sass

We're all set to actually build our gulpfile now. Add the following code in there:

var gulp = require('gulp');
var sass = require('gulp-sass');

gulp.task('css', function(){
    gulp.src('sass/style.scss')
        .pipe(sass())
        .pipe(gulp.dest('css/'));
});

gulp.task('watch', function(){
    gulp.watch('sass/**/*.scss', ['css']);
});

In this file we import gulp and the gulp sass module. Then we define a task, we call the task css. Inside of this task we take our style.scss file and pipe it through to the sass plugin. What happens here is that the sass plugin modifies the stream that was created when we loaded sass/style.scss. When the sass plugin is done it sends the stream on to the next pipe call. This time we call gulp.dest to save the output of our stream to the css folder.

Think of this process as an assembly line for your files. You put the raw file in on one end, apply some plugins to it in order to build your final file and then at the end you save your output to a file.

The second task we define is called watch. This is the task we're going to start from the command line in a bit. What happens in this task is that we tell gulp to watch everything we have in our sass folder, as long as it ends in .scss. When something changes, Gulp will start the css task.

Go back to your command line and type:

gulp watch

Now go to your style.scss file, change something and save it (or just save it). You should see something happening in the command line now.

[20:54:17] Starting 'css'...
[20:54:17] Finished 'css' after 3.63 ms

That's the output I get. If you check the css folder, there should be a css file in there. You just generated that file! That's all there is to it.

Moving forward

Now that you've learned to compile sass files into css files with gulp you can start doing more advanced things. Gulps powerful syntax shouldn't make it too hard to expand on this example. Usually you just add an extra pipe to your file, call the plugin you want, repeat that a few times and then eventually you save the output file.

I hope this guide to getting started with gulp is helpful to you. If you have notes for me, questions or just want to chat you can send me a tweet @donnywals

Sharing cookies between subdomains

A while ago I wrote about sharing cookies on an old Tumblr blog of mine. I figured it contains some valuable information so I migrated the post here. The reason I wrote it was that I was working on a pitch that would take a user through a series of puzzles. Each puzzle would enable the user to see the next website(subdomain) and I decided I'd save the progress of the user in a cookie.

Normally you'd define a cookie for a domain like www.example.com. When the browser tries to read this cookie, the current domain has to be www.example.com. So sub.example.com wouldn't work and the cookie won't be read. There is, however, a way to get around this security limitation and it's quite easy.

If you only specify .example.com(note the period before example.com) as the host for your cookie, it will be accessible for every subdomain from this host. So both www.example.com and sub.example.com can use this cookie.

An example in code (using the jquery cookie plugin):

$.cookie('foo', 'bar', {path: '/', domain: '.example.com'});

Well, hope it's helpful to some of you out there.

Creating a multi step form with Angular.js

Before we start, you might want to check out this example of the form in action.

While I was working with Angular.js to create a nice little recipe / cookbook site for myself, I was creating a form that required me to split it up into multiple parts or steps. I found this surprisingly easy to do actually but I can imagine that not everybody will have the same experience I did. In this short post I will provide you with a good starting point for your html and your javascript.

I'll be using the power of Angular.js directives to hide and show parts of the form. Well, let's dive in then!

First of all, we'll set up a form. It could look a little like this. I'm using bootstrap to style the form in this example. You can just ignore the classes I've used.

<form class="form-vertical" name="myForm" ng-controller="FormController" novalidate>
    <fieldset ng-show="step == 1">
        <legend>Step one</legend>
        <div class="form-group">
           <label for="name">Your name</label>
           <input class="form-control" type="text" id="name" name="name" ng-model="name" />
        </div>
        <button class="btn btn-primary" ng-click="nextStep()">Next step</button>
    </fieldset>
    <fieldset ng-show="step == 2">
        <legend>Step two</legend>
        <div class="form-group">
            <label for="email">Your email</label>
            <input class="form-control" type="email" id="email" name="email" ng-model="email" />
        </div>
        <button class="btn btn-default" ng-click="prevStep()">Previous step</button>
        <button class="btn btn-primary" ng-click="nextStep()">Next step</button>
    </fieldset>
    <fieldset ng-show="step == 3">
        <legend>Step three</legend>
        <div class="form-group">
            <label for="msg">Short message</label>
            <input class="form-control" type="text" id="msg" name="msg" ng-model="msg" />
        </div>
        <button class="btn btn-default" ng-click="prevStep()">Previous step</button>
        <button class="btn btn-primary" ng-click="submitForm()">Submit</button>
    </fieldset>
</form>

So, that's not very bizarre right? It's a regular Angular.js style form with a bunch of fieldsets. The magic happens with the ng-show directives that are set on the fieldsets. These directive will make sure that we will only show a certain fieldset if the step property of our controller is equal to a certain number.

Let's tie this up with some Javascript.

(function(){
    var app = angular.module('myApp', []);
    app.controller('FormController', ['$scope', function($scope){
        $scope.step = 1;

        $scope.nextStep = function() {
            $scope.step++;
        }

        $scope.prevStep = function() {
            $scope.step--;
        }

        $scope.submitForm = function() {
            // submit code goes here
        }
    }]);
})();

If we were to test this out in an actual app we would have a pretty neat form that spans multiple steps. The model data is preserved for each because we're just showing and hiding different parts of a single form!

Source on github