Comparing lifecycle management for async sequences and publishers

In my previous post you learned about some different use cases where you might have to choose between an async sequence and Combine while also clearly seeing that async sequence are almost always better looking in the examples I’ve used, it’s time to take a more realistic look at how you might be using each mechanism in your apps.

The details on how the lifecycle of a Combine subscription or async for-loop should be handled will vary based on how you’re using them so I’ll be providing examples for two situations:

  • Managing your lifecycles in SwiftUI
  • Managing your lifecycles virtually anywhere else

We’ll start with SwiftUI since it’s by far the easiest situation to reason about.

Managing your lifecycles in SwiftUI

Apple has added a bunch of very convenient modifiers to SwiftUI that allow us to subscribe to publishers or launch an async task without worrying about the lifecycle of each too much. For the sake of having an example, let’s assume that we have an object that exists in our view that looks a bit like this:

class ExampleViewModel {
    func notificationCenterPublisher() -> AnyPublisher<UIDeviceOrientation, Never> {
        NotificationCenter.default.publisher(for: UIDevice.orientationDidChangeNotification)
            .map { _ in UIDevice.current.orientation }
            .eraseToAnyPublisher()
    }

    func notificationCenterSequence() async -> AsyncMapSequence<NotificationCenter.Notifications, UIDeviceOrientation> {
        await NotificationCenter.default.notifications(named: UIDevice.orientationDidChangeNotification)
            .map { _ in await UIDevice.current.orientation }
    }
} 

In the SwiftUI view we’ll call each of these two functions to subscribe to the publisher as well as iterate over the async sequence. Here’s what our SwiftUI view looks like:

struct ExampleView: View {
    @State var isPortraitFromPublisher = false
    @State var isPortraitFromSequence = false

    let viewModel = ExampleViewModel()

    var body: some View {
        VStack {
            Text("Portrait from publisher: \(isPortraitFromPublisher ? "yes" : "no")")
            Text("Portrait from sequence: \(isPortraitFromSequence ? "yes" : "no")")
        }
        .task {
            let sequence = await viewModel.notificationCenterSequence()
            for await orientation in sequence {
                isPortraitFromSequence = orientation == .portrait
            }
        }
        .onReceive(viewModel.notificationCenterPublisher()) { orientation in
            isPortraitFromPublisher = orientation == .portrait
        }
    }
}

In this example I’d argue that the publisher approach is easier to understand and use than the async sequence one. Building the publisher is virtually the same as it is for the async sequence with the major difference being the return type of our publisher vs. our sequence: AnyPublisher<UIDeviceOrientation, Never> vs. AsyncMapSequence<NotificationCenter.Notifications, UIDeviceOrientation>. The async sequence actually leaks its implementation details because we have to return an AsyncMapSequence instead of something like an AnyAsyncSequence<UIDeviceOrientation> which would allow us to hide the internal details of our async sequence.

At this time it doesn’t seem like the Swift team sees any benefit in adding something like eraseToAnyAsyncSequence() to the language so we’re expected to provide fully qualified return types in situations like ours.

Using the sequence is also a little bit harder in SwiftUI than it is to use the publisher. SwiftUI’s onReceive will handle subscribing to our publisher and it will provide the publisher’s output to our onReceive closure. For the async sequence we can use task to create a new async context, obtain the sequence, and iterate over it. Not a big deal but definitely a little more complex.

When this view goes out of scope, both the Task created by task as well as the subscription created by onReceive will be cancelled. This means that we don’t need to worry about the lifecycle of our for-loop and subscription.

If you want to iterate over multiple sequences, you might be tempted to write the following:

.task {
    let sequence = await viewModel.notificationCenterSequence()
    for await orientation in sequence {
        isPortraitFromSequence = orientation == .portrait
    }

    let secondSequence = await viewModel.anotherSequence()
    for await output in secondSequence {
        // handle ouput
    }
}

Unfortunately, this setup wouldn’t have the desired outcome. The first for-loop will need to finish before the second sequence is even created. This for-loop behaves just like a regular for-loop where the loop has to finish before moving on to the next lines in your code. The fact that values are produced asynchronously does not change this. To iterate over multiple async sequences in parallel, you need multiple tasks:

.task {
    let sequence = await viewModel.notificationCenterSequence()
    for await orientation in sequence {
        isPortraitFromSequence = orientation == .portrait
    }
}
.task {
    let secondSequence = await viewModel.anotherSequence()
    for await output in secondSequence {
        // handle ouput
    }
}

In SwiftUI, Tasks relatively simple to use, and it’s relatively hard to make mistakes. But what happens if we compare publishers and async sequences lifecycles outside of SwiftUI? That’s what you’ll find out next.

Managing your lifecycles outside of SwiftUI

When you’re subscribing to publishers or iterating over async sequences outside of SwiftUI, things change a little. You suddenly need to manage the lifecycles of everything you do much more carefully, or more specifically for Combine you need to make sure you retain your cancellables to avoid having your subscriptions being torn down immediately. For async sequences you’ll want to make sure you don’t have the tasks that wrap your for-loops linger for longer than they should.

Let’s look at an example. I’m still using SwiftUI, but all the iterating and subscribing will happen in a view model instead of my view:

struct ContentView: View {
    @State var showExampleView = false

    var body: some View {
        Button("Show example") {
            showExampleView = true
        }.sheet(isPresented: $showExampleView) {
            ExampleView(viewModel: ExampleViewModel())
        }
    }
}

struct ExampleView: View {
    @ObservedObject var viewModel: ExampleViewModel
    @Environment(\.dismiss) var dismiss

    var body: some View {
        VStack(spacing: 16) {
            VStack {
                Text("Portrait from publisher: \(viewModel.isPortraitFromPublisher ? "yes" : "no")")
                Text("Portrait from sequence: \(viewModel.isPortraitFromSequence ? "yes" : "no")")
            }

            Button("Dismiss") {
                dismiss()
            }
        }.onAppear {
            viewModel.setup()
        }
    }
}

This setup allows me to present an ExampleView and then dismiss it again. When the ExampleView is presented I want to be subscribed to my notification center publisher and iterate over the notification center async sequence. However, when the view is dismissed the ExampleView and ExampleViewModel should both be deallocated and I want my subscription and the task that wraps my for-loop to be cancelled.

Here’s what my non-optimized ExampleViewModel looks like:

@MainActor
class ExampleViewModel: ObservableObject {
    @Published var isPortraitFromPublisher = false
    @Published var isPortraitFromSequence = false

    private var cancellables = Set<AnyCancellable>()

    deinit {
        print("deinit!")
    }

    func setup() {
        notificationCenterPublisher()
            .map { $0 == .portrait }
            .assign(to: &$isPortraitFromPublisher)

        Task { [weak self] in
            guard let sequence = await self?.notificationCenterSequence() else {
                return
            }
            for await orientation in sequence {
                self?.isPortraitFromSequence = orientation == .portrait
            }
        }
    }

    func notificationCenterPublisher() -> AnyPublisher<UIDeviceOrientation, Never> {
        NotificationCenter.default.publisher(for: UIDevice.orientationDidChangeNotification)
            .map { _ in UIDevice.current.orientation }
            .eraseToAnyPublisher()
    }

    func notificationCenterSequence() -> AsyncMapSequence<NotificationCenter.Notifications, UIDeviceOrientation> {
        NotificationCenter.default.notifications(named: UIDevice.orientationDidChangeNotification)
            .map { _ in UIDevice.current.orientation }
    }
}

If you’d put the views in a project along with this view model, everything will look good on first sight. The view updates as expected and the ExampleViewModel’s deinit is called whenever we dismiss the ExampleView. Let’s make some changes to setup() to double check that both our Combine subscription and our Task are cancelled and no longer receiving values:

func setup() {
    notificationCenterPublisher()
        .map { $0 == .portrait }
        .handleEvents(receiveOutput: { _ in print("subscription received value") })
        .assign(to: &$isPortraitFromPublisher)

    Task { [weak self] in
        guard let sequence = self?.notificationCenterSequence() else {
            return
        }
        for await orientation in sequence {
            print("sequence received value")
            self?.isPortraitFromSequence = orientation == .portrait
        }
    }.store(in: &cancellables)
}

If you run the app now you’ll find that you’ll see the following output when you rotate your device or simulator after dismissing the ExampleView:

// present ExampleView and rotate
subscription received value
sequence received value
// rotate again
subscription received value
sequence received value
// dismiss
deinit!
// rotate again
sequence received value

You can see that the ExampleViewModel is deallocated and that the subscription no longer receives values after that. Unfortunately, our Task is still active and it’s still iterating over our async sequence. If you present the ExampleView again, you’ll find that you now have multiple active iterators. This is a problem because we want to cancel our Task whenever the object that contains it is deallocated, basically what Combine does with its AnyCancellable.

Luckily, we can add a simple extension on Task to piggy-back on the mechanism that makes AnyCancellable work:

extension Task {
    func store(in cancellables: inout Set<AnyCancellable>) {
        asCancellable().store(in: &cancellables)
    }

    func asCancellable() -> AnyCancellable {
        .init { self.cancel() }
    }
}

Combine’s AnyCancellable is created with a closure that’s run whenever the AnyCancellable itself will be deallocated. In this closure, the task can cancel itself which will also cancel the task that’s producing values for our for-loop. This should end the iteration as long as the task that produces values respects Swift Concurrency’s task cancellation rules.

You can now use this extension as follows:

Task { [weak self] in
    guard let sequence = self?.notificationCenterSequence() else {
        return
    }
    for await orientation in sequence {
        print("sequence received value")
        self?.isPortraitFromSequence = orientation == .portrait
    }
}.store(in: &cancellables)

If you run the app again, you’ll find that you’re no longer left with extraneous for-loops being active which is great.

Just like before, iterating over a second async sequence requires you to create a second task to hold the second iteration.

In case the task that’s producing your async values doesn’t respect task cancellation, you could update your for-loop as follows:

for await orientation in sequence {
    print("sequence received value")
    self?.isPortraitFromSequence = orientation == .portrait

    if Task.isCancelled { break }
}

This simply checks whether the task we’re currently in is cancelled, and if it is we break out of the loop. You shouldn’t need this as long as the value producing task was implemented correctly so I wouldn’t recommend adding this to every async for-loop you write.

One more option to break out of our async for loop is to check whether self still exists within each iteration and either having a return or a break in case self is no longer around:

Task { [weak self] in
    guard let sequence = self?.notificationCenterSequence() else {
        return
    }
    for await orientation in sequence {
        guard let self = self else { return }
        print("sequence received value")
        self.isPortraitFromSequence = orientation == .portrait
    }
}

The nice thing is that we don't to rely on Combine at all with this solution. The downside, however, is that we cannot have a guard let self = self as the first line in our Task because that would capture self for the duration of our Task, which means that every check for self within the for loop body results in self being around. This would be a leak again.

In the example above, we only capture the sequence before starting the loop which means that within the loop we can check for the existence of self and break out of the loop as needed.

Summary

In this post you learned a lot about how the lifecycle of a Combine subscription compares to that of a task that iterates over an async sequence. You saw that using either in a SwiftUI view modifier was pretty straightforward, and SwiftUI makes managing lifecycles easy; you don’t need to worry about it.

However, you also learned that as soon as we move our iterations and subscriptions outside of SwiftUI things get messier. You saw that Combine has good built-in mechanisms to manage lifecycles through its AnyCancellable and even its assign(to:) operator. Tasks unfortunately lack a similar mechanism which means that it’s very easy to end up with more iterators than you’re comfortable with. Luckily, we can add an extension to Task to take care of this by piggy-backing on Combine’s AnyCancellable to cancel our Task objects as soon s the object that owns the task is deallocated.

You also saw that we can leverage a guard on self within each for loop iteration to check whether self is still around, and break out of the loop if self is gone which will stop the iterations.

All in all, Combine simply provides more convenient lifecycle management out of the box when we’re using it outside of SwiftUI views. That doesn’t mean that Combine is automatically better, but it does mean that async sequences aren’t quite in a spot where they are as easy to use as Combine. With a simple extension we can improve the ergonomics of iterating over an async sequence by a lot, but I hope that the Swift team will address binding task lifecycles to the lifecycle of another object like Combine does at some point in the future.

Comparing use cases for async sequences and publishers

Swift 5.5 introduces async/await and a whole new concurrency model that includes a new protocol: AsyncSequence. This protocol allows developers to asynchronously iterate over values coming from a sequence by awaiting them. This means that the sequence can generate or obtain its values asynchronously over time, and provide these values to a for-loop as they become available.

If this sounds familiar, that’s because a Combine publisher does roughly the same thing. A publisher will obtain or generate its values (asynchronously) over time, and it will send these values to subscribers whenever they are available.

While the basis of what we can do with both AsyncSequence and Publisher sounds similar, I would like to explore some of the differences between the two mechanisms in a series of two posts. I will focus this comparison on the following topics:

  • Use cases
  • Lifecycle of a subscription / async for-loop

The post you’re reading now will focus on comparing use cases. If you want to learn more about lifecycle management, take a look at this post.

Please note that parts of this comparison will be highly opinionated or be based on my experiences. I’m trying to make sure that this comparison is fair, honest, and correct but of course my experiences and preferences will influence part of the comparison. Also note that I’m not going to speculate on the futures of either Swift Concurrency nor Combine. I’m comparing AsyncSequence to Publisher using Xcode 13.3, and with the Swift Async Algorithms package added to my project.

Let’s dive in, and take a look at some current use cases where publishers and async sequences can truly shine.

Operations that produce a single output

Our first comparison takes a closer look at operations with a single output. While this is a familiar example for most of us, it isn’t the best comparison because async sequences aren’t made for performing work that produces a single result. That’s not to say an async sequence can’t deliver only one result, it absolutely can.

However, you typically wouldn’t leverage an async sequence to make a network call; you’d await the result of a data task instead.

On the other hand, Combine doesn’t differentiate between tasks that produce a single output and tasks that produce a sequence of outputs. This means that publishers are used for operations that can emit many values as well as for values that produce a single value.

Combine’s approach to publishers can be considered a huge benefit of using them because you only have one mechanism to learn and understand; a publisher. It can also be considered a downside because you never know whether an AnyPublisher<(Data, URLResponse), Error> will emit a single value, or many values. On the other hand, let result: (Data, URLResponse) = try await getData() will always clearly produce a single result because we don’t use an async sequence to obtain a single result; we await the result of a task instead.

Even though this comparison technically compares Combine to async/await rather than async sequences, let’s take a look at an example of performing a network call with Combine vs. performing one with async/await to see which one looks more convenient.

Combine:

var cancellables = Set<AnyCancellable>()

func getData() {
    let url = URL(string: "https://donnywals.com")!
    URLSession.shared.dataTaskPublisher(for: url)
        .sink(receiveCompletion: { completion in
            if case .failure(let error) = completion {
                // handle error
            }
        }, receiveValue: { (result: (Data, URLResponse)) in
            // use result
        })
        .store(in: &cancellables)
}

Async/Await:

func getData() async {
    let url = URL(string: "https://donnywals.com")!
    do {
        let result: (Data, URLResponse) = try await URLSession.shared.data(from: url)
        // use result
    } catch {
        // handle error
    }
}

In my opinion it’s pretty clear which technology is more convenient for performing a task that produces a single result. Async/await is easier to read, easier to use, and requires far less code.

With this somewhat unfair comparison out of the way, let’s take a look at another example that allows us to more directly compare an async sequence to a publisher.

Receiving results from an operation that produces multiple values

Operations that produce multiple values come in many shapes. For example, you might be using a TaskGroup from Swift Concurrency to run several tasks asynchronously, receiving the result for each task as it becomes available. This is an example where you would use an async sequence to iterate over your TaskGroup's results. Unfortunately comparing this case to Combine doesn’t make a lot of sense because Combine doesn’t really have an equivalent to TaskGroup.

💡 Tip: to learn more about Swift Concurrency’s TaskGroup take a look at this post.

One example of an operation that will produce multiple values is observing notifications on NotificationCenter. This is a nice example because not only does NotificationCenter produce multiple values, it will do so asynchronously over a long period of time. Let’s take a look at an example where we observe changes to a user’s device orientation.

Combine:

var cancellables = Set<AnyCancellable>()

func notificationCenter() {
    NotificationCenter.default.publisher(
        for: UIDevice.orientationDidChangeNotification
    ).sink(receiveValue: { notification in
        // handle notification
    })
    .store(in: &cancellables)
}

AsyncSequence:

func notificationCenter() async {
    for await notification in await NotificationCenter.default.notifications(
        named: UIDevice.orientationDidChangeNotification
    ) {
        // handle notification
    }
}

In this case, there is a bit less of a difference than when we used async/await to obtain the result of a network call. The main difference is in how we receive values. In Combine, we use sink to subscribe to a publisher and we need to hold on to the provided cancellable so the subscription is kept alive. With our async sequence, we use a special for-loop where we write for await <value> in <sequence>. Whenever a new value becomes available, our for-loop’s body is called and we can handle the notification.

If you look at this example in isolation I don’t think there’s a very clear winner. However, when we get to the ease of use comparison you’ll notice that the comparison in this section doesn’t tell the full story in terms of the lifecycle and implications of using an async sequence in this example. The next part of this comparison will paint a better picture regarding this topic.

Let’s look at another use case where you might find yourself wondering whether you should reach for Combine or an async sequence; state observation.

Observing state

If you’re using SwiftUI in your codebase, you’re making extensive use of state observation. The mix of @Published and ObservableObject on data sources external to your view allow SwiftUI to determine when a view’s source of truth will change so it can potentially schedule a redraw of your view.

💡 Tip: If you want to learn more about how and when SwiftUI decided to redraw views, take a look at this post.

The @Published property wrapper is a special kind of property wrapper that uses Combine’s CurrentValueSubject internally to emit values right before assigning these values as the wrapped property’s current value. This means that you can subscribe to @Published using Combine’s sink to handle new values as they become available.

Unfortunately, we don’t really have a similar mechanism available that only uses Swift Concurrency. However, for the sake of the comparison, we’ll make this example work by leveraging the values property on Publisher to convert our @Published publisher into an async sequence.

Combine:

@Published var myValue = 0

func stateObserving() {
    $myValue.sink(receiveValue: { newValue in

    }).store(in: &cancellables)
}

Async sequence:

@Published var myValue = 0

func stateObserving() async {
    for await newValue in $myValue.values {
        // handle new value
    }
}

Similar to before, the async sequence version looks a little bit cleaner than the Combine version but as you’ll find in the next post, this example doesn’t quite tell the full story of using an async sequence to observe state. The lifecycle of an async sequence can, in certain case complicate our example quite a lot so I really recommend that you also check out the lifecycle comparison to gain a much better understanding of an async sequence’s lifecycle.

It’s also important to keep in mind that this example uses Combine to facilitate the actual state observation because at this time Swift Concurrency does not provide us with a built-in way to do this. However, by converting the Combine publisher to an async sequence we can get a pretty good sense of what state observation could look like if/when support for this is added to Swift.

Summary

In this post, I’ve covered three different use cases for both Combine and async sequences. It’s pretty clear that iterating over an async sequence looks much cleaner than subscribing to a publisher. There’s also no doubt that tasks with a single output like network calls look much cleaner with async/await than they do with Combine.

However, these examples aren’t quite as balanced as I would have liked them to be. In all of the Combine examples I took into account the lifecycle of the subscriptions I created because otherwise the subscriptions wouldn’t work due to the cancellable that’s returned by sink being deallocated if it’s not retained in my set of cancellables.

The async sequence versions, however, work fine without any lifecycle management but there’s a catch. Each of the functions I wrote was async which means that calling those functions must be done with an await, and the caller is suspended until the async sequence that we’re iterating over completes. In the examples of NotificationCenter and state observation the sequences never end so we’ll need to make some changes to our code to make it work without suspending the caller.

We’ll take a better look at this in the next post.

What is the “any” keyword in Swift?

With Swift 5.6, Apple added a new keyword to the Swift language: any. As you'll see in this post, usage of the any keyword looks very similar to how you use the some keyword. They're both used in front of protocol names, and they both tell us something about how that protocol is used. Once you dig deeper into what any means, you'll find that it's very different from some. In fact, you might come to the conclusion that any is somewhat of the opposite of some. In this post, you will learn everything you need to know about the any keyword in Swift as well as existentials, and what they are.

Let’s dive right into the any keyword by taking a look at its intended use in a very simple example:

protocol Networking {
    func fetchPosts() async throws -> [Post]
    // ...
}

struct PostsDataSource {
    let networking: any Networking
    // ...
}

💡Tip: If you’re not familiar with Swift’s some keyword or need a refresher, check out this post on Swift’s some keyword.

While the any keyword might look similar to the some keyword in the sense that both are used in front of a protocol, and sound like they convey a message similar to “I don’t care what’s used for this type as long as it conforms to this protocol”, they’re really not the same at all. To understand their differences, we need to take a look at what existentials are in Swift.

Understanding what an existential is in Swift

While some allows us to write code that more or less ignores, or discards, a protocol’s associated type and/or Self requirement while expecting that every returned object in a function that returns some Protocol has the same concrete type, the any keyword simply annotates that a given type is a so-called existential. While you might not know what an existential is, you've probably seen them used. For example, if we look at the "old" way of writing the PostsDataSource struct that you just saw, it would look as follows:

struct PostsDataSource {
    let networking: Networking
    // ...
}

Note that all I did is remove the any keyword. The Networking object that we use is an existential. This means that let networking is an object that conforms to Networking. The compiler doesn't know which object it will be, or what that object's type is. All the compiler knows is that there will be an object, any object, that will be assigned to let networking when we initialize PostsDataSource, and that object conforms to Networking. We're essentially only sure that we'll have a box that contains a Networking object. To know exactly which object was put in that box, we need to open that box at runtime, peek inside, and find the object.

It's important to know that existentials are relatively expensive to use because the compiler and runtime can’t pre-determine how much memory should be allocated for the concrete object that will fill in the existential. Whenever you call a method on an existential, like the networking property in the snippet you saw earlier, the runtime will have to dynamically dispatch this call to the concrete object which is slower than a static dispatch that goes directly to a concrete type.

The Swift team has determined that it’s currently too easy to reach for an existential over a concrete object. This essentially means that a lot of us are writing code that uses protocols (existentials) that harm our performance without us really being aware of it. For example, there’s nothing wrong with the old fashioned PostsDataSource you saw earlier, right?

struct PostsDataSource {
    let networking: Networking
    // ...
}

I’m sure we all have code like this, and in fact, we might even consider this best practice because we're not depending on concrete types which makes our code easier to test and maintain.

Sadly, this code uses an existential by having a property that has Networking as its type. This means that it’s not clear for the runtime how much memory should be allocated for the object that will fill in our networking property, and any calls to fetchPosts will need to be dynamically dispatched.

By introducing the any keyword, the language forces us to think about this. In Swift 5.6 annotating our let networking: Networking with any is optional; we can do this on our own terms. However, in Swift 6 it will be required to annotate existentials with the any keyword.

Digging deeper into the any keyword

As I was reading the proposal for any, I realized that what the Swift team seems to want us to do, is to use generics and concrete types rather than existentials when possible. It’s especially this part from the introduction of the proposal that made this clear to me:

Despite these significant and often undesirable implications, existential types have a minimal spelling. Syntactically, the cost of using one is hidden, and the similar spelling to generic constraints has caused many programmers to confuse existential types with generics. In reality, the need for the dynamism they provided is relatively rare compared to the need for generics, but the language makes existential types too easy to reach for, especially by mistake. The cost of using existential types should not be hidden, and programmers should explicitly opt into these semantics.

So how should we be writing our PostsDataSource without depending on a concrete implementation directly? And how can we do that without using an existential since clearly existentials are less than ideal?

The easiest way would be to add a generic to our PostsDataSource and constraining it to Networkingas follows:

protocol Networking {
    func fetchPosts() async throws -> [Post]
    // ...
}

struct PostsDataSource<Network: Networking> {
    let networking: Network
    // ...
}

By writing our code like this, the compiler will know up front which type will be used to fill in the Network generic. This means that the runtime will know up-front how much memory needs to be allocated for this object, and calls to fetchPosts can be dispatched statically rather than dynamically.

💡Tip: If you’re not too familiar with generics, take a look at this article to learn more about generics in Swift and how they’re used.

When writing PostsDataSource as shown above, you don’t lose anything valuable. You can still inject different concrete implementations for testing, and you can still have different instances of PostsDataSource with different networking objects even within your app. The difference compared to the previous approach is that the runtime can more efficiently execute your code when it know the concrete types you’re using (through generics).

Alternatively, you could rewrite let networking to use some Networking instead of using a generic. To learn more about some, and how you can use it to replace generics in some situations, take a look at this post.

The only thing we’ve lost by not using any is the ability to dynamically swap out the networking implementation at runtime by assigning a new value of a different concrete type to networking (which we couldn’t do anyway because it’s defined as a let).

It's interesting to note that because we have to choose between any, some, and a generic, when we define our let networking, it's easier to choose the correct option. We could use : any Networking wherever we'd write : Networking in Swift 5.5 and earlier, and our code would work just fine but we might be using a suboptimal existential instead of a concrete type that can benefit from compile-time optimizations and static dispatch at runtime. In some cases, that's exactly what you want. You might need the flexibility that an existential provides, but often you'll find that you don't need an existential at all.

So how useful is the any keyword really? Should you be using it in Swift 5.6 already or is it better to just wait until the compiler starts enforcing any in Swift 6?

In my opinion, the any keyword will provide developers with an interesting tool that forces them to think about how they write code, and more specifically, how we use types in our code. Given that existentials have a detrimental effect on our code’s performance I’m happy to see that we need to explicitly annotate existentials with a keyword in Swift 6 onward. Especially because it’s often possible to use a generic instead of an existential without losing any benefits of using protocols. For that reason alone it’s already worth training yourself to start using any in Swift 5.6.

Note: take a look at my post comparing some and any to learn a bit more about how some can be used in place of a generic in certain situations.

Using any now in Swift 5.6 will smoothen your inevitable transition to Swift 6 where the following code would actually be a compiler error:

protocol Networking {
    func fetchPosts() async throws -> [Post]
    // ...
}

struct PostsDataSource {
    // This is an error in Swift 6 because Networking is an existential
    let networking: Networking
    // ...
}

The above code will at least need to be written using any Networking in Swift if you really need the existential Networking. In most cases however, this should prompt you to reconsider using the protocol in favor of a generic or writing some Networking in order to improve runtime performance.

Whether or not the performance gains from using generics over existentials is significant enough to make a difference in the average app remains to be seen. Being conscious of the cost of existentials in Swift is good though, and it’s definitely making me reconsider some of the code I have written.

The any keyword in Swift 5.7

In Swift 5.7 the any keyword is still not mandatory for all existentials but certain features aren't available to non-any protocols. For example, in Swift 5.7 the requirements around protocols with a Self requirement have been relaxed. Previously, if you wanted to use a protocol with an associated type of Self requirement as a type you would have to use some. This is why you have to write var body: some View in SwiftUI.

In Swift 5.7 this restriction is relaxed, but you have to write any to use an existential that has an associated type or Self requirement. The following example is an example of this:

protocol Content: Identifiable {
    var url: URL { get }
}

func useContent(_ content: any Content) {
    // ...
}

The code above requires us to use any Content because Content extends the Identifiable protocol which has an associated type (defined as associatedtype ID: Hashable). For that reason, we have to use any if we can't use some.

The same is true for protocols that use a primary associated type. Using an existential with a primary associated type already requires the any keyword in Swift 5.7.

Note that any isn't a drop in replacement for some as noted in my comparison of these two keywords. When using any, you'll always opt-in to using an existential rather than a concrete type (which is what some would provide).

Even though any won't be completely mandatory until Swift 6.0 it's interesting to see that Swift 5.7 already requires any for some of the new features that were made available with Swift 5.7. I think this reinforces the point that I made earlier in this post; try to start using any today so you're not surprised by compiler errors once Swift 6.0 drops.

Writing custom property wrappers for SwiftUI

It's been a while since I published my post that helps you wrap your head around Swift's property wrappers. Since then, I've done more and more SwiftUI related work and one challenge that I recently had to dig into was passing dependencies from SwiftUI's environment into a custom property wrapper.

While figuring this out I learned about the DynamicProperty protocol which is a protocol that you can conform your property wrappers to. When your property wrapper conforms to the DynamicProperty protocol, your property wrapper will essentially become a part of your SwiftUI view. This means that your property wrapper can extract values from your SwiftUI environment, and your SwiftUI view will ask your property wrapper to update itself whenever it's about to evaluate your view's body. You can even have @StateObject properties in your property wrapper to trigger updates in your views.

This protocol isn't limited to property wrappers, but for the sake of this post I will explore DynamicProperty in the context of a property wrapper.

Understanding the basics of DynamicProperty

Defining a dynamic property is as simple as conforming a property wrapper to the DynamicProperty protocol. The only requirement that this protocol has is that you implement an update method that's called by your view whenever it's about to evaluate its body. Defining such a property wrapper looks as follows:

@propertyWrapper
struct MyPropertyWrapper: DynamicProperty {
  var wrappedValue: String

  func update() {
    // called whenever the view will evaluate its body
  }
}

This example on its own isn't very useful of course. I'll show you a more useful custom property wrapper in a moment. Let's go ahead and take a moment to explore what we've defined here first.

The property wrapper that we've defined here is pretty straightforward. The wrapped value for this wrapper is a string which means that it'll be used as a string in our SwiftUI view. If you want to learn more about how property wrappers work, take a look at this post I published on the topic.

There's also an update method that's called whenever SwiftUI is about to evaluate its body. This function allows you to update state that exists external to your property wrapper. You’ll often find that you don’t need to implement this method at all unless you’re doing a bunch of more complex work in your property wrapper. I’ll show you an example of this towards the end of the article.

⚠️ Note that I’ve defined my property wrapper as a struct and not a class. Defining a DynamicProperty property wrapper as a class is allowed, and works to some extent, but in my experience it produces very inconsistent results and a lot of things you might expect to work don’t actually work. I’m not quite sure exactly why this is the case, and what SwiftUI does to break property wrappers that were defined as classes. I just know that structs work, and classes don’t.

One pretty neat thing about a DynamicProperty is that SwiftUI will pick it up and make it part of the SwiftUI environment. What this means is that you have access to environment values, and that you can leverage property wrappers like @State and @ObservedObject to trigger updates from within your property wrapper.

Let’s go ahead and define a property wrapper that hold on to some state and updates the view whenever this state changes.

Triggering view updates from your dynamic property

Dynamic properties on their own can’t tell a SwiftUI view to update. However, we can use @State, @ObservedObject, @StateObject and other SwiftUI property wrappers to trigger view updates from within a custom property wrapper.

A simple example would look a little bit like this:

@propertyWrapper
struct CustomProperty: DynamicProperty {
    @State private var value = 0

    var wrappedValue: Int {
        get {
            return value
        }

        nonmutating set {
            value = newValue
        }
    }
}

This property wrapper wraps an Int value. Whenever this value receives a new value, the @State property value is mutated, which will trigger a view update. Using this property wrapper in a view looks as follows:

struct ContentView: View {
    @CustomProperty var customProperty

    var body: some View {
        Text("Count: \(customProperty)")

        Button("Increment") {
            customProperty += 1
        }
    }
}

The SwiftUI view updates the value of customProperty whenever a button is tapped. This on its own does not trigger a reevaluation of the body. The reason our view updates is because the value that represents our wrapped value is marked with @State. What’s neat about this is that if value changes for any reason, our view will update.

A property wrapper like this is not particularly useful, but we can do some pretty neat things to build abstractions around different kinds of data access. For example, you could build an abstraction around UserDefaults that provides a key path based version of AppStorage:

class SettingKeys: ObservableObject {
    @AppStorage("onboardingCompleted") var onboardingCompleted = false
    @AppStorage("promptedForProVersion") var promptedForProVersion = false
}

@propertyWrapper
struct Setting<T>: DynamicProperty {
    @StateObject private var keys = SettingKeys()
    private let key: ReferenceWritableKeyPath<SettingKeys, T>

    var wrappedValue: T {
        get {
            keys[keyPath: key]
        }

        nonmutating set {
            keys[keyPath: key] = newValue
        }
    }

    init(_ key: ReferenceWritableKeyPath<SettingKeys, T>) {
        self.key = key
    }
}

Using this property wrapper would look as follows:

struct ContentView: View {
    @Setting(\.onboardingCompleted) var didOnboard

    var body: some View {
        Text("Onboarding completed: \(didOnboard ? "Yes" : "No")")

        Button("Complete onboarding") {
            didOnboard = true
        }
    }
}

Any place in the app that uses @Setting(\.onboardingCompleted) var didOnboard will automatically update when the value for onboarding completed in user defaults updated, regardless of where / how this happened. This is exactly the same as how @AppStorage works. In fact, my custom property wrapper relies heavily on @AppStorage under the hood.

My SettingsKeys object wraps up all of the different keys I want to write to in UserDefaults, the @AppStorage property wrapper allows for easy observation and makes it so that I can define SettingsKeys as an ObservableObject without any troubles.

By implementing a custom get and set on my Setting<T>'s wrappedValue, I can easily read values from user defaults, or write a new value simply by assigning to the appropriate key path in SettingsKeys.

Simple property wrappers like these are very useful when you want to streamline some of your data access, or if you want to add some semantic meaning and ease of discovery to your property wrapper.

To see some more examples of simple property wrappers (including a user defaults one that inspired the example you just saw), take a look at this post from Dave Delong.

Using SwiftUI environment values in your property wrapper

In addition to triggering view updates via some of SwiftUI’s property wrappers, it’s also possible to access the SwiftUI environment for the view that your property wrapper is used in. This is incredibly useful when your property wrapper is more complex and has a dependency on, for example, a managed object context, a networking object, or similar objects.

Accessing the SwiftUI environment from within your property wrapper is done in exactly the same way as you do it in your views:

@propertyWrapper
struct CustomFetcher<T>: DynamicProperty {
    @Environment(\.managedObjectContext) var managedObjectContext

    // ...
}

Alternatively, you can read environment objects that were assigned through your view with the .environmentObject view modifier as follows:

@propertyWrapper
struct UsesEnvironmentObject<T: ObservableObject>: DynamicProperty {
    @EnvironmentObject var envObject: T

    // ...
}

We can use the environment to conveniently pass dependencies to our property wrappers. For example, let’s say you’re building a property wrapper that fetches data from the network. You might have an object named Networking that can perform network calls to fetch the data you need. You could inject this object into the property wrapper through the environment:

@propertyWrapper
struct FeedLoader<Feed: FeedType>: DynamicProperty {
    @Environment(\.network) var network

    var wrappedValue: [Feed.ObjectType] = []
}

The network environment key is a custom key that I’ve added to my SwiftUI environment. To learn more about adding custom values to the SwiftUI environment, take a look at this tip I posted earlier.

Now that we have this property wrapper defined, we need a way to fetch data from the network and assign it to something in order to update our wrapped value. To do this, we can implement the update method that allows us to update data that’s referenced by our property wrapper if needed.

Implementing the update method for your property wrapper

The update method that’s part of the DynamicProperty protocol allows you to respond to SwiftUI’s body evaluations. Whenever SwiftUI is about to evaluate a view’s body, it will call your dynamic property’s update method.

💡 To learn more about how and when SwiftUI evaluates your view’s body, take a look at this post where I explore body evaluation in depth.

As mentioned earlier, you won’t often have a need to implement the update method. I’ve personally found this method to be handy whenever I needed to kick off some kind of data fetching operation. For example, to fetch data from Core Data in a custom implementation of @FetchRequest, or to experiment with fetching data from a server. Let’s expand the FeedLoader property wrapper from earlier a bit to see what a data loading property wrapper might look like:

@propertyWrapper
struct FeedLoader<Feed: FeedType>: DynamicProperty {
    @Environment(\.network) var network
    @State private var feed: [Feed.ObjectType] = []
    private let feedType: Feed
    @State var isLoading = false

    var wrappedValue: [Feed.ObjectType] {
        return feed
    }

    init(feedType: Feed) {
        self.feedType = feedType
    }

    func update() {
        Task {
            if feed.isEmpty && !isLoading {
                self.isLoading = true
                self.feed = try await network.load(feedType.endpoint)
                self.isLoading = false
            }
        }
    }
}

This is a very, very simple implementation of a property wrapper that uses the update method to go to the network, load some data, and assign it to the feed property. We have to make sure that we only load data if we’re not already loading, and we also need to check whether or not the feed is currently empty to avoid loading the same data every time SwiftUI decides to re-evaluate our view’s body.

This of course begs the question, should you use a custom property wrapper to load data from the network? And the answer is, I’m not sure. I’m still heavily experimenting with the update method, its limitations, and its benefits. One thing that’s important to realize is that update is called every time SwiftUI is about to evaluate a view’s body. So synchronously assigning a new value to an @State property from within that method is probably not the best idea; Xcode even shows a runtime warning when I do this.

At this point I’m fairly sure Apple intended update to be used for updating or reading state external to the property wrapper rather than it being used to synchronously update state that’s internal to the property wrapper.

On the other hand, I’m positive that @FetchRequest makes heavy use of update to refetch data whenever its predicate or sort descriptors have changed, probably in a somewhat similar way that I’m fetching data from the network here.

Summary

Writing custom property wrappers for your SwiftUI views is a fun exercise and it’s possible to write some very convenient little helpers to improve your experience while writing SwiftUI views. The fact that your dynamic properties are connected to the SwiftUI view lifecycle and environment is super convenient because it allows you to trigger view updates, and read values from SwiftUI’s environment.

That said, documentation on some of the details surrounding DynamicProperty is severely lacking which means that we can only guess how mechanisms like update() are supposed to be leverages, and why structs work perfectly fine as dynamic properties but classes don’t.

These are some points that I hope to be able to expand on in the future, but for now, there are definitely still some mysteries for me to unravel. And this is where you come in! If you have any additions for this posts, or if you have a solid understanding of how update() was meant to be used, feel free to send me a Tweet. I’d love to hear from you.

Adding custom keys to the SwiftUI environment

Sometimes you’ll find yourself in a situation where you want to conveniently pass some object down via the SwiftUI environment. An easy way to do this is through the .environmentObject view modifier. The one downside of this view modifier and corresponding @EnvironmentObject property wrapper is that the object you add to the environment must be an observable object.

Luckily, we can extend the SwiftUI environment to add our own objects to the @Environment property wrapper without the need to make these objects observable.

For example, your app might have to do some date formatting, and maybe you’re looking for a convenient way to pass a default date formatter around to your views without explicitly passing this date formatter around all the time. The SwiftUI environment is a convenient way to achieve this.

To add our date formatter to the environment, we need to define an EnvironmentKey, and we need to add a computed property to the EnvironmentValues object. Here’s what this looks like:

private struct DateFormatterKey: EnvironmentKey {
    static let defaultValue: DateFormatter = {
        let formatter = DateFormatter()
        formatter.locale = Locale(identifier: "en_US_POSIX")
        formatter.dateFormat = "MM/dd/yyyy"
        return formatter
    }()
}

extension EnvironmentValues {
    var dateFormatter: DateFormatter {
        get { self[DateFormatterKey.self] }
        set { self[DateFormatterKey.self] = newValue }
    }
}

This code conveniently sets up a default date formatter (which is required by the EnvironmentKey protocol). I’ve also added a computed property to EnvironmentValues to make the date formatter object available in my SwiftUI views.

Using this custom environment value is done as follows:

struct LabelView: View {
    @Environment(\.dateFormatter) var dateFormatter
    @State var date: Date

    var body: some View {
        Text("date: \(dateFormatter.string(from: date))")
    }
}

Adding your own keys to the SwiftUI environment can be done for all kinds of reasons. You can use the environment for small objects like the date formatter in this example. But you can even use the environment to pass around more complex objects. For example, you could pass your networking stack around through the SwiftUI environment if this suits your needs.

Hopefully this quick tip is useful for you! I’d love to hear about the kind of things you’re using the SwiftUI environment for in your apps, so make sure to shoot me a Tweet if you’d like to tell me about your experiences.

Five things iOS developers should focus on in 2022

A new year has started and most of us are probably figuring out what we should focus on this year. Whether it’s learning new things or expanding our knowledge on topics we’ve already learned about in the past, there’s always something that deserves our attention in the world of iOS development.

In this short post I’ve listed five things that I believe will help you become a better developer in 2022. Or rather, the first half of 2022. I’m fully expecting Apple to release some cool new interesting things at this year’s WWDC that deserve some of your attention in the second half of the year.

That said, if you focus on the five things listed in this post I’m sure you’ll come out as a stronger developer by the end of the year.

Please not that this list should not be treated as the “definitive” guide to becoming a good developer in 2022. Nor is it a list of the most important topics for everybody that does iOS development.

It’s a list of topics that I believe to be important, and it’s a list of topics that will take up a lot of my time this year. If you disagree with this list, that’s absolutely okay; your priorities do not have to align with mine.

With that out of the way, let’s jump into the first topic on my list.

1. Using SwiftUI alongside UIKit (and vice versa)

One of the most polarising questions I’ve seen in 2021 is probably whether or not SwiftUI is “production ready”. In my opinion that question is way too vague because the answer depends on what an individual’s definition of production ready is within their context. What’s more important in my opinion is the fact that SwiftUI can be used in your apps just fine. Whether you want to go all-in or not, that you’re choice. There are even cases where going all-in on SwiftUI isn’t quite possible for various reasons.

The vast majority of apps I’ve seen and worked on in the past year can get really far with just plain SwiftUI but almost always there are some edges where dropping down to UIKit was needed. Alternatively, I’ve seen existing production apps that wanted to start integrating SwiftUI without rewriting everything straight away which is completely reasonable.

Luckily, we can use SwiftUI and UIKit simultaneously in our projects and I would highly encourage folks to do this. Make sure you dig and understand how to mix SwiftUI into a UIKit app, or how you can fall back to UIKit in a SwiftUI app if you find that you’re running into limitations with purely using SwiftUI.

Knowing how to do this will allow you to adopt SwiftUI features where possible, and speed up your development process because writing UI with SwiftUI is so much faster than UIKit (when it suits your needs). On top of that, it will take a while for companies to have all their apps written exclusively in SwiftUI so knowing how to gradually introduce it is a really valuable skill to have as an employee or even as someone who’s looking for their next (or their first) job.

2. App Architecture

No, I don’t mean “learn VIPER” or “learn all the architectures”. In fact, I’m not saying you should learn any app architecture in particular.

In my opinion it’s far more valuable to understand the principles that virtually every architecture is built upon; separation of concerns. Knowing how and when to split your app’s functionality into different components, and knowing how these components should be structured is extremely important when you want to write code that’s easy to reason about, easy to refactor, and easy to test.

Try and learn about topics such as single responsibility principle, dependency injection, abstractions, protocols, generics, and more. Once you’ve learned about these topics, you’ll find a lot of the architectural patterns out there are just different applications of the same principles. In other words, lots of architectures provide a framework for you and your team to reason about different layers in your codebase rather that a completely unique way of working.

A less obvious reason to learn more about app architecture is that it will help you write code that can work in a SwiftUI world as well as a UIKit world which is extremely useful given what I explained in the first point on this list. The ability to architect a codebase that works with both SwiftUI and UIKit is extremely useful and will definitely help you enjoy the experience of mixing UI frameworks more.

3. Async-Await

If there’s one topic that I just couldn’t leave off this list it’s async-await. Or rather, Swift’s new concurrency model. With the introduction of async-await Apple didn’t just introduce some syntactic sugar (like how async-await is essentially sugar over promises in JavaScript). Apple introduce a whole new modern concurrency system that we can leverage in our apps.

Topics like structured concurrency, actors, task groups, and more are extremely useful to learn about this year. Especially because Apple’s managed to backport Swift Concurrency all the way to iOS 13. Make sure you’re using Xcode 13.2 or newer if you want to use Swift Concurrency in apps that target iOS 13.0 and up, and you should be good to go.

If you want to learn more about Swift Concurrency, I have a couple posts available on my blog already. Click here to go to the Swift Concurrency category.

4. Core Data

Yes. It’s a pretty old framework and its Objective-C roots are not very well hidden. Regardless, Apple’s clearly still interested in having people use and adopt Core Data given the fact that they’ve added new features for Core Data + SwiftUI in iOS 15, and previous iOS versions received various Core Data updates too.

Will Apple replace Core Data with a more Swift-friendly alternative soon? I honestly don’t know. I don’t think it’s likely that Apple will do a complete replacement any time soon. It seems more likely for Apple to keep Core Data’s core bits and provide us a more Swift-friendly API on top of this. That way the transition from the current API to a newer API can be done step by step, and our apps won’t have to go through some major migration if we want to leverage the latest and greatest. Pretty similar to how Apple is introducing SwiftUI.

Is Core Data the absolute best way to persist data in all cases? Probably not. Is it extremely difficult to implement and way too heavy for most apps? No, not at all. Core Data really isn’t that scary, and it integrates with SwiftUI really nicely. Check out this video I did on using Core Data in a SwiftUI application for example:

If you want to learn more about Core Data this year, I highly recommend you pick up my Practical Core Data book. It teaches you everything you need to know to make use of Core Data effectively in both SwiftUI and UIKit applications.

5. Accessibility

Last but by no means least on my list is a topic that I myself should learn more about. Accessibility is often considered optional, a “feature”, or something you do last in your development process. Or honestly, it’s not even rare for accessibility to not be considered on a roadmap at all.

When you think of accessibility like that, there’s a good chance your app isn’t accessible at all because you never ended up doing the work. I’m not entirely sure where I’ve heard this first but if you’re not sure whether your app is accessible or not, it isn’t.

Accessibility is something we should actively keep an eye on to make sure everybody can use our apps. Apple’s tools for implementing and testing accessibility are really good, and I have to admit I know far too little about them. So for 2022, accessibility is absolutely on my list of things to focus on.

Forcing an app out of memory on iOS

I’ve recently been working on a background uploading feature for an app. One of the key aspects to get right with a feature like that is to correctly handle scenarios where your app is suspended by the system due to RAM constraints or other, similar, reasons. Testing this is easily done by clearing the RAM memory on your device. Unfortunately, this isn’t straightforward. But it’s also not impossible.

Note that opening the task switcher and force closing your app from there is not quite the same as forcing your app to be suspended. Or rather, it’s not the same as forcing your app out of memory.

Luckily, there’s somewhat of a hidden trick to clear your iOS device’s RAM memory, resulting in your app getting suspended just like it would if the device ran out of memory due to something your user is doing.

To force-clear your iOS device’s RAM memory, go through the following steps:

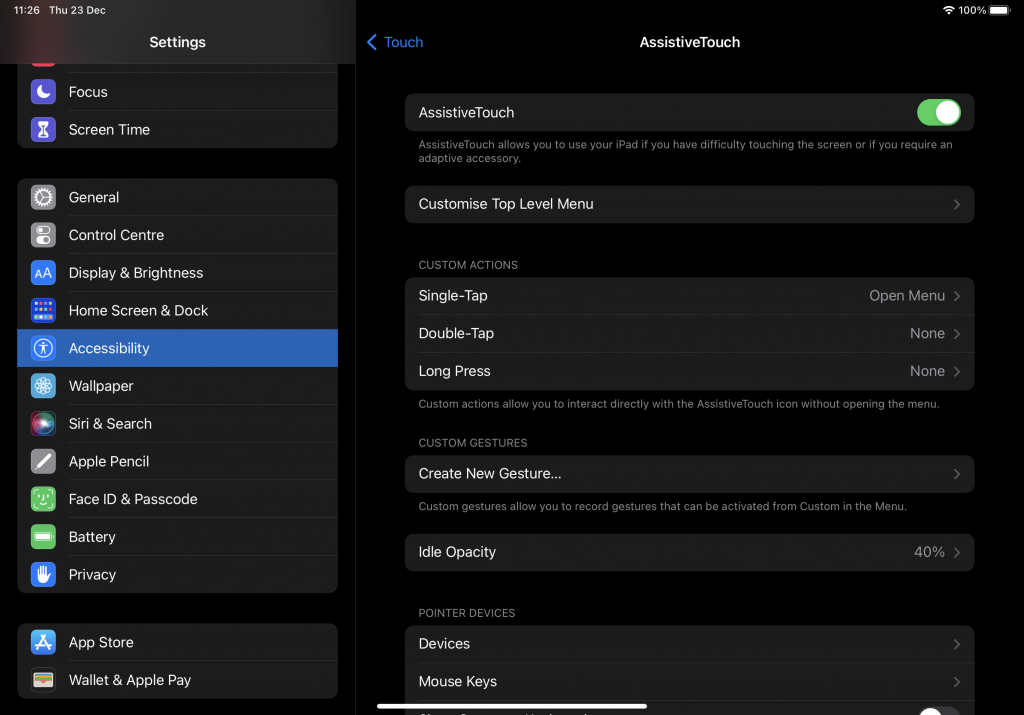
  1. If you’re using a device without a home button, enable Assistive Touch. If your device has a home button you can skip this step. You can enable Assistive Touch by going to Settings → Accessibility → Touch → Enable Assistive Touch. This will make a floating software button appear on your device that can be tapped to access several shortcuts, a virtual home button is one of these shortcuts.

Settings window for accessibility -> touch -> assistive touch

  1. In a (somewhat) fluid sequence press volume up, volume down, and then hold your device’s power button until a screen appears that allows you to power down your device.
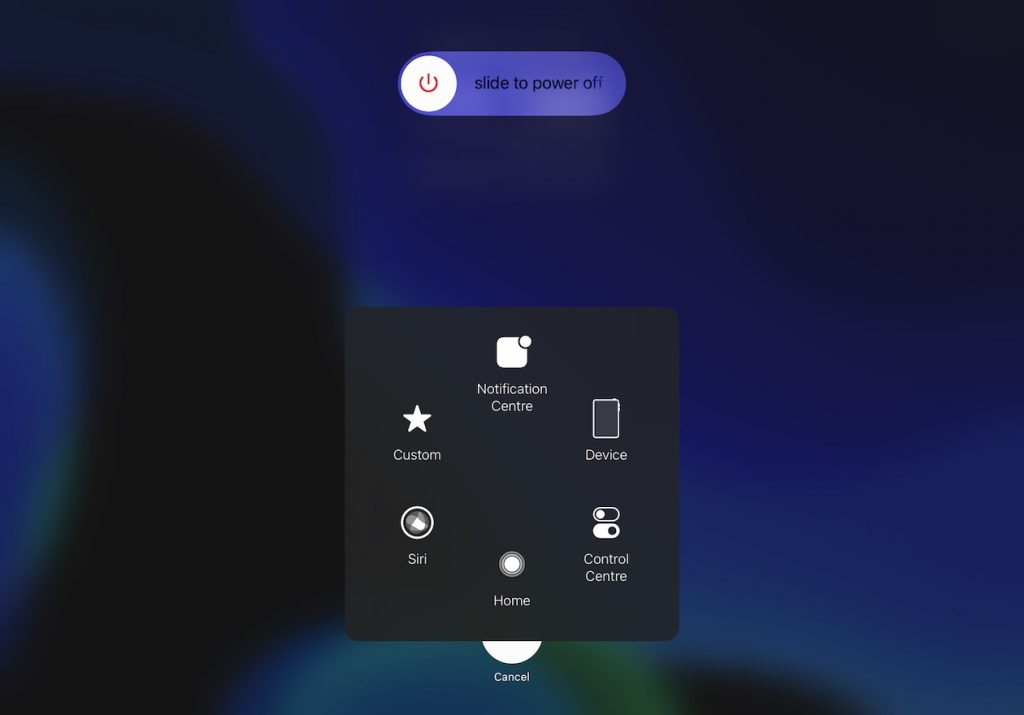
  2. Once that screen appears, tap the assistive touch button and then press and hold the virtual home button until you’re prompted to unlock your device. You’ve successfully wiped your device’s RAM memory.

Shut down screen with assistive touch actions visible

Being able to simulate situations where your app goes out of memory is incredibly useful when you’re working on features that rely on your app being resumed in the background even when it’s out of memory. Background uploads and downloads are just some examples of when this trick is useful.

My favorite part of using this approach to debug my apps going out of memory is that I can do it completely detached from Xcode, and I can even ask other people like a Q&A department to test with this method to ensure everything works as expected.

An app that's forced out of ram is not considered closed because it's still present in the app switcher, and any background processes continue to run. during normal device usage, apps will be forced out of ram whenever ann app that the user is using needs more ram, of if a user hasn't opened your app in a while. When the user launches your app the app will still boot as a fresh launch with the main difference being that the app might have done work in the background.

When an app is force closed from the app switcher, iOS does not allow this app to continue work in the background, so any in progress uploads or other tasks are considered cancelled.

Understanding how and when SwiftUI decides to redraw views

There's a good chance that you're using SwiftUI and that you're not quite sure how and when SwiftUI determines which views should redraw. And arguably, that's a good thing. SwiftUI is clearly smart enough to make decent decisions without any negative consequences. In fact, you might even have set up your app in a way that coincidentally plays into SwiftUI's strength beautifully. There's an equal likelihood that your setup isn't as performant as you might think but you're just not seeing any issues yet.

Recently, I had to figure out how SwiftUI determines that it should redraw views in order to fix some performance issues. One issue was that for some reason SwiftUI decided that it needed access the bodies of a lot of views that never changed which led to some dropped frames while scrolling. Another issue that I investigated is one where scrolling performance suffered greatly when just one or two items in a list were updated.

The details and specifics of these issues aren't that interesting. What's more interesting in my opinion is what I learned about how and when SwiftUI determines to redraw views because some of the things I've noticed were quite surprising to me while others felt very natural and confirmed some thoughts I've had regarding SwiftUI for a while.

Please keep in mind that I don't have insight into SwiftUI's internals, the information I've gathered in this post is based on observations and measurements and there are no guarantees that they'll remain accurate in the future. In general you shouldn't rely on undocumented internals, even if you have lots of proof to back up your reasoning. That said, the measurements in this post were done to solve real problems, and I think the conclusions that can be drawn from these measurements explain sensible best-practices without relying on the internals of SwiftUI too much.

With that out of the way, let's dive right in!

Understanding the example we'll work from

The most important thing to understand while we're exploring SwiftUI is the example that I'm using to work from. Luckily, this example is relatively simple. If you want to check out the source code that I've used to gather measurements during my exploration, you can grab it from GitHub.

The sample I've been working from is based on a list of items. There's functionality to set a list item to "active". Doing this will mark the currently active item (if one exists) as not active, and the next item in the list becomes active. I can either do this by hand, or I can do it on a timer. The models used to populate my cells also have a random UUID that's not shown in the cell. However, when changing the active cell there's an option in the app to update the random UUID on every model in the my data source.

I'll show you the important parts of my model and data source code first. After that I'll show you the view code I'm working from, and then we can get busy with taking some measurements.

Understanding the sample's data model

My sample app uses an MVVM-like strategy where cells in my list receive a model object that they display. The list itself uses a view model that maintains some state surrounding which item is active, and whether a list of items is loaded already.

Let's look at the model that's shown in my cells first:

struct Item: Identifiable {
    var isActive: Bool
    let id = UUID()
    var nonVisibleProperty = UUID()

    init(id: UUID = UUID(), isActive: Bool = false, nonVisibleProperty: UUID = UUID()) {
        self.isActive = isActive
    }
}

It's pretty simple and what's important for you to note is that my model is a struct. This means that changing the nonVisibleProperty or isActive state does not trigger a view redraw. The reason for this is that there's a view model that holds all of the items I want to show. The view model is an observable object and whenever one of its items changes, it will update its @Published list of items.

I won't put the full view model code in this post, you can view it right here on GitHub if you're interested to see the entire setup.

The list of items is defined as follows:

@Published var state: State = .loading

By using a State enum it's possible to easily show appropriate UI that corresponds to the state of the view model. For simplicity I only have two states in my State enum:

enum State {
    case loading
    case loaded([Item])
}

Probably the most interesting part of the view model I defined is how I'm toggling my model's isActive property. Here's what my implementation looks like for the method that activates the next item in my list:

func activateNextItem() {
    guard case .loaded(let items) = state else {
        return
    }

    var itemsCopy = items

    defer {
        if isMutatingHiddenProperty {
            itemsCopy = itemsCopy.map { item in
                var copy = item
                copy.nonVisibleProperty = UUID()
                return copy
            }
        }

        self.state = .loaded(itemsCopy)
    }

    guard let oldIndex = activeIndex, oldIndex + 1 < items.endIndex else {
        activeIndex = 0
        setActiveStateForItem(at: activeIndex!, to: true, in: &itemsCopy)
        return
    }

    activeIndex = oldIndex + 1

    setActiveStateForItem(at: oldIndex, to: false, in: &itemsCopy)
    setActiveStateForItem(at: activeIndex!, to: true, in: &itemsCopy)
}

I'm using a defer to assign a copy of my list of items to self.state regardless of whether my guard requirement is satisfied or not.

If this method looks suboptimal to you, that's ok. The point of this exercise was never to write optimal code. The point is to write code that allows us to observe and analyze SwiftUI's behavior when it comes to determining to which views get redrawn and when.

Before we start taking some measurements, I want to show you what my views look like.

Understanding the sample's views

The sample views are quite simple so I won't explain them in detail. My cell view looks as follows:

struct StateDrivenCell: View {
    let item: Item

    var body: some View {
        VStack(alignment: .leading, spacing: 8) {
            HStack {
                VStack(alignment: .leading) {
                    Text("identifier:").bold()
                    Text(item.id.uuidString.split(separator: "-").first!)
                }
                Spacer()
            }

            HStack {
                VStack(alignment: .leading) {
                    Text("active state:").bold()
                    Text("is active: \(item.isActive  ? "✅ yes": "❌ no")")
                }
                Spacer()
            }

        }.padding()
    }
}

All this cell does is display its model. Nothing more, nothing less.

The list view looks as follows:

struct StateDrivenView: View {
    @StateObject var state = DataSource()

    var body: some View {
        NavigationView {
            ScrollView {
                if case .loaded(let items) = state.state {
                    LazyVStack {
                        ForEach(items) { item in
                            StateDrivenCell(item: item)
                        }
                    }
                } else {
                    ProgressView()
                }
            }
            .toolbar {
                // some buttons to activate next item, start timer, etc.
            }
            .navigationTitle(Text("State driven"))
        }
        .onAppear {
            state.loadItems()
        }
    }
}

Overall, this view shouldn't surprise you too much.

When looking at this, you might expect things to be suboptimal and you would maybe set this example up in a different way. That's okay because again, the point of this code is not to be optimal. In fact, as our measurements will soon prove, we can write much better code with minimal changes. Instead, the point is to observe and analyze how SwiftUI determines what it should redraw.

To do that, we'll make extensive use of Instruments.

Using Instruments to understand SwiftUI's redraw behavior

When we run our app, everything looks fine at first glance. When we set the application up to automatically update the active item status every second, we don't see any issues. Even when we set the application up to automatically mutate our non-visible property everything seems completely fine.

At this point, it's a good idea to run the application with the SwiftUI Instruments template to see if everything looks exactly as we expect.

In particular, we're looking for body access where we don't expect it.

If everything works correctly, we only want the view bodies for cells that have different data to be accessed. More specifically, ideally we don't redraw any views that won't end up looking any different if they would be redrawn.

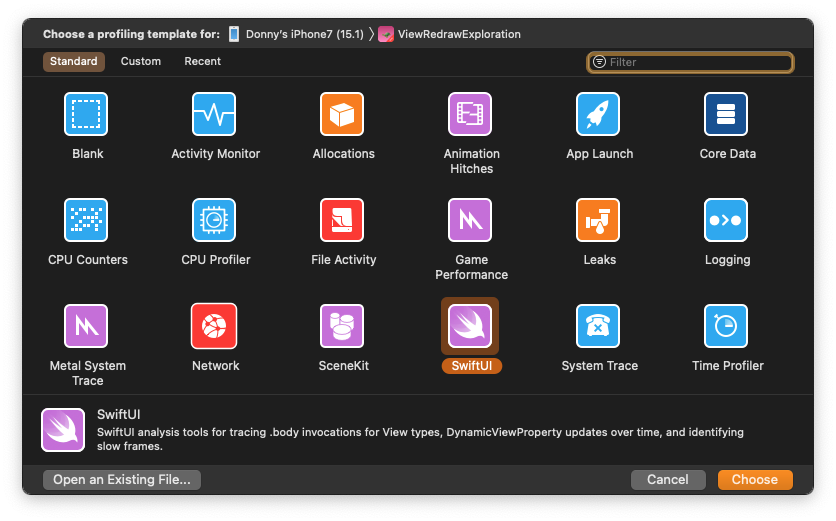
Whenever you build your app for profiling in Xcode, Instruments will automatically open. If you're running your own SwiftUI related profiling, you'll want to select the SwiftUI template from Instruments' templates.

Instruments' template selection screen

Once you've opened the SwiftUI template, you can run your application and perform the interactions that you want to profile. In my case, I set my sample app up to automatically update the active item every second, and every time this happens I change some non-visible properties to see if cells are redrawn even if their output looks the same.

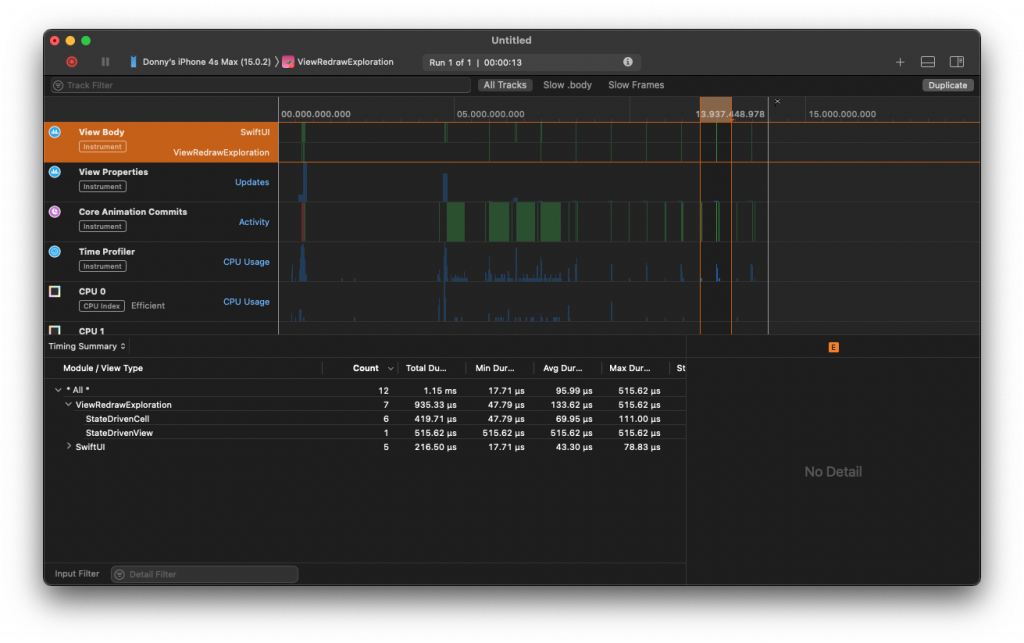
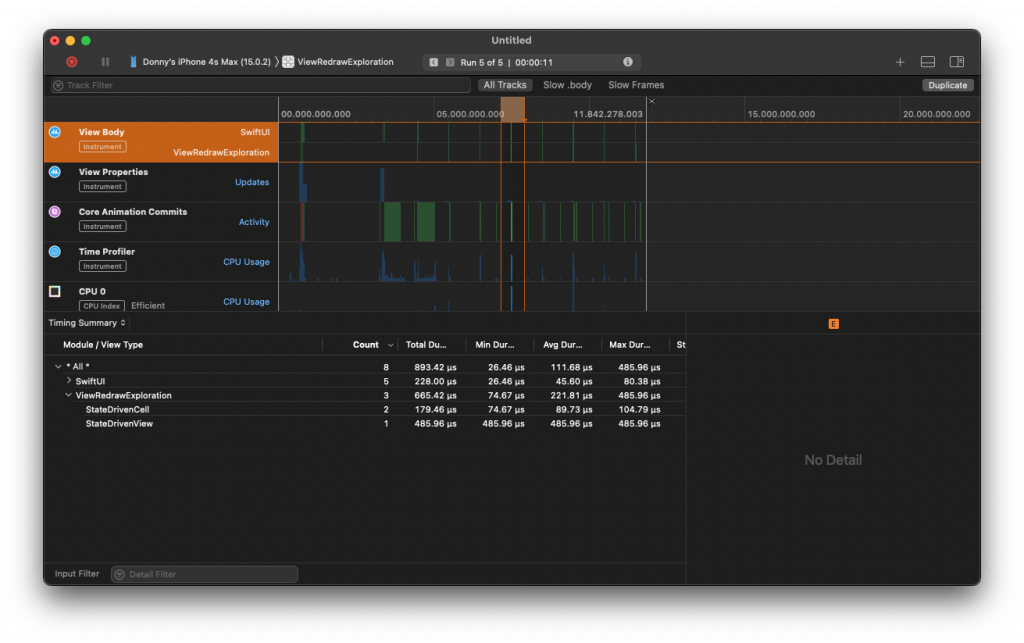
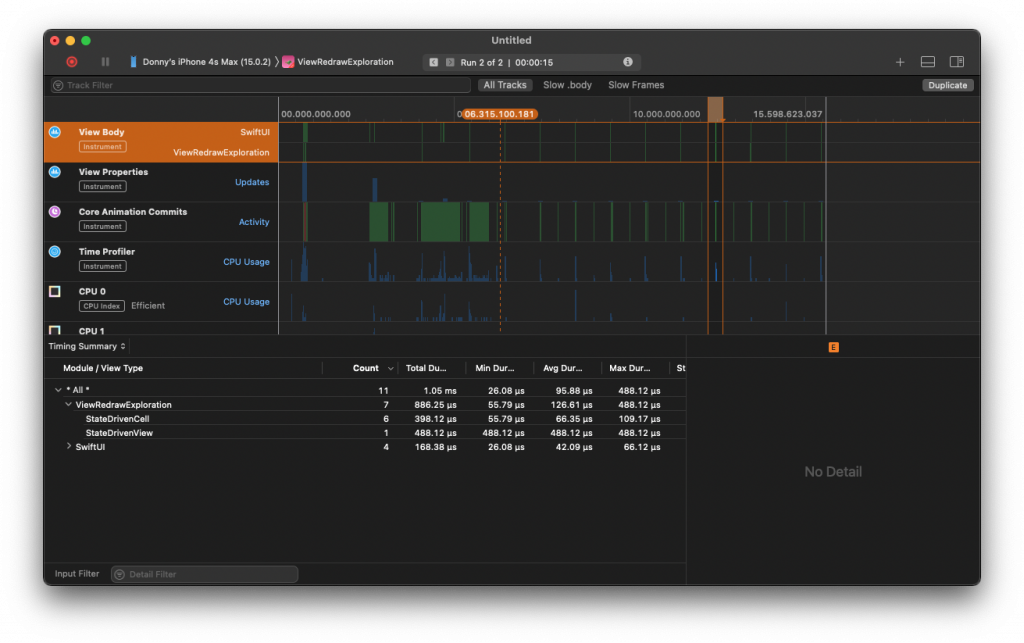
When I run the app with this configuration, here's what a single timer tick looks like in Instruments when I focus on the View Body timeline:

A screenshot of Instruments that shows 6 cells get re-evaluated

In this image, you can see that the view body for StateDrivenCell was invoked six times. In other words, six cells got their bodies evaluated so they could be redrawn on the screen. This number is roughly equal to the number of cells on screen (my device fits five cells) so to some extent this makes sense.

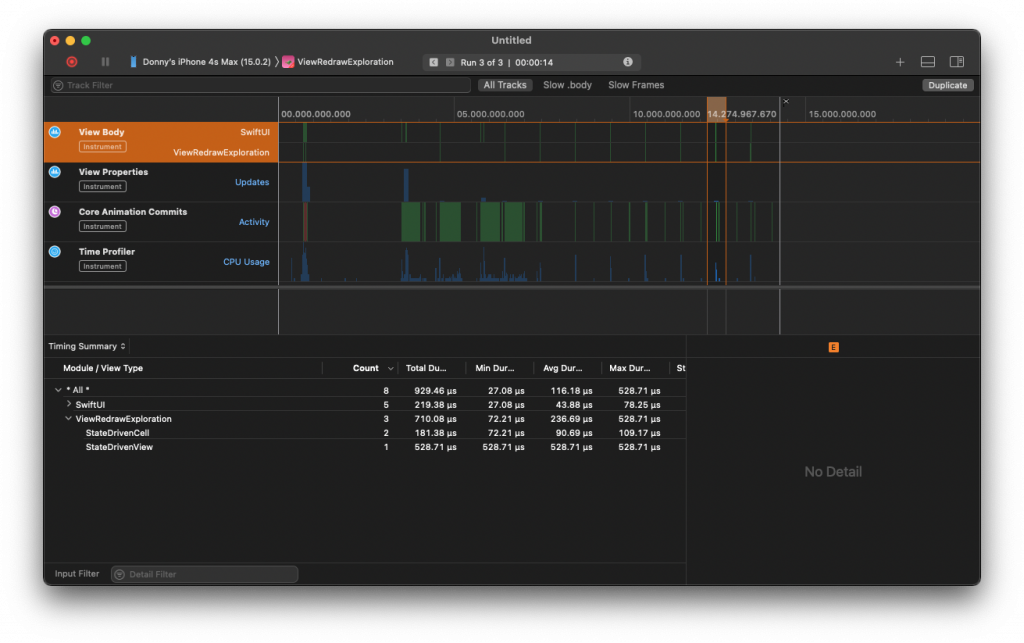
On the other hand, we know that out of these six cells only two actually updated. One would have its isActive state flipped from true to false and the other would have its isActive state flipped from false to true. The other property that we updated is not shown and doesn't influence the cell's body in any way. If I run the same experiment except I don't update the non-visible property every time, the result is that only two cell bodies get re-evaluated.

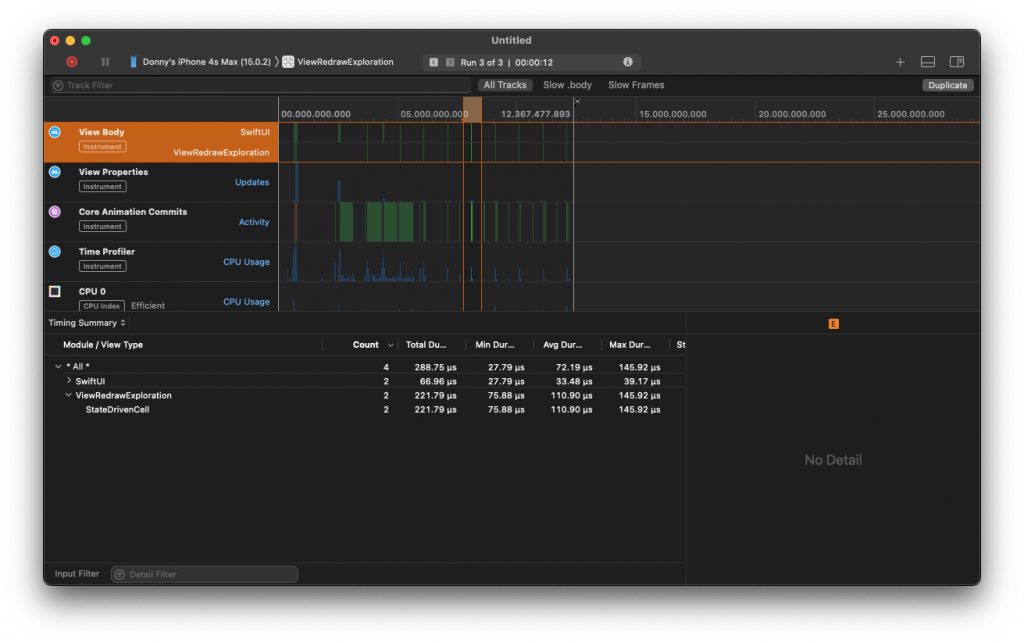
Instruments screenshot that shows 2 cells get re-evaluated when we don't change a non-visible property

We can see that apparently SwiftUI is smart enough to somehow compare our models even though they're not Equatable. In an ideal world, we would write our app in a way that would ensure only the two cell bodies that show the models that changed in a meaningful way are evaluated.

Before we dig into that, take a good look at what's shown in Instruments. It shows that StateDrivenView also has its body evaluated.

The reason this happens is that the StateDrivenView holds a @StateObject as the source of truth for the entire list. Whenever we change one of the @StateObject's published properties, the StateDrivenView's body will be evaluated because its source of truth changed.

Note that body evalulation is not guaranteed to trigger an actual redraw on the screen. We're seeing Core Animation commits in the Instruments anlysis so it's pretty safe to assume something got redrawn, but it's hard to determine what exactly. What's certain though is that if SwiftUI evaluates the body of a view, there's a good chance this leads to a redraw of the accessed view itself, or that one of its child views needs to be redrawn. It's also good to mention that a body evaluation does not immediately lead to a redraw. In other words, if a view's body is evaulated multiple times during a single render loop, the view is only redrawn once. As a mental model, you can think of SwiftUI collecting views that need to be redrawn during each render loop, and then only redrawing everything that needs to be redrawn once rather than commiting a redraw for every change (this would be wildly inefficient as you can imagine). This model isn't 100% accurate, but in my opinion it's good enough for the context of this blog post.

Because we're using a LazyVStack in the view, not all cells are instantiated immediately which means that the StateDrivenView will initially only create about six cells. Each of these six cells gets created when the StateDrivenView's body is re-evaluated and all of their bodies get re-evaluated too.

You might think that this is just the way SwiftUI works, but we can actually observe some interesting behavior if we make some minor changes to our model. By making our model Equatable, we can give some hints to SwiftUI about whether or not the underlying data for our cell got changed. This will in turn influence whether the cell's body is evaluated or not.

This is also where things get a little... strange. For now, let's pretend everything is completely normal and add an Equatable conformance to our model to see what happens.

Here's what my conformance looks like:

struct Item: Identifiable, Equatable {
    var isActive: Bool
    let id = UUID()
    var nonVisibleProperty = UUID()

    init(id: UUID = UUID(), isActive: Bool = false, nonVisibleProperty: UUID = UUID()) {
        self.isActive = isActive
    }

    static func == (lhs: Item, rhs: Item) -> Bool {
        return lhs.id == rhs.id && lhs.isActive == rhs.isActive
    }
}

The parameters for my test are the exact same. Every second, a new item is made active, the previously active item is made inactive. The nonVisibleProperty for every item in my list is mutated.

My Equatable conformance ignores the nonVisibleProperty and only compares the id and the isActive property. Based on this, what I want to happen is that only the bodies of the cells who's item's isActive state changed is evaluated.

Unfortunately, my Instruments output at this point still looks the same.

A screenshot of Instruments that shows 6 cells get re-evaluated

While I was putting together the sample app for this post, this outcome had me stumped. I literally had a project open alongside this project where I could reliably fix this body evaluation by making my model Equatable. After spending a lot of time trying to figure out what was causing this, I added a random String to my model, making it look like this:

struct Item: Identifiable, Equatable {
    var isActive: Bool
    let id = UUID()
    var nonVisibleProperty = UUID()
    let someString: String

    init(id: UUID = UUID(), isActive: Bool = false, nonVisibleProperty: UUID = UUID()) {
        self.isActive = isActive
        self.someString = nonVisibleProperty.uuidString
    }

    static func == (lhs: Item, rhs: Item) -> Bool {
        return lhs.id == rhs.id && lhs.isActive == rhs.isActive
    }
}

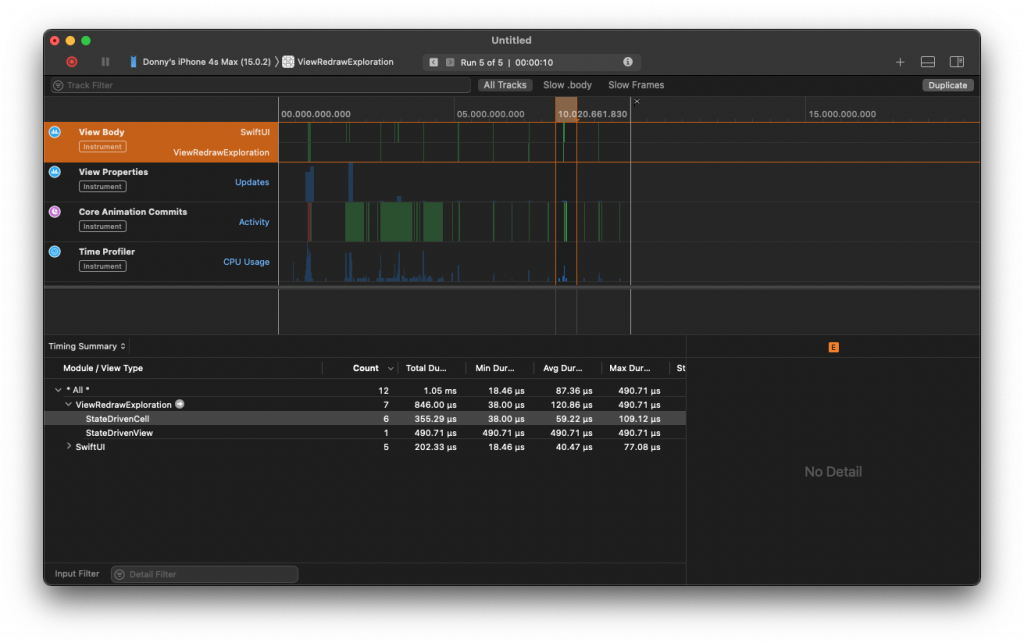
After updating the app with this random String added to my model, I'm suddenly seeing the output I was looking for. The View body timeline now shows that only two StateDrivenCell bodies get evaluated every time my experiment runs.

A screenshot of Instruments that shows 2 cells get re-evaluated with our updates in place

It appears that SwiftUI determines whether a struct is a plain data type, or a more complex one by running the built-in _isPOD function that's used to determin whether a struct is a "plain old data" type. If it is, SwiftUI will use reflection to directly compare fields on the struct. If we're not dealing with a plain old data type, the custom == function is used. Adding a String property to our struct changes it from being a plain old data type to a complex type which means SwiftUI will use our custom == implementation.

To learn more about this, take a look at this post by the SwiftUI Lab.

After I realized that I can make my models conform to Equatable and that influences whether my view's body is evaluated or not, I was wondering what leads SwiftUI to compare my model struct in the first place. After all, my cell is defined is follows:

struct StateDrivenCell: View {
    let item: Item

    var body: some View {
        VStack(alignment: .leading, spacing: 8) {
            // cell contents
        }.padding()
    }
}

The item property is not observed. It's a simple stored property on my view. And according to Instruments my view's body isn't evaluated. So it's not like SwiftUI is comparing the entire view. More interestingly, it was able to do some kind of comparison before I made my model Equatable.

The only conclusion that I can draw here is that SwiftUI will compare your models regardless of their Equatable conformance in order to determine whether a view needs to have its body re-evaluated. And in some cases, your Equatable conformance might be ignored.

At this point I was curious. Does SwiftUI evaluate everything on my struct that's not my body? Or does it evaluate stored properties only? To find out, I added the following computed property to my view:

var randomInt: Int { Int.random(in: 0..<Int.max) }

Every time this is accessed, it will return a new random value. If SwiftUI takes this property into account when it determines whether or not StateDrivenCell's body needs to be re-evaluated, that means that this would negate my Equatable conformance.

After profiling this change with Instruments, I noticed that this did not impact my body access. The body for only two cells got evaluated every second.

Then I redefined randomInt as follows:

let randomInt = Int.random(in: 0..<Int.max)

Now, every time an instance of my struct is created, randomInt will get a constant value. When I ran my app again, I noticed that I was right back where I started. Six body evaluations for every time my experiment runs.

A screenshot of Instruments that shows 6 cells get re-evaluated

This led me to conclude that SwiftUI will always attempt to compare all of its stored properties regardless of whether they're Equatable. If you provide an Equatable conformance on one of the view's stored properties this implementation will be used if SwiftUI considers it relevant for your model. It's not quite clear when using your model's Equatable implementation is or is not relevant according to SwiftUI.

An interesting side-note here is that it's also possible to make your view itself conform to Equatable and compare relevant model properties in there if the model itself isn't Equatable:

extension StateDrivenCell: Equatable {
    static func ==(lhs: StateDrivenCell, rhs: StateDrivenCell) -> Bool {
        return lhs.item.id == rhs.item.id && lhs.item.isActive == rhs.item.isActive
    }
}

What's interesting is that this conformance is pretty much ignored under the same circumstances as before. If Item does not have this extra string that I added, there are six cell bodies accessed every second. Adding the string back makes this work properly regardless of whether the Item itself is Equatable.

I told you things would get weird here, didn't I...

Overall, I feel like the simple model I had is probably way too simple which might lead SwiftUI to get more eager with its body access. The situation where an Equatable conformance to a model would lead to SwiftUI no longer re-evaluating a cell's body if the model is considered equal seems more likely in the real world than the situation where it doesn't.

In fact, I have tinkered with this in a real app, a sample experiment, and a dedicated sample app for this post and only in the dedicated app did I see this problem.

Takeaways on SwiftUI redrawing based on Instruments analysis

What we've seen so far is that SwiftUI will evaluate a view's body if it thinks that this view's underlying data will change its visual representation (or that of one the view's subviews). It will do so by comparing all stored properties before evaluating the body, regardless of whether these stored properties are Equatable.

If your stored properties are Equatable, SwiftUI might decide to rely on your Equatable conformance to determine whether or not your model changed. If SwiftUI determines that all stored properties are still equal, your view's body is not evaluated. If one of the properties changed, the body is evaluated and each of the views returned from your view's body is evaluated in the same way that I just described.

Conforming your view to Equatable works in the same way except you get to decide which properties participate in the comparison. This means that you could take computed properties into account, or you could ignore some of your view's stored properties.

Note that this only applies to view updates that weren't triggered by a view's @ObservedObject, @StateObject, @State, @Binding, and similar properties. Changes in these properties will immediately cause your view's body to be evaluated.

Designing your app to play into SwiftUI's behavior

Now that we know about some of SwiftUI's behavior, we can think about how our app can play into this behavior. One thing I've purposefully ignored up until now is that the body for our StateDrivenView got evaluated every second.

The reason this happens is that we assign to the DataSource's state property every second and this property is marked with @Published.

Technically, our data source didn't really change. It's just one of the properties on one of the models that we're showing in the list that got changed. It'd be far nicer if we could scope our view updates entirely to the cells holding onto the changed models.

Not only would this get rid of the StateDrivenView's body being evaluated every second, it would allow us to get rid of the entire Equatable conformance that we added in the previous section.

To achieve this, we can keep the @Published property on DataSource. It doesn't need to be changed. What needs to be updated is the definition of Item, and the way we toggle the active item.

First, let's make Item a class and mark it as an ObservableObject. We'll also mark its isActive property as @Published:

class Item: Identifiable, ObservableObject {
    @Published var isActive: Bool
    let id = UUID()
    var nonVisibleProperty = UUID()

    init(id: UUID = UUID(), isActive: Bool = false, nonVisibleProperty: UUID = UUID()) {
        self.isActive = isActive
    }
}

Note that I got rid of someString since its only purpose was to make the Equatable workaround work.

The view needs to be updated to use Item as an observed object:

struct StateDrivenView: View {
    @ObservedObject var item: Item

    var body: some View {
        VStack(alignment: .leading, spacing: 8) {
            HStack {
                VStack(alignment: .leading) {
                    Text("identifier:").bold()
                    Text(item.id.uuidString.split(separator: "-").first!)
                }
                Spacer()
            }

            HStack {
                VStack(alignment: .leading) {
                    Text("active state:").bold()
                    Text("is active: \(item.isActive ? "✅ yes": "❌ no")")
                }
                Spacer()
            }

        }.padding()
    }
}

Now that Item can be observed by our view, we need to change the implementation of activateNextItem() in the DataSource:

func activateNextItem() {
    guard case .loaded(let items) = state else {
        return
    }

    defer {
        if isMutatingHiddenProperty {
            for item in items {
                item.nonVisibleProperty = UUID()
            }
        }
    }

    guard let oldIndex = activeIndex, oldIndex + 1 < items.endIndex else {
        activeIndex = 0
        items[activeIndex!].isActive = true
        return
    }

    activeIndex = oldIndex + 1

    items[oldIndex].isActive = false
    items[activeIndex!].isActive = true
}

Instead of updating the state property on DataSource every time this method is called, I just mutate the items I want to mutate directly.

Running the sample app with Instruments again yields the following result:

A screenshot of Instruments that shows 2 cells get re-evaluated and the list itself is not evaluated

As you can see, only two cell bodies get evaluated now. That's the cell that's no longer active, and the newly activated cell. The StateDrivenView itself is no longer evaluated every second.

I'm sure you can imagine that this is the desired situation to be in. We don't want to re-evaluate and redraw our entire list when all we really want to do is re-evaluate one or two cells.

The lesson to draw from this optimization section is that you should always aim to make your data source scope as small as possible. Triggering view updates from way up high in your view hierarchy to update something that's all that way at the bottom is not very efficient because all of the bodies of views in between will need to be evaluated and redrawn in the process.

Conclusions

In this post you learned a lot about how and when SwiftUI decides to redraw your views. You learned that if the model for a view contains properties that changed, SwiftUI will re-evaluate the view's body. This is true even if the changed properties aren't used in your view. More interestingly, you saw that SwiftUI can compare your models even if they're not Equatable.

Next, I showed you that adding Equatable conformance to your model can influence how SwiftUI decides whether or not your view's body needs to be re-evaluated. There's one caveat though. Your Equatable conformance won't influence SwiftUI's re-evaluation behavior depending on whether your model object is a "plain old data" object or not.

After that, you saw that your view will automatically take all of its stored properties into account when it decides whether or not your view's body needs re-evaluation. Computed properties are ignored. You also saw that instead of conforming your model to Equatable, you can conform your views to Equatable and as far as I can tell, the same caveat mentioned earlier applies.

Lastly, you saw that in order to keep tight control over your views and when they get redrawn, it's best to keep your data sources small and focussed. Instead of having a global state that contains a lot of structs, it might be better have your models as ObservableObjects that can be observed at a more granular level. This can, for example, prevent your lists body from being evaluated and works around the extra redraws that were covered in the first half of this post entirely.

I'd like to stress one last time that it's not guaranteed that SwiftUI will continue working the way it does, and this post is an exercise in trying to unravel some of SwiftUI's mysteries like, for example, how SwiftUI's diffing works. Investigating all of this was a lot of fun and if you have any additions, corrections, or suggestions for this post I'd love to add them, please send them to me on Twitter.

Understanding Swift’s AsyncSequence

The biggest features in Swift 5.5 all revolve around its new and improved concurrency features. There's actors, async/await, and more. With these features folks are wondering whether async/await will replace Combine eventually.

While I overall do not think that async/await can or will replace Combine on its own, Swift 5.5 comes with some concurrency features that provide very similar functionality to Combine.

If you're curious about my thoughts on Combine and async/await specifically, I still believe that what I wrote about this topic earlier is true. Async/await will be a great tool for work that have a clearly defined start and end with a single output while Combine is more useful for observing state and responding to this state.

In this post, I would like to take a look at a Swift Concurrency feature that provides a very Combine-like functionality because it allows us to asynchronously receive and use values. We'll take a look at how an async sequence is used, and when you might want to choose an async sequence over Combine (and vice versa).

Using an AsyncSequence

The best way to explain how Swift's AsyncSequence works is to show you how it can be used. Luckily, Apple has added a very useful extension to URL that allows us to asynchronously read lines from a URL. This can be incredibly useful when your server might stream data as it becomes available instead of waiting for all data to be ready before it begins sending an HTTP body. Alternatively, your server's response format might allow you to begin parsing and decoding its body line by line. An example of this would be a server that returns a csv file where every line in the file represents a row in the returned dataset.

Iterating over an async sequence like the one provided by URL looks as folllows:

let url = URL(string: "https://www.donnywals.com")!
for try await line in url.lines {
    print(line)
}

This code only works when you're in an asynchronous context, this is no different from any other asynchronous code. The main difference is in how the execution of the code above works.

A simple network call with async/await would look as follows:

let (data, response) = try await URLSession.shared.data(from: url)

The main difference here is that URLSession.shared.data(from:) only returns a single result. This means that the url is loaded asynchronously, and you get the entire response and the HTTP body back at once.

When you iterate over an AsyncSequence like the one provided through URL's lines property, you are potentially awaiting many things. In this case, you await each line that's returned by the server.

In other words, the for loop executes each time a new line, or a new item becomes available.

The example of loading a URL line-by-line is not something you'll encounter often in your own code. However, it could be a useful tool if your server's responses are formatted in a way that would allow you to parse the response one line at a time.

A cool feature of AsyncSequence is that it behaves a lot like a regular Sequence in terms of what you can do with it. For example, you can transform your the items in an AsyncSequence using a map:

let url = URL(string: "https://www.donnywals.com")!
let sequence = url.lines.map { string in
    return string.count
}

for try await line in sequence {
    print(line)
}

Even though this example is very simple and naive, it shows how you can map over an AsyncSequence.

Note that AsyncSequence is not similar to TaskGroup. A TaskGroup runs multiple tasks that each produce a single result. An AsyncSequence on the other hand is more useful to wrap a single task that produces multiple results.

However, if you're familiar with TaskGroup, you'll know that you can obtain the results of the tasks in a group by looping over it. In an earlier post I wrote about TaskGroup, I showed the following example:

func fetchFavorites(user: User) async -> [Movie] {
    // fetch Ids for favorites from a remote source
    let ids = await getFavoriteIds(for: user)

    // load all favorites concurrently
    return await withTaskGroup(of: Movie.self) { group in
        var movies = [Movie]()
        movies.reserveCapacity(ids.count)

        // adding tasks to the group and fetching movies
        for id in ids {
            group.addTask {
                return await self.getMovie(withId: id)
            }
        }

        // grab movies as their tasks complete, and append them to the `movies` array
        for await movie in group {
            movies.append(movie)
        }

        return movies
    }
}

Note how the last couple of likes await each movie in the group. That's because TaskGroup itself conforms to AsyncSequence. This means that we can iterate over the group to obtain results from the group as they become available.

In my post on TaskGroup, I explain how a task that can throw an error can cause all tasks in the group to be cancelled if the error is thrown out of the task group. This means that you can still catch and handle errors inside of your task group to prevent your group from failing. When you're working with AsyncSequence, this is slightly different.

AsyncSequence and errors

Whenever an AsyncSequence throws an error, your for loop will stop iterating and you'll receive no further values. Wrapping the entire loop in a do {} catch {} block doesn't work; that would just prevent the enclosing task from rethrowing the error, but the loop still stops.

This is part of the contract of how AsyncSequence works. A sequence ends either when its iterator returns nil to signal the end of the sequence, or when it throws an error.

Note that a sequence that produces optional values like String? can exist and if a nil value exists this wouldn't end the stream because the iterator would produce an Optional.some(nil). The reason for this is that an item of type String? was found in the sequence (hence Optional.some) and its value was nil. It's only when the iterator doesn't find a value and returns nil (or Optional.none) that the stream actually ends.

In the beginning of this post I mentioned Combine, and how AsyncSequence provides some similar features to what we're used to in Combine. Let's take a closer look at similarities and differences between Combine's publishers and AsyncSequence.

AsyncSequence and Combine

The most obvious similarities between Combine and AsyncSequence are in the fact that both can produce values over time asynchronously. Furthermore, they both allow us to transform values using pure functions like map and flatMap. In other words, we can use functional programming to transform values. When we look at how thrown errors are handled, the similarities do not stop. Both Combine and AsyncSequence end the stream of values whenever an error is thrown.

To sum things up, these are the similarities between Combine and AsyncSequence:

  • Both allow us to asynchronously handle values that are produced over time.
  • Both allow us to manipulate the produced values with functions like map, flatMap, and more.
  • Both end their stream of values when an error occurs.

When you look at this list you might thing that AsyncSequence clearly replaces Combine.

In reality, Combine allows us to easily do things that we can't do with AsyncSequence. For example, we can't debounce values with AsyncSequence. We also can't have one asynchronous iterator that produces values for multiple for loops because iterators are destructive which means that if you loop over the same iterator twice, you should expect to see the second iterator return no values at all.

I'm sure there are ways to work around this but we don't have built-in support at this time.

Furthermore, at this time we can't observe an object's state with an AsyncSequence which, in my opinion is where Combine's value is the biggest. Again, I'm sure you could code up something that leverages KVO to build something that observes state but it's not built-in at this time.

This is most obvious when looking at an ObservableObject that's used with SwiftUI:

class MyViewModel: ObservableObject {
  @Published var currentValue = 0
}

SwiftUI can observe this view model's objectWillChange publisher to be notified of changes to any of the ObservableObject's @Published properties. This is really powerful, and we currently can't do this with AsyncSequence. Furthermore, we can use Combine to take a publisher's output, transform it, and assign it to an @Published property with the assign(to:) operator. If you want to learn more about this, take a look at this post I wrote where I use the assign(to:) operator.

Two other useful features we have in Combine are CurrentValueSubject and PassthroughSubject. While AsyncSequence itself isn't equivalent to Subject in Combine, we can achieve similar functionality with AsyncStream which I plan to write a post about soon.

The last thing I'd like to cover is the lifetime of an iterator versus that of a Combine subscription. When you subscribe to a Combine publisher you are given a cancellable to you must persist to connect the lifetime of your subscription to the owner of the cancellable. To learn more about cancellables in Combine, take a look at my post on AnyCancellable.

You can easily subscribe to a Combine publisher in a regular function in your code:

var cancellables = Set<AnyCancellable>()

func subscribeToPublishers() {
  viewModel.$numberOfLikes.sink { value in 
    // use new value
  }.store(in: &cancellables)

  viewModel.$currentUser.sink { value in 
    // use new value
  }.store(in: &cancellables)
}

The lifetime of these subscriptions is tied to the object that holds my set of cancellables. With AsyncSequence this lifecycle isn't as clear:

var entryTask: Task<Void, Never>?

deinit {
  entryTask.cancel()
}

func subscribeToSequence() {
  entryTask = Task {
    for await entry in viewModel.fetchEntries {
      // use entry
    }
  }
}

We could do something like the above to cancel our sequence when the class that holds our task is deallocated but this seems very error prone, and I don't think its as elegant as Combine's cancellable.

Summary

In this post, you learned about Swift's AsyncSequence and you've learned a little bit about how it can be used in your code. You learned about asynchronous for loops, and you saw that you can transform an AsyncSequence output.

In my opinion, AsyncSequence is a very useful mechanism to obtain values over time from a process that has a beginning and end. For more open ended tasks like observing state on an object, I personally think that Combine is a better solution. At least for now it is, who knows what the future brings.

Using Swift’s async/await to build an image loader

Async/await will be the defacto way of doing asynchronous programming on iOS 15 and above. I've already written quite a bit about the new Swift Concurrency features, and there's still plenty to write about. In this post, I'm going to take a look at building an asynchronous image loader that has support for caching.

SwiftUI on iOS 15 already has a component that allows us to load images from the network but it doesn't support caching (other than what’s already offered by URLSession), and it only works with a URL rather than also accepting a URLRequest. The component will be fine for most of our use cases, but as an exercise, I'd like to explore what it takes to implement such a component ourselves. More specifically I’d like to explore what it’s like to build an image loader with Swift Concurrency.

We'll start by building the image loader object itself. After that, I'll show how you can build a simple SwiftUI view that uses the image loader to load images from the network (or a local cache if possible). We'll make it so that the loader work with both URL and URLRequest to allow for maximum configurability.

Note that the point of this post is not to show you a perfect image caching solution. The point is to demonstrate how you'd build an ImageLoader object that will check whether an image is available locally and only uses the network if the requested image isn't available locally.

Designing the image loader API

The public API for our image loader will be pretty simple. It'll be just two methods:

  1. public func fetch(_ url: URL) async throws -> UIImage
  2. public func fetch(_ urlRequest: URLRequest) async throws -> UIImage

The image loader will keep track of in-flight requests and already loaded images. It'll reuse the image or the task that's loading the image whenever possible. For this reason, we'll want to make the image loader an actor. If you're not familiar with actors, take a look at this post I published to brush up on Swift Concurrency's actors.

While the public API is relatively simple, tracking in-progress fetches and loading images from disk when possible will require a little bit more effort.

Defining the ImageLoader actor

We'll work our way towards a fully featured loader one step at a time. Let's start by defining the skeleton for the ImageLoader actor and take it from there.

actor ImageLoader {
    private var images: [URLRequest: LoaderStatus] = [:]

    public func fetch(_ url: URL) async throws -> UIImage {
        let request = URLRequest(url: url)
        return try await fetch(request)
    }

    public func fetch(_ urlRequest: URLRequest) async throws -> UIImage {
        // fetch image by URLRequest
    }

    private enum LoaderStatus {
        case inProgress(Task<UIImage, Error>)
        case fetched(UIImage)
    }
}

In this code snippet I actually did a little bit more than just define a skeleton. For example, I've defined a private enum LoaderStatus. This enum will be used to keep track of which images we're loading from the network, and which images are available immediately from memory. I also went ahead and implemented the fetch(:) method that takes a URL. To keep things simple, it just constructs a URLRequest with no additional configuration and calls the overload for fetch(_:) that takes a URLRequest.

Now that we have a skeleton ready to go, we can start implementing the fetch(_:) method. There are essentially three different scenarios that we can run into. Interestingly enough, these three scenarios are quite similar to what I wrote in an earlier Swift Concurrency related post that covered refreshing authentication tokens.

The scenarios can be roughly defined as follows:

  1. fetch(_:) has already been called for this URLRequest so will either return a task or the loaded image.
  2. We can load the image from disk and store it in-memory
  3. We need to load the image from the network and store it in-memory and on disk

I'll show you the implementation for fetch(_:) one step at a time. Note that the code won't compile until we've finished the implementation.

First, we'll want to check the images dictionary to see if we can reuse an existing task or grab the image directly from the dictionary:

public func fetch(_ urlRequest: URLRequest) async throws -> UIImage {
    if let status = images[urlRequest] {
        switch status {
        case .fetched(let image):
            return image
        case .inProgress(let task):
            return try await task.value
        }
    }

    // we'll need to implement a bit more before this code compiles
}

The code above shouldn't look too surprising. We can simply check the dictionary like we would normally. Since ImageLoader is an actor, it will ensure that accessing this dictionary is done in a thread safe way (don't forget to refer back to my post on actors if you're not familiar with them yet).

If we find an image, we return it. If we encounter an in-progress task, we await the task's value to obtain the requested image without creating a new (duplicate) task.

The next step is to check whether the image exist on disk to avoid having to go to the network if we don't have to:

public func fetch(_ urlRequest: URLRequest) async throws -> UIImage {
    // ... code from the previous snippet

    if let image = try self.imageFromFileSystem(for: urlRequest) {
        images[urlRequest] = .fetched(image)
        return image
    }

    // we'll need to implement a bit more before this code compiles
}

This code calls out to a private method called imageFromFileSystem. I haven't shown you this method yet, I'll show you the implementation soon. First, I want to briefly cover what this code snippet does. It attempts to fetch the requested image from the filesystem. This is done synchronously and when an image is found we store it in the images array so that the next called of fetch(_:) will receive the image from memory rather than the filesystem.

And again, this is all done in a thread safe manner because our ImageLoader is an actor.

As promised, here's what imageFromFileSystem looks like. It's fairly straightforward:

private func imageFromFileSystem(for urlRequest: URLRequest) throws -> UIImage? {
    guard let url = fileName(for: urlRequest) else {
        assertionFailure("Unable to generate a local path for \(urlRequest)")
        return nil
    }

    let data = try Data(contentsOf: url)
    return UIImage(data: data)
}

private func fileName(for urlRequest: URLRequest) -> URL? {
    guard let fileName = urlRequest.url?.absoluteString.addingPercentEncoding(withAllowedCharacters: .urlPathAllowed),
          let applicationSupport = FileManager.default.urls(for: .applicationSupportDirectory, in: .userDomainMask).first else {
              return nil
          }

    return applicationSupport.appendingPathComponent(fileName)
}

The third and last situation we might encounter is one where the image needs to be retrieved from the network. Let's see what this looks like:

public func fetch(_ urlRequest: URLRequest) async throws -> UIImage {
    // ... code from the previous snippets

    let task: Task<UIImage, Error> = Task {
        let (imageData, _) = try await URLSession.shared.data(for: urlRequest)
        let image = UIImage(data: imageData)!
        try self.persistImage(image, for: urlRequest)
        return image
    }

    images[urlRequest] = .inProgress(task)

    let image = try await task.value

    images[urlRequest] = .fetched(image)

    return image
}

private func persistImage(_ image: UIImage, for urlRequest: URLRequest) throws {
    guard let url = fileName(for: urlRequest),
          let data = image.jpegData(compressionQuality: 0.8) else {
        assertionFailure("Unable to generate a local path for \(urlRequest)")
        return
    }

    try data.write(to: url)
}

This last addition to fetch(:) creates a new Task instance to fetch image data from the network. When the data is successfully retrieved, and it's converted to an instance of UIImage. This image is then persisted to disk using the persistImage(:for:) method that I included in this snippet.

After creating the task, I update the images dictionary so it contains the newly created task. This will allow other callers of fetch(_:) to reuse this task. Next, I await the task's value and I update the images dictionary so it contains the fetched image. Lastly, I return the image.

You might be wondering why I need to add the in progress task to the images dictionary before awaiting it.

The reason is that while fetch(:) is suspended to await the networking task's value, other callers to fetch(:) will get time to run. This means that while we're awaiting the task value, someone else might call the fetch(_:) method and read the images dictionary. If the in progress task isn't added to the dictionary at that time, we would kick off a second fetch. By updating the images dictionary first, we make sure that subsequent callers will reuse the in progress task.

At this point, we have a complete image loader done. Pretty sweet, right? I'm always delightfully surprised to see how simple actors make complicated flows that require careful synchronization to correctly handle concurrent access.

Here's what the final implementation for the fetch(_:) method looks like:

public func fetch(_ urlRequest: URLRequest) async throws -> UIImage {
    if let status = images[urlRequest] {
        switch status {
        case .fetched(let image):
            return image
        case .inProgress(let task):
            return try await task.value
        }
    }

    if let image = try self.imageFromFileSystem(for: urlRequest) {
        images[urlRequest] = .fetched(image)
        return image
    }

    let task: Task<UIImage, Error> = Task {
        let (imageData, _) = try await URLSession.shared.data(for: urlRequest)
        let image = UIImage(data: imageData)!
        try self.persistImage(image, for: urlRequest)
        return image
    }

    images[urlRequest] = .inProgress(task)

    let image = try await task.value

    images[urlRequest] = .fetched(image)

    return image
}

Next up, using it in a SwiftUI view to create our own version of AsyncImage.

Building our custom SwiftUI async image view

The custom SwiftUI view that we'll create in this section is mostly intended as a proof of concept. I've tested it in a few scenarios but not thoroughly enough to say with confidence that this would be a better async image than the built-in AsyncImage. However, I'm pretty sure that this is an implementation that should work fine in many situations.

To provide our custom image view with an instance of the ImageLoader, I'll use SwiftUI's environment. To do this, we'll need to add a custom value to the EnvironmentValues object:

struct ImageLoaderKey: EnvironmentKey {
    static let defaultValue = ImageLoader()
}

extension EnvironmentValues {
    var imageLoader: ImageLoader {
        get { self[ImageLoaderKey.self] }
        set { self[ImageLoaderKey.self ] = newValue}
    }
}

This code adds an instance of ImageLoader to the SwiftUI environment, allowing us to easily access it from within our custom view.

Our SwiftUI view will be initialized with a URL or a URLRequest. To keep things simple, we'll always use a URLRequest internally.

Here's what the SwiftUI view's implementation looks like:

struct RemoteImage: View {
    private let source: URLRequest
    @State private var image: UIImage?

    @Environment(\.imageLoader) private var imageLoader

    init(source: URL) {
        self.init(source: URLRequest(url: source))
    }

    init(source: URLRequest) {
        self.source = source
    }

    var body: some View {
        Group {
            if let image = image {
                Image(uiImage: image)
            } else {
                Rectangle()
                    .background(Color.red)
            }
        }
        .task {
            await loadImage(at: source)
        }
    }

    func loadImage(at source: URLRequest) async {
        do {
            image = try await imageLoader.fetch(source)
        } catch {
            print(error)
        }
    }
}

When we're instantiating the view, we provide it with a URL or a URLRequest. When the view is first rendered, image will be nil so we'll just render a placeholder rectangle. I didn't give it any size, that would be up to the user of RemoteImage to do.

The SwiftUI view has a task modifier applied. This modifier allows us to run asynchronous work when the view is first created. In this case, we'll use a task to ask the image loader for an image. When the image is loaded, we update the @State var image which will trigger a redraw of the view.

This SwiftUI view is pretty simple and it doesn't handle things like animations or updating the image later. Some nice additions could be to add the ability to use a placeholder image, or to make the source property non-private and use an onChange modifier to kick off a new task using the Task initializer to load a new image.

I'll leave these features to be implemented by you. The point of this simple view was merely to show you how this custom image loader can be used in a SwiftUI context; not to show you how to build a fantastic fully-featured SwiftUI image view replacement.

In Summary

In this post we covered a lot of ground. I mean, a lot. You saw how you can build an ImageLoader that gracefully handles concurrent calls by making it an actor. You saw how we can keep track of both in progress fetches as well as already fetched images using a dictionary. I showed you a very simple implementation of a file system cache as well. This allows us to cache images in memory, and load from the filesystem if needed. Lastly, you saw how we can implement logic to load our image from the network if needed.

You learned that while an asynchronous function that's defined on an actor is suspended, the actor's state can be read and written by others. This means that we needed to assign our image loading task to our dictionary before awaiting the tasks result so that subsequent callers would reuse our in progress task.

After that, I showed you how you can inject the custom image loader we've built into SwiftUI's environment, and how it can be used to build a very simple custom asynchronous image view.

All in all, you've learned a lot in this post. And the best part is, in my opinion, that while the underlying logic and thought process is quite complex, Swift Concurrency allows us to express this logic in a sensible and readable way which is really awesome.