How to use experimental Swift versions and features in Xcode?

If you’re keen on reading about what’s new in Swift or learn about all the cool things that are coming up, you’re probably following several folks in the iOS community that keep track and tell you about all the new things. But what if you read about an upcoming Swift feature that you’d like to try out? Do you have to wait for it to become available in a new Xcode release?

Sometimes the answer is Yes, you’ll have to wait. But more often than not a Swift evolution proposal will have a header that looks a bit like this:

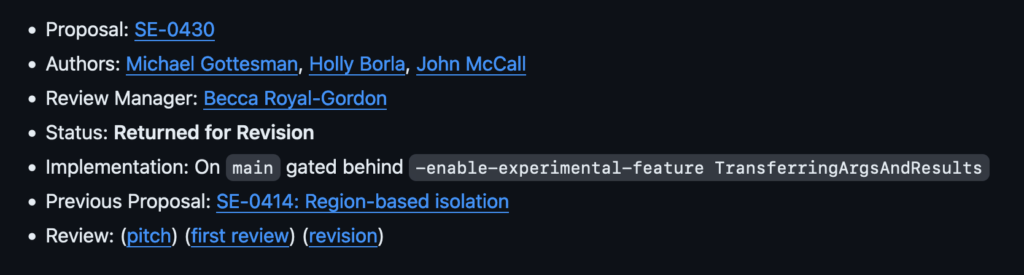
Notice the Implementation on main and gated behind -enable-experimental-feature TransferringArgsAndResults. This tells us that if you were to Swift directly from its main branch you would be able to try out this new feature when you set a compiler flag.

Sometimes, you’ll find that the implementation is marked as available on a specific branch like release/5.10 or release/6.0. Without any information about gating the feature behind a flag. This means that the feature is available just by using Swift from the branch specified.

This is great, but… how do you actually use Swift from a specific branch? And where and how do we pass these compiler flags so we can try out experimental features in Xcode? In this post, I’ll answer those questions!

Installing an alternative Swift toolchain for Xcode

Xcode uses a Swift toolchain under the hood to compile your code. Essentially, this means that Xcode will run a whole bunch of shell commands to compile your code into an app that can run on your device or simulator. When you have the Xcode command line tools installed (which should have happened when you installed Xcode), you can open your terminal and type swift --version to see that there’s a command line interface that lets you use a Swift toolchain.

By default, this will be whichever toolchain shipped with Xcode. So if you have Xcode 15.3 installed running swift --version should yield something like the following output:

❯ swift --version
swift-driver version: 1.90.11.1 Apple Swift version 5.10 (swiftlang-5.10.0.13 clang-1500.3.9.4)
Target: arm64-apple-macosx14.0

We can obtain different versions of Swift quite easily from swift.org on their download page.

Here you’ll find different releases of Swift for different platforms. The topmost section will show you the latest release which is already bundled with Xcode. If we scroll down to snapshots however there are snapshots for Trunk Development (main) and upcoming Swift releases like Swift. 6.0 for example.

We can click the Universal download link to install the Swift toolchain that you’re interested in. For example, if you’re eager to try out a cutting edge feature like Swift 6’s isolation regions feature you can download the trunk development toolchain. Or if you’re interested in trying out a feature that has made its way into the Swift 6 release branch, you could download the Swift 6.0 Development toolchain.

Once you’ve downloaded your toolchain and you can install it through a convenient installer. This process is pretty self explanatory.

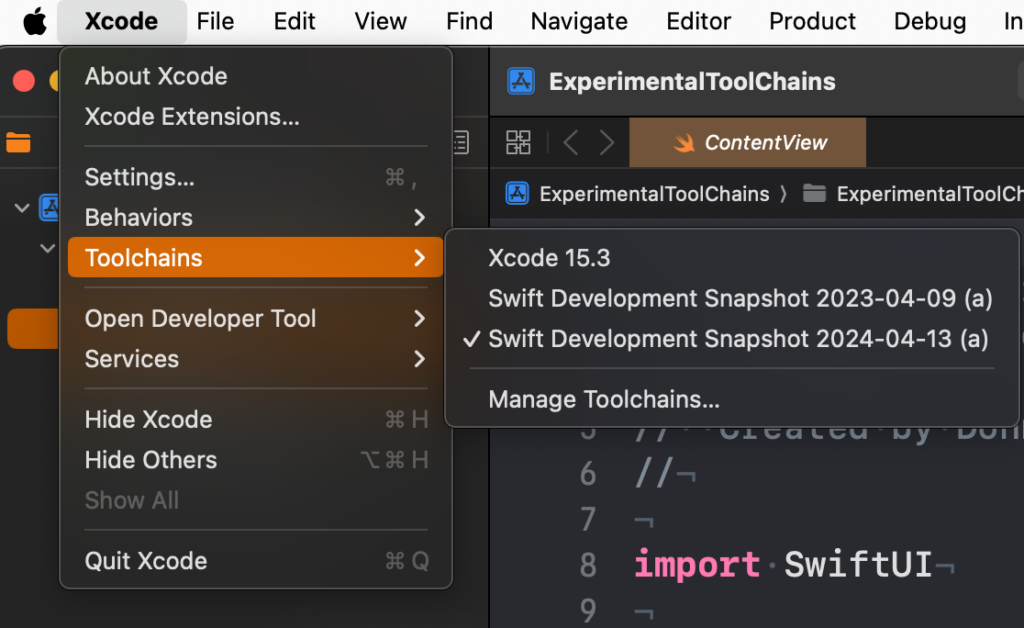
After installing the toolchain, you can activate this new Swift version in Xcode through the Xcode → Toolchains menu. In the screenshot below you can see that I’m using the Swift Development Snapshot 2024-04-13 (a) toolchain. This is the trunk development toolchain that you saw on swift.org.

Once you’ve selected this toolchain, Xcode will use that Swift version to compile your project. This means that if your project is compatible with that Swift version, you can already get a sense of what it will be like to compile your project with a Swift version that’s not available yet.

Note that this may not be entirely representative of what a new Swift version like Swift 6 will be like. After all, we’re using a snapshot built from Swift’s main branch rather than its release/6.0 branch which is what the Swift 6.0 development toolchain is based off of.

Sometimes I’ve found that Xcode doesn’t like swapping toolchains in a project that you’re actively working on and compiling all the time. You’ll see warnings that aren’t supposed to be there or you’ll be missing warnings that you expected to see. I’m pretty sure this is related to Xcode caching stuff in between builds and rebooting Xcode usually gets me back where I’d like to be.

Now that we can use a custom toolchain in Xcode, let’s see how we can opt-in to experimental features.

Trying out experimental Swift features in Xcode

To try out new Swift features, we sometimes need to enable them through a compiler flag. The evolution proposal that goes along with the feature you’d like to try will have an Implementation field in its header that explains which toolchain contains the feature, and whether the feature is gated behind a flag or not.

For example, you might want to try out SE-0414 Region based isolation to see whether it resolves some of your Swift Concurrency warnings.

We’ll use the following code (which is also used as an example in the Evolution proposal) as an example to see whether we’ve correctly opted in to the feature:

// Not Sendable
class Client {
  init(name: String, initialBalance: Double) {  }
}

actor ClientStore {
  var clients: [Client] = []

  static let shared = ClientStore()

  func addClient(_ c: Client) {
    clients.append(c)
  }
}

func openNewAccount(name: String, initialBalance: Double) async {
  let client = Client(name: name, initialBalance: initialBalance)
  await ClientStore.shared.addClient(client) // Warning! 'Client' is non-`Sendable`!
}

To get the warning that we’re expecting based on the code snippet, we need to enable strict concurrency checking. If you’re not sure how to do that, take a look at this post.

After enabling strict concurrency you’ll see the warning pop up as expected.

Now, make sure that you have your new toolchain selected and navigate to your project’s build settings. In the build settings search for Other Swift Flags and make sure you add entries to have your flags look as shown below:

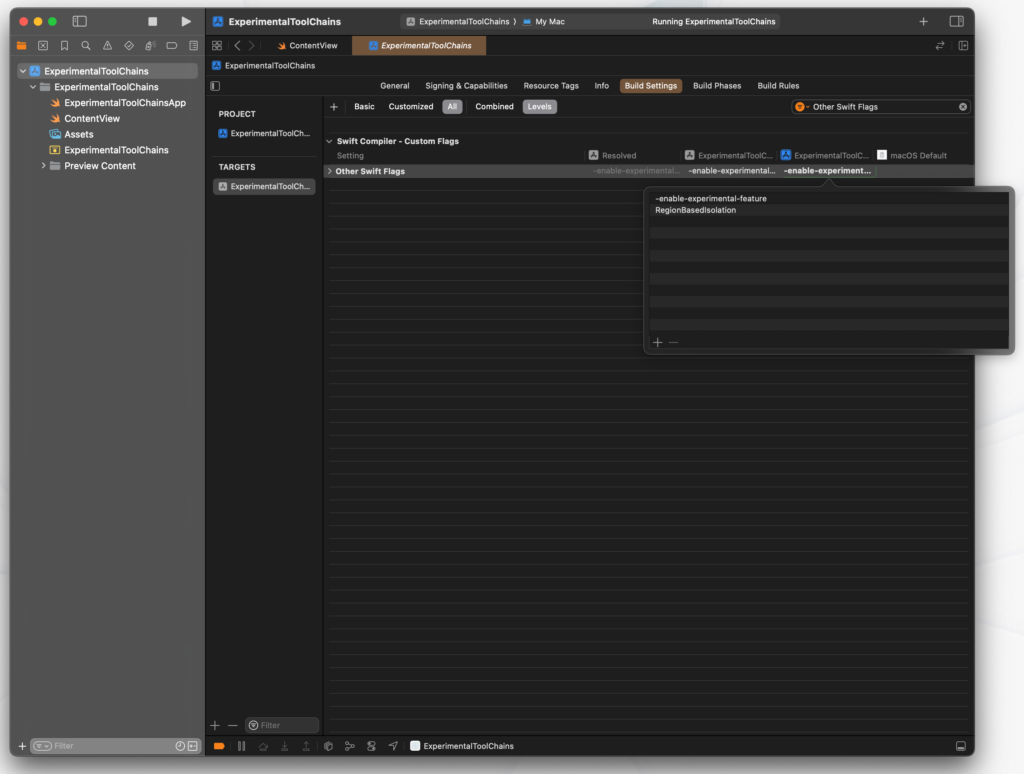
Notice that I’ve placed -enable-experimental-feature and RegionBasedIsolation as separate lines; not doing this results in a compiler error because the argument won’t be passed correctly.

If you build your project after opting in to the experimental feature, you’ll be able to play around with region based isolation. Pretty cool, right?

You can enable multiple experimental feature by passing in the experimental feature flag multiple times, or by adding other arguments if that’s what the Evolution proposal requires.

In Summary

Experimenting with new and upcoming Swift features can be a lot of fun. You’ll be able to get a sense of how new features will work, and whether you’re able to use these new features in your project. Keep in mind that experimental toolchains shouldn’t be used for your production work so after using an experimental toolchain make sure you switch back to Xcode’s default toolchain if you want to ensure that your main project correctly.

In this post you’ve also seen how you can play around with experimental Swift features which is something that I really enjoy doing. It gives me a sense of where Swift is going, and it allows me to explore new features early. Of course, this isn’t for everyone and since you’re dealing with a pre-release feature on a pre-release toolchain anything can go wrong.

Actor reentrancy in Swift explained

When you start learning about actors in Swift, you’ll find that explanations will always contain something along the lines of “Actors protect shared mutable state by making sure the actor only does one thing at a time”. As a single sentence summary of actors, this is great but it misses an important nuance. While it’s true that actors do only one thing at a time, they don’t always execute function calls atomically.

In this post, we’ll explore the following:

  • Exploring what actor reentrancy is
  • Understanding why async functions in actors can be problematic

Generally speaking, you’ll use actors for objects that must hold mutable state while also being safe to pass around in tasks. In other words, objects that hold mutable state, are passed by reference, and have a need to be Sendable are great candidates for being actors.

If you prefer to see the contents of this post in a video format, you can watch the video below:

Implementing a simple actor

A very simple example of an actor is an object that caches data. Here’s how that might look:

actor DataCache {
  var cache: [UUID: Data] = [:]
}

We can directly access the cache property on this actor without worrying about introducing data races. We know that the actor will make sure that we won’t run into data races when we get and set values in our cache from multiple tasks in parallel.

If needed, we can make the cache private and write separate read and write methods for our cache:

actor DataCache {
  private var cache: [UUID: Data] = [:]

  func read(_ key: UUID) -> Data? {
    return cache[key]
  }

  func write(_ key: UUID, data: Data) {
    cache[key] = data
  }
}

Everything still works perfectly fine in the code above. We’ve managed to limit access to our caching dictionary and users of this actor can interact with the cache through a dedicated read and write method.

Now let’s make things a little more complicated.

Adding a remote cache feature to our actor

Let’s imagine that our cached values can either exist in the cache dictionary or remotely on a server. If we can’t find a specific key locally our plan is to send a request to a server to see if the server has data for the cache key that we’re looking for. When we get data back we cache it locally and if we don’t we return nil from our read function.

Let’s update the actor to have a read function that’s async and attempts to read data from a server:

actor DataCache {
  private var cache: [UUID: Data] = [:]

  func read(_ key: UUID) async -> Data? {
    print(" cache read called for \(key)")
    defer {
      print(" cache read finished for \(key)")
    }

    if let data = cache[key] {
      return data
    }

    do {
      print(" attempt to read remote cache for \(key)")
      let url = URL(string: "http://localhost:8080/\(key)")!
      let (data, response) = try await URLSession.shared.data(from: url)

      guard let httpResponse = response as? HTTPURLResponse,
              httpResponse.statusCode == 200 else {
        print(" remote cache MISS for \(key)")
        return nil
      }

      cache[key] = data
      print(" remote cache HIT for \(key)")
      return data
    } catch {
      print(" remote cache MISS for \(key)")
      return nil
    }
  }

  func write(_ key: UUID, data: Data) {
    cache[key] = data
  }
}

Our function is a lot longer now but it does exactly what we set out to do; check if data exists locally, attempt to read it from the server if needed and cache the result.

If you run and test this code it will most likely work exactly like you’ve intended, well done!

However, once you introduce concurrent calls to your read and write methods you’ll find that results can get a little strange…

For this post, I’m running a very simple webserver that I’ve pre-warmed with a couple of values. When I make a handful of concurrent requests to read a value that’s cached remotely but not locally, here’s what I see in the console:

 cache read called for DDFA2377-C10F-4324-BBA3-68126B49EB00
 attempt to read remote cache for DDFA2377-C10F-4324-BBA3-68126B49EB00
 cache read called for DDFA2377-C10F-4324-BBA3-68126B49EB00
 attempt to read remote cache for DDFA2377-C10F-4324-BBA3-68126B49EB00
 cache read called for DDFA2377-C10F-4324-BBA3-68126B49EB00
 attempt to read remote cache for DDFA2377-C10F-4324-BBA3-68126B49EB00
 cache read called for DDFA2377-C10F-4324-BBA3-68126B49EB00
 attempt to read remote cache for DDFA2377-C10F-4324-BBA3-68126B49EB00
 cache read called for DDFA2377-C10F-4324-BBA3-68126B49EB00
 attempt to read remote cache for DDFA2377-C10F-4324-BBA3-68126B49EB00
 remote cache HIT for DDFA2377-C10F-4324-BBA3-68126B49EB00
 cache read finished for DDFA2377-C10F-4324-BBA3-68126B49EB00
 remote cache HIT for DDFA2377-C10F-4324-BBA3-68126B49EB00
 cache read finished for DDFA2377-C10F-4324-BBA3-68126B49EB00
 remote cache HIT for DDFA2377-C10F-4324-BBA3-68126B49EB00
 cache read finished for DDFA2377-C10F-4324-BBA3-68126B49EB00
 remote cache HIT for DDFA2377-C10F-4324-BBA3-68126B49EB00
 cache read finished for DDFA2377-C10F-4324-BBA3-68126B49EB00
 remote cache HIT for DDFA2377-C10F-4324-BBA3-68126B49EB00
 cache read finished for DDFA2377-C10F-4324-BBA3-68126B49EB00

As you can see, executing multiple read operations results in having lots of requests to the server, even if the data exists and you expected to have the data cached after your first call.

Our code is written in a way that ensures that we always write a new value to our local cache after we grab it from the remote so we really shouldn’t expect to be going to the server this often.

Furthermore, we’ve made our cache an actor so why is it running multiple calls to our read function concurrently? Aren’t actors supposed to only do one thing at a time?

The problem with awaiting inside of an actor

The code that we’re using to grab information from a remote data source actually forces us into a situation where actor reentrancy bites us.

Actors only do one thing at a time, that’s a fact and we can trust that actors protect our mutable state by never having concurrent read and write access happen on mutable state that it owns.

That said, actors do not like to sit around and do nothing. When we call a synchronous function on an actor that function will run start to end with no interruptions; the actor only does one thing at a time.

However, when we introduce an async function that has a suspension point the actor will not sit around and wait for the suspension point to resume. Instead, the actor will grab the next message in its “mailbox” and start making progress on that instead. When the thing we were awaiting returns, the actor will continue working on our original function.

Actors don’t like to sit around and do nothing when they have messages in their mailbox. They will pick up the next task to perform whenever an active task is suspended.

The fact that actors can do this is called actor reentrancy and it can cause interesting bugs and challenges for us.

Solving actor reentrancy can be a tricky problem. In our case, we can solve the reentrancy issue by creating and retaining tasks for each network call that we’re about to make. That way, reentrant calls to read can see that we already have an in progress task that we’re awaiting and those calls will also await the same task’s result. This ensures we only make a single network call. The code below shows the entire DataCache implementation. Notice how we’ve changed the cache dictionary so that it can either hold a fetch task or our Data object:

actor DataCache {
  enum LoadingTask {
    case inProgress(Task<Data?, Error>)
    case loaded(Data)
  }

  private var cache: [UUID: LoadingTask] = [:]
  private let remoteCache: RemoteCache

  init(remoteCache: RemoteCache) {
    self.remoteCache = remoteCache
  }

  func read(_ key: UUID) async -> Data? {
    print(" cache read called for \(key)")
    defer {
      print(" cache read finished for \(key)")
    }

    // we have the data, no need to go to the network
    if case let .loaded(data) = cache[key] {
      return data
    }

    // a previous call started loading the data
    if case let .inProgress(task) = cache[key] {
      return try? await task.value
    }

    // we don't have the data and we're not already loading it
    do {
      let task: Task<Data?, Error> = Task {
        guard let data = try await remoteCache.read(key) else {
          return nil
        }

        return data
      }

      cache[key] = .inProgress(task)
      if let data = try await task.value {
        cache[key] = .loaded(data)
        return data
      } else {
        cache[key] = nil
        return nil
      }
    } catch {
      return nil
    }
  }

  func write(_ key: UUID, data: Data) async {
    print(" cache write called for \(key)")
    defer {
      print(" cache write finished for \(key)")
    }

    do {
      try await remoteCache.write(key, data: data)
    } catch {
      // failed to store the data on the remote cache
    }
    cache[key] = .loaded(data)
  }
}

I explain this approach more deeply in my post on building a token refresh flow with actors as well as my post on building a custom async image loader so I won’t go into too much detail here.

When we run the same test that we ran before, the result looks like this:

 cache read called for DDFA2377-C10F-4324-BBA3-68126B49EB00
 cache read called for DDFA2377-C10F-4324-BBA3-68126B49EB00
 cache read called for DDFA2377-C10F-4324-BBA3-68126B49EB00
 cache read called for DDFA2377-C10F-4324-BBA3-68126B49EB00
 cache read called for DDFA2377-C10F-4324-BBA3-68126B49EB00
 attempt to read remote cache for DDFA2377-C10F-4324-BBA3-68126B49EB00
 remote cache HIT for DDFA2377-C10F-4324-BBA3-68126B49EB00
 cache read finished for DDFA2377-C10F-4324-BBA3-68126B49EB00
 cache read finished for DDFA2377-C10F-4324-BBA3-68126B49EB00
 cache read finished for DDFA2377-C10F-4324-BBA3-68126B49EB00
 cache read finished for DDFA2377-C10F-4324-BBA3-68126B49EB00
 cache read finished for DDFA2377-C10F-4324-BBA3-68126B49EB00

We start multiple cache reads, this is actor reentrancy in action. But because we’ve retained the loading task so it can be reused, we only make a single network call. Once that call completes, all of our reentrant cache read actions will receive the same output from the task we created in the first call.

The point is that we can rely on actors doing one thing at a time to update some mutable state before we hit our await. This state will then tell reentrant calls that we’re already working on a given task and that we don’t need to make another (in this case) network call.

Things become trickier when you try and make your actor into a serial queue that runs async tasks. In a future post I’d like to dig into why that’s so tricky and explore possible solutions.

In Summary

Actor reentrancy is a feature of actors that can lead to subtle bugs and unexpected results. Due to actor reentrancy we need to be very careful when we’re adding async methods to an actor, and we need to make sure that we think about what can and should happen when we have multiple, reentrant, calls to a specific function on an actor.

Sometimes this is completely fine, other times it’s wasteful but won’t cause problems. Other times, you’ll run into problems that arise due to certain state on your actor being changed while your function was suspended. Every time you await something inside of an actor it’s important that you ask yourself whether you’ve made any state related assumptions before your await that you need to reverify after your await.

Step one to avoiding reentrancy related issues is to understand what it is, and have a sense of how you can solve problems when they arise. Unfortunately there’s no single solution that fixes every reentrancy related issue. In this post you saw that holding on to a task that encapsulates work can prevent multiple network calls from being made.

Have you ever run into a reentrancy related problem yourself? And if so, did you manage to solve it? I’d love to hear from you on Twitter or Mastodon!

Building a backend-driven paywall with RevenueCat

On of app development’s largest downsides (in my opinion) is that it’s frustratingly hard for developers to quickly iterate on an app’s core features due to the App Review process which can take anywhere between a few hours to a few days.

As a result of this process, developers either need to ship their apps with A/B testing built in if they want to test multiple variations of a feature, they can iterate more slowly or they can opt to build a so-called backend-driven UI. A backend-driven UI is a user interface that’s drawn by fetching information about the UI from a server, parsing the information, and placing appropriate UI components on screen based on the retrieved data.

One of the most important components in an app that implements in-app purchases is the paywall. You want to make sure that your paywall is presented at the right time, and that it presents the best possible offer for your user in the best way. Usually, you’ll want to iterate on your paywall and experiment with different configurations to decide which paywall converts best for your app.

In this post, we’ll explore RevenueCat’s paywall feature to see how we can leverage this feature to build a backend-driven, native paywall for your apps.

This post is a sponsored post. Its target is to provide an honest and fair view on RevenueCat. To make sure that this post is valuable to my readers, all opinions expressed in this post are my own.

Understanding what backend-driven is

If you think that a backend-driven UI sounds incredibly complicated, that’s because it can be very complex indeed. The simplest version of a backend-driven UI is a UI that loads JSON, parses that JSON into model objects, and then your views render the parsed models into a SwiftUI list view.

In this example, the backend didn’t decide how your screen looks, but it did inform your app about what should be presented to the user. Of course, this is a very simple example of a backend-driven UI and it’s usually not what people mean when they talk about being backend-driven but it does demonstrate the basics of being backend-driven without being overly complex.

When we apply the idea of being backend-driven to RevenueCat paywalls, what we’re talking about is the ability for a backend to tell your app exactly which in-app purchases, metadata and UI elements should be shown to your user.

Let’s get started by looking at how you can set up the RevenueCat side of things by configuring a paywall and its contents. After that, we’ll see how we can leverage the RevenueCat paywall in an app to show our paywall with backend-driven components.

Setting up RevenueCat for backend driven paywalls

If you’ve worked with RevenueCat before, you’ll know that RevenueCat models your in-app purchases through entitlements, products and offerings. In short, here’s what each of these configurations are for:

  • Entitlement An entitlement is what “marks” your user as having access to one or more features in your app. Having “pro access” to an app is an example of an entitlement.
  • Product These map to your in app purchases in App Store Connect. For example, you can have a monthly, yearly and lifetime subscription enabled for your app. These are three separate products in App Store Connect but all three can unlock the same entitlement in RevenueCat.
  • Offerings An offering in RevenueCat is a collection of products that you group together as a paywall. This allows you to experiment with different products being offered to your user (for example, you can have an offering that shows your monthly / yearly subscriptions, one that only shows your lifetime subscription, and one that shows all your products). You can programmatically decide which offering is presented to a user. You can even set up experiments to present different offers to your users as a means of A/B testing your pricing strategy.

In order to implement a backend driven paywall, you will need to have created your entitlements and products. If you’re just getting started with RevenueCat, they have great documentation available to help you get set up quickly.

The trick to implementing a backend-driven paywall is in how you set up your offer.

RevenueCat allows you to associate JSON metadata with your offering. You’re free to include as much metadata as you’d like which means that you can provide loads of paywall related information for a specific offer as metadata.

For example, when you’re presenting your lifetime subscription only offering, you might want your app to highlight the features your user unlocks along with some positive user reviews. When you’re presenting a user with the option to choose a monthly vs. yearly subscription, you could opt to present the user with some benefits of choosing yearly instead of monthly.

You might want to switch things up after you’ve tried an approach for a while.

All of this is possible by associating the right metadata to your offering. In the next section, I’ll show you what this looks like from an app point of view. For now, we’ll focus on the somewhat more abstract JSON side of things.

Rather than showing you everything that’s possible with this JSON, I’d like to focus on presenting something relatively simple. If you want to see a more elaborate example of what can be done, check out this talk from RevenueCat’s Charlie Chapman where he demoes backend-driven paywalls as well as the corresponding demo app code.

For the purposes of this blog post, here’s the JSON I’ll be working with:

{
  "default_selection": "$rc_annual",
  "header": {
    "description": "Get the pro version of TinySteps and enjoy unlimited activities as well as a convenient sharing feature.",
    "title": "Go pro today!"
  }
}

All we’re doing here is setting up a simple header object as well as configuring a default selected package. This will allow us to experiment with pre-selecting a subscription to see whether that impacts a user’s choice between yearly and monthly subscriptions.

Here’s what that end up looking like in RevenueCat’s UI.

Now that we’ve set up our offering, let’s take a look at how we can leverage this in our app.

Presenting the paywall in your app

Once you’ve included the RevenueCat SDK in your app and you’ve configured it with your api key, you can start implementing your paywall. For this post, we’ll implement a very simple paywall that displays our header, lists all different subscription types that we have available, and we pre-select the subscription that we’ve configured in our JSON metadata.

To get started, we should write out the model that we intend to decode from our JSON Metadata. In this case, we’re working with fairly simple data so our model can be simple too:

struct PaywallInfo: Decodable {
  let defaultSelection: String
  let header: Header
}

extension PaywallInfo {
  struct Header: Decodable {
    let description: String
    let title: String
  }
}

To load PaywallInfo from our metadata, we can fetch our offering from RevenueCat, extract the metadata, and then decode that metadata into our model object.

Here’s what that could look like:

enum PaywallLoader {
  static func getPayWallInfo() async -> (PaywallInfo, [Package])? {
    do {
      guard let offering = try await Purchases.shared.offerings().current else {
        return nil
      }

      let data = try JSONSerialization.data(withJSONObject: offering.metadata)
      let decoder = JSONDecoder()
      decoder.keyDecodingStrategy = .convertFromSnakeCase
      let paywallInfo = try decoder.decode(PaywallInfo.self, from: data)

      let packages = offering.availablePackages

      return (paywallInfo, packages)
    } catch {
      print("Error: \(error)")
      return nil
    }
  }
}

In the snippet above, you might notice the following lines and wonder what they do:

let data = try JSONSerialization.data(withJSONObject: offering.metadata)
let decoder = JSONDecoder()
decoder.keyDecodingStrategy = .convertFromSnakeCase
let paywallInfo = try decoder.decode(PaywallInfo.self, from: data)

The metadata JSON that we get on our offering is of type [String: Any]. We know that this data originated as JSON from the RevenueCat admin panel but we want to be able to transform the [String: Any] dictionary into our model object. To do this we convert the dictionary to Data, and from Data into our model. It’s a little tedious but it works.

Once we’ve retrieved our data, we can use it to populate our view.

The following shows an extremely bare-bones example of using our PaywallLoader in a view:

struct PaywallMainView: View {
  @State var paywallData: (PaywallInfo, [Package])?
  @State var selectedPackage: Package?

  var body: some View {
    if let paywallData {
      VStack {
        Text(paywallData.0.header.title)
          .font(.title)

        Text(paywallData.0.header.description)
          .font(.title)

        ForEach(paywallData.1) { package in
          if package.identifier == selectedPackage?.identifier {
            Button(package.storeProduct.localizedTitle, action: {
              selectedPackage = package
            })
            .background(Color.gray)
          } else {
            Button(package.storeProduct.localizedTitle, action: {
              selectedPackage = package
            })
          }
        }
      }
    } else {
      ProgressView()
        .task {
          paywallData = await PaywallLoader.getPayWallInfo()
          selectedPackage = paywallData?.1.first(where: { package in
            return package.identifier == paywallData?.0.defaultSelection
          })
        }
    }
  }
}

This code is purely provided as a reference to show you what’s next after decoding your model data. It’s not intended to look pretty, nor is it intended to show you the most beautiful paywall. The key lesson here is that you can leverage the JSON metadata on a RevenueCat offering to build a paywall that uses backend-driven UI, allowing you to experiment with different texts, configuration and more.

In Summary

There’s no limit to how flexible you can get with a backend-driven UI other than your imagination. In this post, I’ve shown you a very basic backend-driven UI that would allow me to change a default selection for my paywall and to experiment with different texts on my paywall.

You’ve seen how you can configure an offering in your RevenueCat console with any JSON you’d like, allowing you to experiment to your heart’s content. You’ve also seen how you can write code that fetches an offering and extract the relevant information from the JSON metadata.

Again, there’s virtually no limit to what you can do here. You can provide as much JSON data as you’d like to build complex, dynamic, and customizable paywalls that can be updated on the fly. No App Review needed.

I’m a big fan of RevenueCat’s implementation of JSON metadata. Being able to expand the available information like this is a huge benefit to experimentation and testing to find out the absolute best paywall implementation for your app.

Using closures for dependencies instead of protocols

It’s common for developers to leverage protocols as a means to model and abstract dependencies. Usually this works perfectly well and there’s really no reason to try and pretend that there’s any issue with this approach that warrants an immediate switch to something else.

However, protocols are not the only way that we can model dependencies.

Often, you’ll have a protocol that holds a handful of methods and properties that dependents might need to access. Sometimes, your protocol is injected into multiple dependents and they don’t all need access to all properties that you’ve added to your protocol.

Also, when you're testing code that depends on protocols you need to write mocks that implement all protocol methods even if your test will only require one or two out of several methods to be callable.

We can solve this through techniques used in functional programming allowing us to inject functionality into our objects instead of injecting an entire object that conforms to a protocol.

In this post, I’ll explore how we can do this, what the pros are, and most importantly we’ll take a look at downsides and pitfalls associated with this way of designing dependencies.

If you’re not familiar with the topic of dependency injection, I highly recommend that you read this post where explain what dependency injection is, and why you need it.

This post heavily assumes that you are familiar and comfortable with closures. Read this post if you could use a refresher on closures.

If you prefer learning through videos, check out the video for this post here:

Defining objects that depend on closures

When we talk about injecting functionality into objects instead of full blown protocols, we talk about injecting closures that provide the functionality we need.

For example, instead of injecting an instance of an object that conforms to a protocol called ‘Caching’ that implements two methods; read and write, we could inject closures that call the read and write functionality that we’ve defined in our Cache object.

Here’s what the protocol based code might look like:

protocol Caching {
  func read(_ key: String) -> Data
  func write(_ object: Data)
}

class NetworkingProvider {
  let cache: Caching

  // ...
}

Like I’ve said in the intro for this post, there’s nothing wrong with doing this. However, you can see that our object only calls the Cache’s read method. We never write into the cache.

Depending on an object that can both read and write means that whenever we mock our cache for this object, we’d probably end up with an empty write function and a read function that provides our mock functionality.

When we refactor this code to depend on closures instead of a protocol, the code changes like this:

class NetworkingProvider {
  let readCache: (String) -> Data

  // ...
}

With this approach, we can still define a Cache object that contains our methods, but the dependent only receives the functionality that it needs. In this case, it only asks for a closure that provides read functionality from our Cache.

There are some limitations to what we can do with objects that depend on closures though. The Caching protocol we’ve defined could be improved a little by redefining the protocol as follows:

protocol Caching {
  func read<T: Decodable>(_ key: String) -> T
  func write<T: Encodable>(_ object: T)
}

The read and write methods defined here can’t be expressed as closures because closures don’t work with generic arguments like our Caching protocol does. This is a downside of closures as dependencies that you could work around if you really wanted to, but at that point you might ask whether that even makes sense; the protocol approach would cause far less friction.

Depending on closures instead of protocols when possible can make mocking trivial, especially when you’re mocking larger objects that might have dependencies of their own.

In your unit tests, you can now completely separate mocks from functions which can be a huge productivity boost. This approach can also help you prevent accidentally depending on implementation details because instead of a full object you now only have access to a closure. You don’t know which other variables or functions the object you’re depending on might have. Even if you did know, you wouldn’t be able to access any of these methods and properties because they were never injected into your object.

If you end up with loads of injected closures, you might want to wrap them all up in a tuple. I’m personally not a huge fan of doing this but I’ve seen this done as a means to help structure code. Here’s what that looks like:

struct ProfileViewModel {
  typealias Dependencies = (
    getProfileInfo: @escaping () async throws -> ProfileInfo,
    getUserSettings: @escaping () async throws -> UserSettings,
    updateSettings: @escaping (UserSettings) async throws -> Void
  )

  let dependencies: Dependencies

  init(dependencies: Dependencies) {
    self.dependencies = dependencies
  }
}

With this approach you’re creating something that sits between an object and just plain closures which essentially gets you the best of both worlds. You have your closures as dependencies, but you don’t end up with loads of properties on your object because you wrap them all into a single tuple.

It’s really up to you to decide what makes the most sense.

Note that I haven’t provided you examples for dependencies that have properties that you want to access. For example, you might have an object that’s able to load page after page of content as long as its hasNewPage property is set to true.

The approach of dependency injection I’m outlining here can be made to work if you really wanted to (you’d inject closures to get / set the property, much like SwiftUI’s Binding) but I’ve found that in those cases it’s far more manageable to use the protocol-based dependency approach instead.

Now that you’ve seen how you can depend on closures instead of objects that implement specific protocols, let’s see how you can make instances of these objects that depend on closures.

Injecting closures instead of objects

Once you’ve defined your object, it’d be kind of nice to know how you’re supposed to use them.

Since you’re injecting closures instead of objects, your initialization code for your objects will be a bit longer than you might be used to. Here’s my favorite way of passing closures as dependencies using the ProfileViewModel that you’ve seen before:

let viewModel = ProfileViewModel(dependencies: (
  getProfileInfo: { [weak self] in
    guard let self else { throw ScopingError.deallocated }

    return try await self.networking.getProfileInfo()
  },
  getUserSettings: { [weak self] in 
    guard let self else { throw ScopingError.deallocated }  
    return try await self.networking.getUserSettings()
  },
  updateSettings: { [weak self]  newSettings in 
    guard let self else { throw ScopingError.deallocated }

    try await self.networking.updateSettings(newSettings)
  }
))

Writing this code is certainly a lot more than just writing let viewModel = ProfileViewModel(networking: AppNetworking) but it’s a tradeoff that can be worth the hassle.

Having a view model that can access your entire networking stack means that it’s very easy to make more network calls than the object should be making. Which can lead to code that creeps into being too broad, and too intertwined with functionality from other objects.

By only injecting calls to the functions you intended to make, your view model can’t accidentally grow larger than it should without having to go through several steps.

And this is immediately a downside too; you sacrifice a lot of flexibility. It’s really up to you to decide whether that’s a tradeoff worth making.

If you’re working on a smaller scale app, the tradeoff most likely isn’t worth it. You’re introducing mental overhead and complexity to solve a problem that you either don’t have or is incredibly limited in its impact.

If your project is large and has many developers and is split up into many modules, then using closures as dependencies instead of protocols might make a lot of sense.

It’s worth noting that memory leaks can become an issues in a closure-driven dependency tree if you’re not careful. Notice how I had a [weak self] on each of my closures. This is to make sure I don’t accidentally create a retain cycle.

That said, not capturing self strongly here could be considered bad practice.

The self in this example would be an object that has access to all dependencies we need for our view model. Without that object, our view model can’t exist. And our view model will most likely go away long before our view model creator goes away.

For example, if you’re following the Factory pattern then you might have a ViewModelFactory that can make instances of our ProfileViewModel and other view models too. This factory object will stay around for the entire time your app exists. It’s fine for a view model to receive a strong self capture because it won’t prevent the factory from being deallocated. The factory wasn’t going to get deallocated anyway.

With that thought in place, we can update the code from before:

let viewModel = ProfileViewModel(dependencies: (
  getProfileInfo: networking.getProfileInfo,
  getUserSettings: networking.getUserSettings,
  updateSettings: networking.updateSettings
))

This code is much, much, shorter. We pass the functions that we want to call directly instead of wrapping calls to these functions in closures.

Normally, I would consider this dangerous. When you’re passing functions like this you’re also passing strong references to self. However, because we know that the view models won’t prevent their factories from being deallocated anyway we can do this relatively safely.

I’ll leave it up to you to decide how you feel about this. I’m always a little reluctant to skip the weak self captures but logic often tells me that I can. Even then, I usually just go for the more verbose code just because it feels wrong to not have a weak self.

In Summary

Dependency Injection is something that most apps deal with in some way, shape, or form. There are different ways in which apps can model their dependencies but there’s always one clear goal; to be explicit in what you depend on.

As you’ve seen in this post, you can use protocols to declare what you depend on but that often means you’re depending on more than you actually need. Instead, we can depend on closures instead which means that you’re depending on very granular, and flexible, bodies of code that are easy to mock, test, replace, and manage.

There’s definitely a tradeoff to be made in terms of ease of use, flexibility and readability. Passing dependencies as closures comes at a cost and I’ll leave it up to you to decide whether that’s a cost you and your team are able and willing to pay.

I’ve worked on projects where we’ve used this approach with great satisfaction, and I’ve also declined this approach on small projects where we didn’t have a need for the granularity provided by closures as dependencies; we needed flexibility and ease of use instead.

All in all I think closures as dependencies are an interesting topic that’s well worth exploring even if you end up modeling your dependencies with protocols.

Building an AsyncSequence with AsyncStream.makeStream

A while ago I’ve published a post that explains how you can use AsyncStream to build your own asynchronous sequences in Swift Concurrency. Since writing that post, a new approach to creating AsyncStream objects has been introduced to allow for more convenience stream building.

In this post, I’ll expand on what we’ve already covered in the previous post so that we don’t have to go over everything from scratch.

By the end of this post you will understand the new and more convenient makeStream method that was added to AsyncStream. You’ll learn how and when it makes sense to build your own async streams, and I will reiterate some of their gotchas to help you avoid mistakes that I’ve had to make in the past.

If you prefer to learn by watching videos, this video is for you:

Reviewing the older situation

While I won’t explain the old approach in detail, I think it makes sense to go over the old approach in order to refresh your mind. Or if you weren’t familiar with the old approach, it will help put the improvements in Swift 5.9 into perspective a bit more.

Pre-Swift 5.9 we could create our AsyncStream objects as follows:

let stream = AsyncStream(unfolding: {
    return Int.random(in: 0..<Int.max)
})

The approach shown here is the simplest way to build an async stream but also the least flexible.

In short, the closure that we pass to unfolding here will be called every time we’re expected to asynchronously produce a new value for our stream. Once the value is produced, you return it so that the for loop iterating over this sequence can use the value. To terminate your async stream, you return nil from your closure to indicate that there are no further values to be produced.

This approach lacks some flexibility and doesn’t fit very well for transforming things like delegate based code over into Swift Concurrency.

A more useful and flexible way to build an AsyncStream that can bridge a callback based API like CLLocationManagerDelegate looks as follows:

class AsyncLocationStream: NSObject, CLLocationManagerDelegate {
    lazy var stream: AsyncStream<CLLocation> = {
        AsyncStream { (continuation: AsyncStream<CLLocation>.Continuation) -> Void in
            self.continuation = continuation
        }
    }()
    var continuation: AsyncStream<CLLocation>.Continuation?

    func locationManager(_ manager: CLLocationManager, didUpdateLocations locations: [CLLocation]) {

        for location in locations {
            continuation?.yield(location)
        }
    }
}

This code does a little bit more than build an async stream so let’s go over it in a bit more detail.

First, there’s a lazy var that’s used to create an instance of AsyncStream. When we create the async stream, we pass the AsyncStream initializer a closure. This closure receives a continuation object that we can use to push values onto our AsyncStream. Because we’re bridging a callback based API we need access to the continuation from outside of the initial closure so we assign the continuation to a var on the AsyncLocationStream object.

Next, we have the didUpdateLocations delegate method. From that method, we call yield on the continuation to push every received location onto our AsyncStream which allows anybody that’s writing a for loop over the stream property to receive locations. Here’s what that would like like in a simplified example:

let locationStream = AsyncLocationStream()

for await value in locationStream.stream {
  print("location received", value)
}

While this all works perfectly fine, there’s this optional continuation that we’re dealing with. Luckily, the new makeStream approach takes care of this.

Creating a stream with makeStream

In essence, a makeStream based AsyncStream works identical to the one you saw earlier.

We still work with a continuation that’s used to yield values to whoever is iterating our stream. In order to end the stream we call finish on the continuation, and to handle someone cancelling their Task or breaking out of the for loop you can still use onTermination on the continuation to perform cleanup. We’ll take a look at onTermination in the next section.

For now, let’s focus on seeing how makeStream allows us to rewrite the example you just saw to be a bit cleaner.

class AsyncLocationStream: NSObject, CLLocationManagerDelegate {
  let stream: AsyncStream<CLLocation>
  private let continuation: AsyncStream<CLLocation>.Continuation

  override init() {
    let (stream, continuation) = AsyncStream.makeStream(of: CLLocation.self)
    self.stream = stream
    self.continuation = continuation

    super.init()
  }

  func locationManager(_ manager: CLLocationManager, didUpdateLocations locations: [CLLocation]) {
    for location in locations {
      continuation.yield(location)
    }
  }
}

We’ve written a little bit more code than we had before but the code we have now is slightly cleaner and more readable.

Instead of a lazy var we can now define two let properties which fits much better with what we’re trying to do. Additionally, we create our AsyncStream and its continuation in a single line of code instead of needing a closure to lift the continuation from our closure onto our class.

Everything else remains pretty much the same. We still call yield to push values onto our stream, and we still use finish to end our continuation (we’re not calling that in the snippet above).

While this is all very convenient, AsyncStream.makeStream comes with the same memory and lifecycle related issues as its older counterparts. Let’s take a brief look at these issues and how to fix them in the next section.

Avoiding memory leaks and infinite loops

When we’re iterating an async sequence from within a task, it’s reasonable to expect that at some point the object we’re iterating goes out of scope and that our iteration stops.

For example, if we’re leveraging the AsyncLocationStream you saw before from within a ViewModel we’d want the location updates to stop automatically whenever the screen, its ViewModel, and the AsyncLocationStream go out of scope.

In reality, these objects will go out of scope but any task that’s iterating the AsyncLocationStream's stream won’t end until the stream’s continuation is explicitly ended. I've explored this phenomenon more in depth in this post where I dig into lifecycle management for async sequences.

Let’s look at an example that demonstrates this effect. We’ll look at a dummy LocationProvider first.

class LocationProvider {
  let locations: AsyncStream<UUID>
  private let continuation: AsyncStream<UUID>.Continuation
  private let cancellable: AnyCancellable?

  init() {
    let stream = AsyncStream.makeStream(of: UUID.self)
    locations = stream.stream
    continuation = stream.continuation
  }

  deinit {
    print("location provider is gone")
  }

  func startUpdates() {
    cancellable = Timer.publish(every: 1.0, on: .main, in: .common)
      .autoconnect()
      .sink(receiveValue: { [weak self] _ in
        print("will send")
        self?.continuation.yield(UUID())
      })
  }
}

The object above creates an AsyncStream just like you saw before. When we call startUpdates we start simulating receiving location updates. Every second, we send a new unique UUID onto our stream.

To make the test realistic, I’ve added a MyViewModel object that would normally serve as the interface in between the location provider and the view:

class MyViewModel {
  let locationProvider = LocationProvider()

  var locations: AsyncStream<UUID> {
    locationProvider.locations
  }

  deinit {
    print("view model is gone")
  }

  init() {
    locationProvider.startUpdates()
  }
}

We’re not doing anything special in this code so let’s move on to creating the test scenario itself:

var viewModel: MyViewModel? = MyViewModel()

let sampleTask = Task {
  guard let locations = viewModel?.locations else { return }

  print("before for loop")
  for await location in locations {
    print(location)
  }
  print("after for loop")
}

Task {
  try await Task.sleep(for: .seconds(2))
  viewModel = nil
}

In our test, we set up two tasks. One that we’ll use to iterate over our AsyncStream and we print some strings before and after the loop.

We have a second task that runs in parallel. This task will wait for two seconds and then it sets the viewModel property to nil. This simulates a screen going away and the view model being deallocated because of it.

Let’s look at the printed results for this code:

before for loop
will send
B9BED2DE-B929-47A6-B47D-C28AD723FCB1
will send
FCE7DAD1-D47C-4D03-81FD-42B0BA38F976
view model is gone
location provider is gone

Notice how we’re not seeing after the loop printed here.

This means that while the view model and location provider both get deallocated as expected, we’re not seeing the for loop end like we’d want to.

To fix this, we need to make sure that we finish our continuation when the location provider is deallocated:

class LocationProvider {
  // ...

  deinit {
    print("location provider is gone")
    continuation.finish()
  }

  // ...
}

In the deinit for LocationProvider we can call continuation.finish() which will fix the leak that we just saw. If we run the code again, we’ll see the following output:

before for loop
will send
B3DE2994-E0E1-4397-B04E-448047315133
will send
D790D3FA-FE40-4182-9F58-1FEC93335F18
view model is gone
location provider is gone
after for loop

So that fixed our for loop sitting and waiting for a value that would never come (and our Task being stuck forever as a result). However, we’re not out of the woods yet. Let’s change the test setup a little bit. Instead of deallocating the view model, let’s try cancelling the Task that we created to iterate the AsyncStream.

var viewModel: MyViewModel? = MyViewModel()

let sampleTask = Task {
  guard let locations = viewModel?.locations else { return }

  print("before for loop")
  for await location in locations {
    print(location)
  }
  print("after for loop")
}

Task {
  try await Task.sleep(for: .seconds(2))
  sampleTask.cancel()
}

Running to code now results in the following output:

before for loop
will send
0B6E962F-F2ED-4C33-8155-140DB94F3AE0
will send
1E195613-2CE1-4763-80C4-590083E4353E
after for loop
will send
will send
will send
will send

So while our loop ended, the location updates don’t stop. We can add an onTermination closure to our continuation to be notified of an ended for loop (which happens when you cancel a Task that’s iterating an async sequence):

class LocationProvider {
  // ...

  func startUpdates() {
    cancellable = Timer.publish(every: 1.0, on: .main, in: .common)
      .autoconnect()
      .sink(receiveValue: { [weak self] _ in
        print("will send")
        self?.continuation.yield(UUID())
      })

    continuation.onTermination = { [weak self] _ in
      self?.cancellable = nil
    }
  }
}

With this code in place, we can now handle both a task getting cancelled as well as our LocationProvider being deallocated.

Whenever you’re writing your own async streams it’s important that you test what happens when the owner of your continuation is deallocated (you’ll usually want to finish your continuation) or when the for loop that iterates your stream is ended (you’ll want to perform some cleanup as needed).

Making mistakes here is quite easy so be sure to keep an eye out!

In Summary

In this post, you saw the new and more convenient AsyncStream.makeStream method in action. You learned that this method replaces a less convenient AsyncStream initializer that forced us to manually store a continuation outside of the closure which would usually lead to having a lazy var for the stream and an optional for the continuation.

After showing you how you can use AsyncStream.makeStream, you learned about some of the gotchas that come with async streams in general. I showed you how you can test for these gotchas, and how you can fix them to make sure that your streams end and clean up as and when you expect.

How to make sure your CI pipelines are always up to date?

When you work with CI, you’ll know how frustrating it can be when a CI server has versions of Xcode or other tools installed than the tools that you’re using. Especially major Xcode releases can be problematic. If your CI doesn’t have the same new versions available while your project uses recently released features which will lead your builds to fail.

An obvious example of this would be when you start using features that are exclusive to the latest iOS version. If Xcode doesn’t know about these features then your project won’t build. An out of date CI can cause your team to slow down their release cadence, discourage experimentation, and most importantly it can prevent important bug fixes from being released.

In this post I’d like to highlight some of the struggles that you might experience and how you can get around them by having a CI provider like Bitrise that always makes sure that you can quickly update your CI pipelines to run using the latest Xcode versions.

This post is a sponsored post. Its target is to provide an honest and fair view on Bitrise’s stacks. To make sure that this post is valuable to my readers, all opinions expressed in this post are my own.

Understanding why CI servers go out of date

I can sum this section up in one sentence, it’s a lot of work to maintain CI. And it’s even more work to support new software releases all the time while also maintaining support for older versions.

If you’re working in a company that’s big enough to have its own team to maintain a self-hosted CI server you’ll know that it’s not always trivial to get this team to prioritize your needs. At any given time your CI team will be dealing with build issues for one or more platforms, they will be maintaining and updating servers, and on top of that they will be fulfilling service and feature requests that get submitted by the teams that rely on the CI team to build them the tools that they need.

Because maintaining CI is a lot of work it makes sense to use a CI provider to make maintenance a lot easier. Of course, you sacrifice a little bit in flexibility and ownership but let’s be honest. You probably don’t need to run a self-hosted build server to have access to all the CI features you need.

So while it makes sense that self-hosted solutions require a lot of maintenance, why is it that CI providers have their build server go out of date? After all, CI is the one thing they do, right?

And to be honest, I don’t know exactly why it is that CI providers sometimes needs months to make the latest Xcode versions available to users. I’m sure it’s got something to do with the amount of work involved in maintaining a CI platform that works for loads of programming languages and platforms and making a new Docker image available that uses the latest Xcode of course takes time.

Regardless of reasons why, it’s a productivity killer to not be able to update to the latest Xcode due to CI reasons.

Making sure you can always build on the latest Xcode version

When CI is involved, there’s not much you can do to enforce Xcode updates. When you have an internal team you could maybe stress why it’s essential to get the latest Xcode version available on one or more build machines but that’s no guarantee that the CI team will honor your request quickly. Of course, if the team understands the importance of having up to date CI they should be able to prioritize your Xcode updates and handle them quickly.

Alternatively you can pick a CI provider that promises to make new Xcode versions available on CI machines within a reasonable timeframe. For example, Bitrise is a CI provider that aims to make new Xcode releases available on build machines within a day of being release.

That’s super fast!

And what’s even better, this includes making betas available.

In other words, with Bitrise you always have access to several images with several Xcode versions, including the edge builds (betas) that Apple makes available.

Using the latest Xcode versions with Bitrise

If your project makes use of Bitrise you’ll have a bitrise.yaml file in your project. In this file, you can specify exactly which Xcode version you’d like to use by specifying a “stack”. This stack consists of a macOS version as well as an Xcode version.

Bitrise aims to make new stacks available to developers as soon as they possibly can which means that you can usually switch to a new stack a day or so after Apple releases a new Xcode version. For an overview of the available stacks, take a look at this page.

The quickest way to leverage a new stack is to migrate over to a new stack by updating your bitrise.yaml and update the meta:bitrise.io:stack property.

If you’re not using the bitrise.yaml file to configure your CI, you can use the web interface to configure your stack instead. You can do this in your workflow editor by selecting the “Stacks and Machines” section. In there, you can choose which Xcode version you want to use and there’s even an option that gets you the most recent release possible every time.

However, you might not want to switch your entire project over just yet. If needed, you can make a new branch in your repository, update the bitrise.yaml there and then push your new branch. At that point you can instruct Bitrise to run builds whenever you push to that branch or you can start new builds manually.

This approach can be particularly useful when you’d like to test your project on the latest Xcode betas every once in a while but you’re not ready to switch your entire project over to be built using the betas just yet. All you’d need to do is rebase your beta branch on main every once in a while and push to start a new build (or start one manually).

If you’re not entirely sure how you can set up your Bitrise CI pipelines take a look at this guide that became available recently. It’s a comprehensive overview of 50+ recipes that help you set up useful and reliable CI pipelines.

In Summary

In this post, I explained why it’s important that you always have recent (the latest) Xcode available on your CI server. I explained that it takes time and effort that dedicated CI teams sometimes don’t have (of course, depending on your team size), and that it can be a lot of work to make new images available all the time.

Next, I explained how Bitrise aims to make new Xcode releases available within a day or so and how that’s extremely important if you’re using features that are only available in the latest iOS and/or Xcode versions. The last thing you want is for CI to hold you back while you’re working on new features for your users.

Of course, having the latest Xcode available on your build machines won’t solve problems that are a result of team members using different Xcode versions than you have on your CI but at least you know that your CI isn’t holding you back due to new Xcode versions being unavailable.

Getting some team members to update their Xcode versions is much easier than getting your CI team to prepare new Docker images with new Xcode versions for you.

Everything you need to know about Swift 5.10

The long awaited iOS 17.4 and iPadOS 17.4 have just been released which means that we could slowly but surely start seeing alternative app stores to appear if you’re an EU iOS user. Alongside the 17.4 releases Apple has made Xcode 15.3 and Swift 5.10 available.

There’s not a huge number of proposals included in Swift 5.10 but that doesn’t make this release less significant.

With Swift 5.10, Apple has managed to close some large gaps that existed in Swift Concurrency’s data safety features. In short, this means that the compiler will be able to catch more possible thread safety issue by enforcing actor isolation and Sendability in more places.

Let’s take a look at the two features that make this possible.

If you prefer to watch this content as a video, the video is avaialble on YouTube:

Enhanced concurrency checking

I’ve written about strict concurrency checking before but back then there were still some ways that your code could be unsafe without the compiler noticing. In Swift 5.10 Apple has patched these cases and the compiler will now correctly flag all of your unsafe code in strict concurrency mode.

Of course, that excludes code that you have marked with nonisolated(unsafe) or @unchecked Sendable because both of those markers indicate that the code should be safe but the compiler won’t be able to check that.

If you’ve worked with strict concurrency checking and you’ve resolved all of your warnings already (if you were able to, kudos to you! That’s not trivial) then Swift 5.10 might flag some edge cases that you’ve missed otherwise.

Better compile time checks to guard against data races are a welcome improvement to the language in my opinion and I can’t wait to see which other improvements Apple will make to strict concurrency checking in the near future. There are currently some active proposals that aim to address the usability of strict concurrency checking which is a very good thing in my opinion.

SE-0412 Strict concurrency for global variables

Proposal SE-0412 made its way into Swift 5.10 and it further strengthens Swift’s ability to guard against data races at compile time.

When you write code that involves shared state you open yourself up to data races from many locations if you don’t make sure that this shared state is safe to be used across threads.

In Swift 5.10, the compiler will only allow you to access shared mutable state from a concurrent context if:

  • This state is immutable and Sendable (learn more about Sendable here)
  • This state is isolated to a global actor (like @MainActor or an actor you’ve written yourself)

In any other cases, the compiler will consider accessing the shared state concurrently to be unsafe.

If you’ve taken measures that sidestep Swift Concurrency’s actors and Sendability (for example because you’re working with legacy code that uses Semaphore or DispatchQueue to synchronize access) you can opt out of concurrency checks for your global variables by marking them as nonisolated(unsafe). This marker will tell the compiler that it doesn’t need to do any safety checks for the marked property; you have made sure that the code is safe to be used from a concurrent context yourself.

Marking properties as nonisolated(unsafe) is a lot like force unwrapping a property. You might be certain that your code is safe and will work as expected but you’re on your own. You’ve told the compiler that you know what you’re doing and that you don’t need the compiler to perform any checks for you.

Whenever you’re tempted to use nonisolated(unsafe) you should always ask yourself whether it’s possible for you to actually make the type you’re marking isolated to a global actor or maybe you can make the type of the property Sendable and immutable.

In Summary

Swift 5.10 is a very welcome improvement to the language that makes Swift Concurrency slightly more reliable than it was in Swift 5.9. Swift 6.0 is slowly but surely being worked on and I think we’ll see the first Swift 6.0 beta around June when Apple announces iOS 18, Xcode 16.0, etc.

I’m excited to see Apple work on Concurrency and make (sometimes much needed) improvements with every release, and in my opinion Swift 5.10 is a fantastic milestone in achieving compile time safety for our asynchronous code.

Working with dates and Codable in Swift

When you’re decoding JSON, you’ll run into situations where you’ll have to decode dates every once in a while. Most commonly you’ll probably be dealing with dates that conform to the ISO-8601 standard but there’s also a good chance that you’ll have to deal with different date formats.

In this post, we’ll take a look at how you can leverage some of Swift’s built-in date formats for en- and decoding data as well as providing your own date format. We’ll look at some of the up- and downsides of how Swift decodes dates, and how we can possibly work around some of the downsides.

This post is part of a series I have on Swift’s codable so I highly recommend that you take a look at my other posts on this topic too.

If you prefer to learn about dates and Codable in a video format, you can watch the video here:

Exploring the default JSON en- and decoding behavior

When we don’t do anything, a JSONDecoder (and JSONEncoder) will expect dates in a JSON file to be formatted as a double. This double should represent the number of seconds that have passed since January 1st 2001 which is a pretty non-standard way to format a timestamp. The most common way to set up a timestamp would be to use the number of seconds passed since January 1st 1970.

However, this method of talking about dates isn’t very reliable when you take complexities like timezones into account.

Usually a system will use its own timezone as the timezone to apply the reference date to. So a given number of seconds since January 1st 2001 can be quite ambiguous because the timestamp doesn’t say in which timezone we should be adding the given timestamp to January 1st 2001. Different parts of the world have a different moment where January 1st 2001 starts so it’s not a stable date to compare against.

Of course, we have some best practices around this like most servers will use UTC as their timezone which means that timestamps that are returned by these servers should always be applied using the UTC timezone regardless of the client’s timezone.

When we receive a JSON file like the one shown below, the default behavior for our JSONDecoder will be to just decode the provided timestamps using the device’s current timezone.

var jsonData = """
[
    {
        "title": "Grocery shopping",
        "date": 730976400.0
    },
    {
        "title": "Dentist appointment",
        "date": 731341800.0
    },
    {
        "title": "Finish project report",
        "date": 731721600.0
    },
    {
        "title": "Call plumber",
        "date": 732178800.0
    },
    {
        "title": "Book vacation",
        "date": 732412800.0
    }
]
""".data(using: .utf8)!

struct ToDoItem: Codable {
  let title: String
  let date: Date
}

do {
  let decoder = JSONDecoder()
  let todos = try decoder.decode([ToDoItem].self, from: jsonData)
  print(todos)
} catch {
  print(error)
}

This might be fine in some cases but more often than not you’ll want to use something that’s more standardized, and more explicit about which timezone the date is in.

Before we look at what I think is the most sensible solution I want to show you how you can configure your JSON Decoder to use a more standard timestamp reference date which is January 1st 1970.

Setting a date decoding strategy

If you want to change how a JSONEncoder or JSONDecoder deals with your date, you should make sure that you set its date decoding strategy. You can do this by assigning an appropriate strategy to the object’s dateDecodingStrategy property (or dateEncodingStrategy for JSONEncoder. The default strategy is called deferredToDate and you’ve just seen how it works.

If we want to change the date decoding strategy so it decodes dates based on timestamps in seconds since January 1st 1970, we can do that as follows:

do {
  let decoder = JSONDecoder()
  decoder.dateDecodingStrategy = .secondsSince1970
  let todos = try decoder.decode([ToDoItem].self, from: jsonData)
  print(todos)
} catch {
  print(error)
}

Some servers work with timestamps in milliseconds since 1970. You can accommodate for that by using the .millisecondsSince1970 configuration instead of .secondsSince1970 and the system will handle the rest.

While this allows you to use a standardized timestamp format, you’re still going to run into timezone related issues. To work around that, we need to take a look at dates that use the ISO-8601 standard.

Working with dates that conform to ISO-8601

Because there are countless ways to represent dates as long as you have some consistency amongst the systems where these dates are used, a standard was created to represent dates as strings. This standard is called ISO-8601 and it describes several conventions around how we can represent dates as strings.

We can represent anything from just a year or a full date to a date with a time that includes information about which timezone that date exists in.

For example, a date that represents 5pm on Feb 15th 2024 in The Netherlands (UTC+1 during February) would represent 9am on Feb 15th 2024 in New York (UTC-5 in February).

It can be important for a system to represent a date in a user’s local timezone (for example when you’re publishing a sports event schedule) so that the user doesn’t have to do the timezone math for themselves. For that reason, ISO-8601 tells us how we can represent Feb 15th 2024 at 5pm in a standardized way. For example, we could use the following string:

2024-02-15T17:00:00+01:00

This system contains information about the date, the time, and timezone. This allows a client in New York to translate the provided time to a local time which in this case means that the time would be shown to a user as 9am instead of 5pm.

We can tell our JSONEncoder or JSONDecoder to discover which one of the several different date formats from ISO-8601 our JSON uses, and then decode our models using that format.

Let’s look at an example of how we can set this up:

var jsonData = """
[
    {
        "title": "Grocery shopping",
        "date": "2024-03-01T10:00:00+01:00"
    },
    {
        "title": "Dentist appointment",
        "date": "2024-03-05T14:30:00+01:00"
    },
    {
        "title": "Finish project report",
        "date": "2024-03-10T23:59:00+01:00"
    },
    {
        "title": "Call plumber",
        "date": "2024-03-15T08:00:00+01:00"
    },
    {
        "title": "Book vacation",
        "date": "2024-03-20T20:00:00+01:00"
    }
]
""".data(using: .utf8)!

struct ToDoItem: Codable {
  let title: String
  let date: Date
}

do {
  let decoder = JSONDecoder()
  decoder.dateDecodingStrategy = .iso8601
  let todos = try decoder.decode([ToDoItem].self, from: jsonData)
  print(todos)
} catch {
  print(error)
}

The JSON in the snippet above is slightly changed to make it use ISO-8601 date strings instead of timestamps.

The ToDoItem model is completely unchanged.

The decoder’s dateDecodingStrategy has been changed to .iso8601 which will allow us to not worry about the exact date format that’s used in our JSON as long as it conforms to .iso8601.

In some cases, you might have to take some more control over how your dates are decoded. You can do this by setting your dateDecodingStrategy to either .custom or .formatted.

Using a custom encoding and decoding strategy for dates

Sometimes, a server returns a date that technically conforms to the ISO-8601 standard yet Swift doesn’t decode your dates correctly. In this case, it might make sense to provide a custom date format that your encoder / decoder can use.

You can do this as follows:

do {
  let decoder = JSONDecoder()

  let formatter = DateFormatter()
  formatter.dateFormat = "yyyy-MM-dd"
  formatter.locale = Locale(identifier: "en_US_POSIX")
  formatter.timeZone = TimeZone(secondsFromGMT: 0)

  decoder.dateDecodingStrategy = .formatted(formatter)

  let todos = try decoder.decode([ToDoItem].self, from: jsonData)
  print(todos)
} catch {
  print(error)
}

Alternatively, you might need to have some more complex logic than you can encapsulate in a date formatter. If that’s the case, you can provide a closure to the custom configuration for your date decoding strategy as follows:

decoder.dateDecodingStrategy = .custom({ decoder in
  let container = try decoder.singleValueContainer()
  let dateString = try container.decode(String.self)

  if let date = ISO8601DateFormatter().date(from: dateString) {
    return date
  } else {
    throw DecodingError.dataCorruptedError(in: container, debugDescription: "Cannot decode date string \(dateString)")
  }
})

This example creates its own ISO-8601 date formatter so it’s not the most useful example (you can just use .iso8601 instead) but it shows how you should go about decoding and creating a date using custom logic.

In Summary

In this post, you saw several ways to work with dates and JSON.

You learned about the default approach to decoding dates from a JSON file which requires your dates to be represented as seconds from January 1st 2001. After that, you saw how you can configure your JSONEncoder or JSONDecoder to use the more standard January 1st 1970 reference date.

Next, we looked at how to use ISO-8601 date strings as that optionally include timezone information which greatly improves our situation.

Lastly, you learn how you can take more control over your JSON by using a custom date formatter or even having a closure that allows you to perform much more complex decoding (or encoding) logic by taking full control over the process.

I hope you enjoyed this post!

Designing APIs with typed throws in Swift

When Swift 2.0 added the throws keyword to the language, folks were somewhat divided on its usefulness. Some people preferred designing their APIs with an (at the time) unofficial implementation of the Result type because that worked with both regular and callback based functions.

However, the language feature got adopted and a new complaint came up regularly. The way throws in Swift was designed didn’t allow developers to specify the types of errors that a function could throw.

In every do {} catch {} block we write we have to assume and account for any object that conforms to the Error protocol to be thrown.

This post will take a closer look at how we can write catch blocks to handle specific errors, and how we can leverage the brand new types throws that will be implemented through SE-0413 recently.

Let’s dig in!

If you prefer to watch this content as a video, the video is available on YouTube:

The situation today: catching specific errors in Swift

The following code shows a standard do { } catch { } block in Swift that you might already be familiar with:

do {
  try loadfeed()
} catch {
  print(error.localizedDescription)
}

Calling a method that can throw errors should always be done in a do { } catch { } block unless you call your method with a try? or a try! prefix which will cause you to ignore any errors that come up.

In order to handle the error in your catch block, you can cast the error that you’ve received to different types as follows:

do {
  try loadFeed()
} catch {
  switch error {
  case let authError as AuthError:
    print("auth error", authError)
    // present login screen
  case let networkError as NetworkError:
    print("network error", networkError)
    // present alert explaining what went wrong
  default:
    print("error", error)
    // present generic alert with a message
  }
}

By casing your error in the switch statement, you can have different code paths for different error types. This allows you to extract information from the error as needed. For example, an authentication error might have some specific cases that you’d want to inspect to correctly manage what went wrong.

Here’s what the case for AuthError might end up looking like:

case let authError as AuthError:
  print("auth error", authError)

  switch authError {
  case .missingToken:
      print("missing token")
      // present a login screen
  case .tokenExpired:
    print("token expired")
    // attempt a token refresh
  }

When your API can return many different kinds of errors you can end up with lots of different cases in your switch, and with several levels of nesting. This doesn’t look pretty and luckily we can work around this by defining catch blocks for specific error types.

For example, here’s what the same control flow as before looks like without the switch using typed catch blocks:

do {
  try loadFeed()
} 
catch let authError as AuthError {
  print("auth error", authError)

  switch authError {
  case .missingToken:
      print("missing token")
      // present a login screen
  case .tokenExpired:
    print("token expired")
    // attempt a token refresh
  }
} 
catch let networkError as NetworkError {
  print("network error", networkError)
  // present alert explaining what went wrong
} 
catch {
  print("error", error)
}

Notice how we have a dedicated catch for each error type. This makes our code a little bit easier to read because there’s a lot less nesting.

The main issues with out code at this point are:

  1. We don’t know which errors loadFeed can throw. If our API changes and we add more error types, or even if we remove error types, the compiler won’t be able to tell us. This means that we might have catch blocks for errors that will never get thrown or that we miss catch blocks for certain error types which means those errors get handles by the generic catch block.
  2. We always need a generic catch at the end even if we know that we handle all error types that our function cold probably throw. It’s not a huge problem, but it feels a bit like having an exhaustive switch with a default case that only contains a break statement.

Luckily, Swift proposal SE-0413 will fix these two pain points by introducing typed throws.

Exploring typed throws

At the time of writing this post SE-0413 has been accepted but not yet implemented. This means that I’m basing this section on the proposal itself which means that I haven’t yet had a chance to fully test all code shown.

At its core, typed throws in Swift will allow us to inform callers of throwing functions which errors they might receive as a result of calling a function. At this point it looks like we’ll be able to only throw a single type of error from our function.

For example, we could write the following:

func loadFeed() throws(FeedError) {
  // implementation
}

What we can’t do is the following:

func loadFeed() throws(AuthError, NetworkError) {
  // implementation
}

So even though our loadFeed function can throw a couple of errors, we’ll need to design our code in a way that allows loadFeed to throw a single, specific type instead of multiple. We could define our FeedError as follows to do this:

enum FeedError {
  case authError(AuthError)
  case networkError(NetworkError)
  case other(any Error)
}

By adding the other case we can gain a lot of flexibility. However, that also comes with the downsides that were described in the previous section so a better design could be:

enum FeedError {
  case authError(AuthError)
  case networkError(NetworkError)
}

This fully depends on your needs and expectations. Both approaches can work well and the resulting code that you write to handle your errors can be much nicer when you have a lot more control over the kinds of errors that you might be throwing.

So when we call loadFeed now, we can write the following code:

do {
  try loadFeed()
} 
catch {
  switch error {
    case .authError(let authError):
      // handle auth error
    case .networkError(let networkError):
      // handle network error
  }
}

The error that’s passed to our catch is now a FeedError which means that we can switch over the error and compare its cases directly.

For this specific example, we still require nesting to inspect the specific errors that were thrown but I’m sure you can see how there are benefits to knowing which type of errors we could receive.

In the cases where you call multiple throwing methods, we’re back to the old fashioned any Error in our catch:

do {
  let feed = try loadFeed()
  try cacheFeed(feed)
} catch {
  // error is any Error here
}

If you’re not familiar with any in Swift, check out this post to learn more.

The reason we’re back to any Error here is that our two different methods might not throw the same error types which means that the compiler needs to drop down to any Error since we know that both methods will have to throw something that conforms to Error.

In Summary

Typed throws have been in high demand ever since Swift gained the throws keyword. Now that we’re finally about to get them, I think a lot of folks are quite happy.

Personally, I think typed throws are a nice feature but that we won’t see them used that much.

The fact that we can only throw a single type combined with having to try calls in a do block erasing our error back to any Error means that we’ll still be doing a bunch of switching and inspecting to see which error was thrown exactly, and how we should handle that thrown error.

I’m sure typed throws will evolve in the future but for now I don’t think I’ll be jumping on them straight away once they’re released.

How to determine where tasks and async functions run in Swift?

Swift’s current concurrency model leverages tasks to encapsulate the asynchronous work that you’d like to perform. I wrote about the different kinds of tasks we have in Swift in the past. You can take a look at that post here. In this post, I’d like to explore the rules that Swift applies when it determines where your tasks and functions run. More specifically, I’d like to explore how we can determine whether a task or function will run on the main actor or not.

We’ll start this post by very briefly looking at tasks and how we can determine where they run. I’ll dig right into the details so if you’re not entirely up to date on the basics of Swift’s unstructured and detached tasks, I highly recommend that you catch up here.

After that, we’ll look at asynchronous functions and how we can reason about where these functions run.

To follow along with this post, it’s recommended that you’re somewhat up to date on Swift’s actors and how they work. Take a look at my post on actors if you want to make sure you’ve got the most important concepts down.

If you prefer to consume the contents of this post as a video, you can watch the video below.

Reasoning about where a Swift Task will run

In Swift, we have two kinds of tasks:

  • Unstructured tasks
  • Detached tasks

Each task type has its own rules regarding where the task will run its body.

When you create a detached task, this task will always run its body using the global executor. In practical terms this means that a detached task will always run on a background thread. You can create a detached task as follows:

Task.detached {
  // this runs on the global executor
}

A detached task should hardly ever be used in practice because there are other ways to perform work in the background that don’t involve starting a new task (that doesn’t participate in structured concurrency).

The other way to start a new task is by creating an unstructured task. This looks as follows:

Task {
  // this runs ... somewhere?
}

An unstructured task will inherit certain things from its context, like the current actor for example. It’s this current actor that determines where our unstructured task will run.

Sometimes it’s pretty obvious that we want a task to run on the main actor:

Task { @MainActor in 

}

While this task inherits an actor from the current context, we’re overriding this by annotating our task body with MainActor to make sure that our task’s body runs on the main actor.

Interesting sidenote: you can do the same with a detached task.

Additionally, we can create a new task that’s on the main actor like this:

@MainActor
struct MyView: View {
  // body etc...

  func startTask() {
    Task {
      // this task runs on the main actor
    }
  }
}

Our SwiftUI view in this example is annotated with @MainActor. This means that every function and property that’s defined on MyView will be executed on the main actor. Including our startTask function. The Task inherits the main actor from MyView so it’s running its body on the main actor.

If we make one small change to the view, everything changes:

struct MyView: View {
  // body etc...

  func startTask() {
    Task {
      // where does this task run?
    }
  }
}

Instead of knowing that startTask will run on the main actor, it's a bit trickier to reason about where our function will run exactly. Our view itself is not main actor bound which means that its functions can be called on any actor or executor. When we call startTask, we'll find that the Task that's created in its function body will not be main actor isolated. Not even if you call this function from a place that is main actor isolated. This seems to be related to startTask being nonisolated by definition which means that it's never bound to a specific actor and runs on the global executor which results in unstructured Tasks being spawned on the global excutor too.

At runtime, we can use MainActor.assertIsolated(_:) to perform a check and see whether we're on the main actor. If we're not, our app would crash during development which is perfectly fine. Especially when we're using this function as a tool to learn more about our code. Here's how you can use this function:

struct MyView: View {
  // body etc...

  func startTask() {
    Task {
      MainActor.assertIsolated("Not isolated!!")
    }
  }
}

When I ran this example on my device, it crashed every time which shows that the runtime behavior is not something that's random. We can already know at compile time that our code will not run on the main actor because neither the function, the view, nor the task are @MainActor annotated.

As a rule of thumb you could say that a Task will always run in the background if you’re not attached to any actors. This is the case when you create a new Task from any object that’s not main actor annotated for example. When you create your task from a place that’s main actor annotated, you know your task will run on the main actor.

Unfortunately, this isn’t always straightforward to determine and Apple seems to want us to not worry too much about this. The key takeaway is that if you want something to run on the main actor, you have to annotate it with the @MainActor annotation. The underlying system will make sure there are no extraneous thread hops and that there's no perfromance cost to having these annotations in place.

Luckily, the way async functions work in Swift can give us some confidence in making sure that we don’t block the main actor by accident.

Reasoning about where an async function runs in Swift

Whenever you want to call an async function in Swift, you have to do this from a task and you have to do this from within an existing asynchronous context. If you’re not yet in an async function you’ll usually create this asynchronous context by making a new Task object.

From within that task you’ll call your async function and prefix the call with the await keyword. It’s a common misconception that when you await a function call the task you’re using the await from will be blocked until the function you’re waiting for is completed. If this were true, you’d always want to make sure your tasks run away from the main actor to make sure you’re not blocking the main actor while you’re waiting for something like a network call to complete.

Luckily, awaiting something does not block the current actor. Instead, it sets aside all work that’s ongoing so that the actor you were on is free to perform other work. I gave a talk where I went into detail on this. You can see the talk here.

Knowing all of this, let’s talk about how we can determine where an async function will run. Examine the following code:

struct MyView: View {
  // body etc...

  func performWork() async {
    // Can we determine where this function runs?
  }
}

The performWork function is marked async which means that we must call it from within an async context, and we have to await it.

A reasonable assumption would be to expect this function to run on the actor that we’ve called this function from.

For example, in the following situation you might expect performWork to run on the main actor:

struct MyView: View {
  var body: some View {
    Text("Sample...")
      .task {
        await peformWork()
      }
  }

  func performWork() async {
    // Can we determine where this function runs?
  }
}

Interestingly enough, peformWork will not run on the main actor in this case. The reason for that is that in Swift, functions don’t just run on whatever actor they were called from. Instead, they run on the global executor unless instructed otherwise.

In practical terms, this means that your asynchronous functions will need to be either directly or indirectly annotated with the main actor if you want them to run on the main actor. In every other situation your function will run on the global executor.

While this rule is straightforward enough, it can be tricky to determine exactly whether or not your function is implicitly annotated with @MainActor. This is usually the case when there’s inheritance involved.

A simpler example looks as follows:

@MainActor
struct MyView: View {
  var body: some View {
    Text("Sample...")
      .task {
        await peformWork()
      }
  }

  func performWork() async {
    // This function will run on the main actor
  }
}

Because we’ve annotated our view with @MainActor, the asynchronous performWork function inherits the annotation and it will run on the main actor.

While the practice of reasoning about where an asynchronous function will run isn’t straightforward, I usually find this easier than reasoning about where my Task will run but it’s still not trivial.

The key is always to look at the function itself first. If there’s no @MainActor, you can look at the enclosing object’s definition. After that you can look at base classes and protocols to make sure there isn’t any main actor association there.

At runtime, you can use the MainActor.assertIsolated(_:) function to see if your async function runs on the main actor. If it does, you’ll know that there’s some main actor annotation that’s applied to your asynchronous function. If you’re not running on the main actor, you can safely say that there’s no main actor annotation applied to your function.

In Summary

Swift Concurrency’s rules for determining where a task or function runs are relatively clear and specific. However, in practice things can get a little muddy for tasks because it’s not always trivial to reason about whether or that your task is created from a context that’s associated with the main actor. Note that running on the main thread is not the same as being associated with the main actor.

For async functions we can reason more locally which results in an easier mental modal but it’s still not trivial.

We can use MainActor.assertIsolated(_:) to study whether our code is running on the main thread but once you fully understand and internalize the rules outlined in this post you shouldn't need this function to reason about where your code runs.

If you have any additions, questions, or comments on this article please don’t hesitate to reach out on X.